

Notes on building smarter websites for actual humans.

A Minimalist's Guide to Squarespace Sales & Marketing Extensions
Launching an eCommerce website is not a “build it and they will come” situation - you’ve got to do your work on sales & marketing! Here is my take on all the Squarespace extensions that can help you with things like getting customer testimonials, running digital ads, and syncing your product feed to other sales platforms or channels.
UPDATED: March 2026
Launching an eCommerce website is not a “build it and they will come” situation - you’ve got to do your work on sales & marketing! Squarespace has a few extensions just for things like getting customer testimonials, running digital ads, and syncing your product feed to other sales platforms or channels. Here’s the 411 on all of them!
Ad Manager
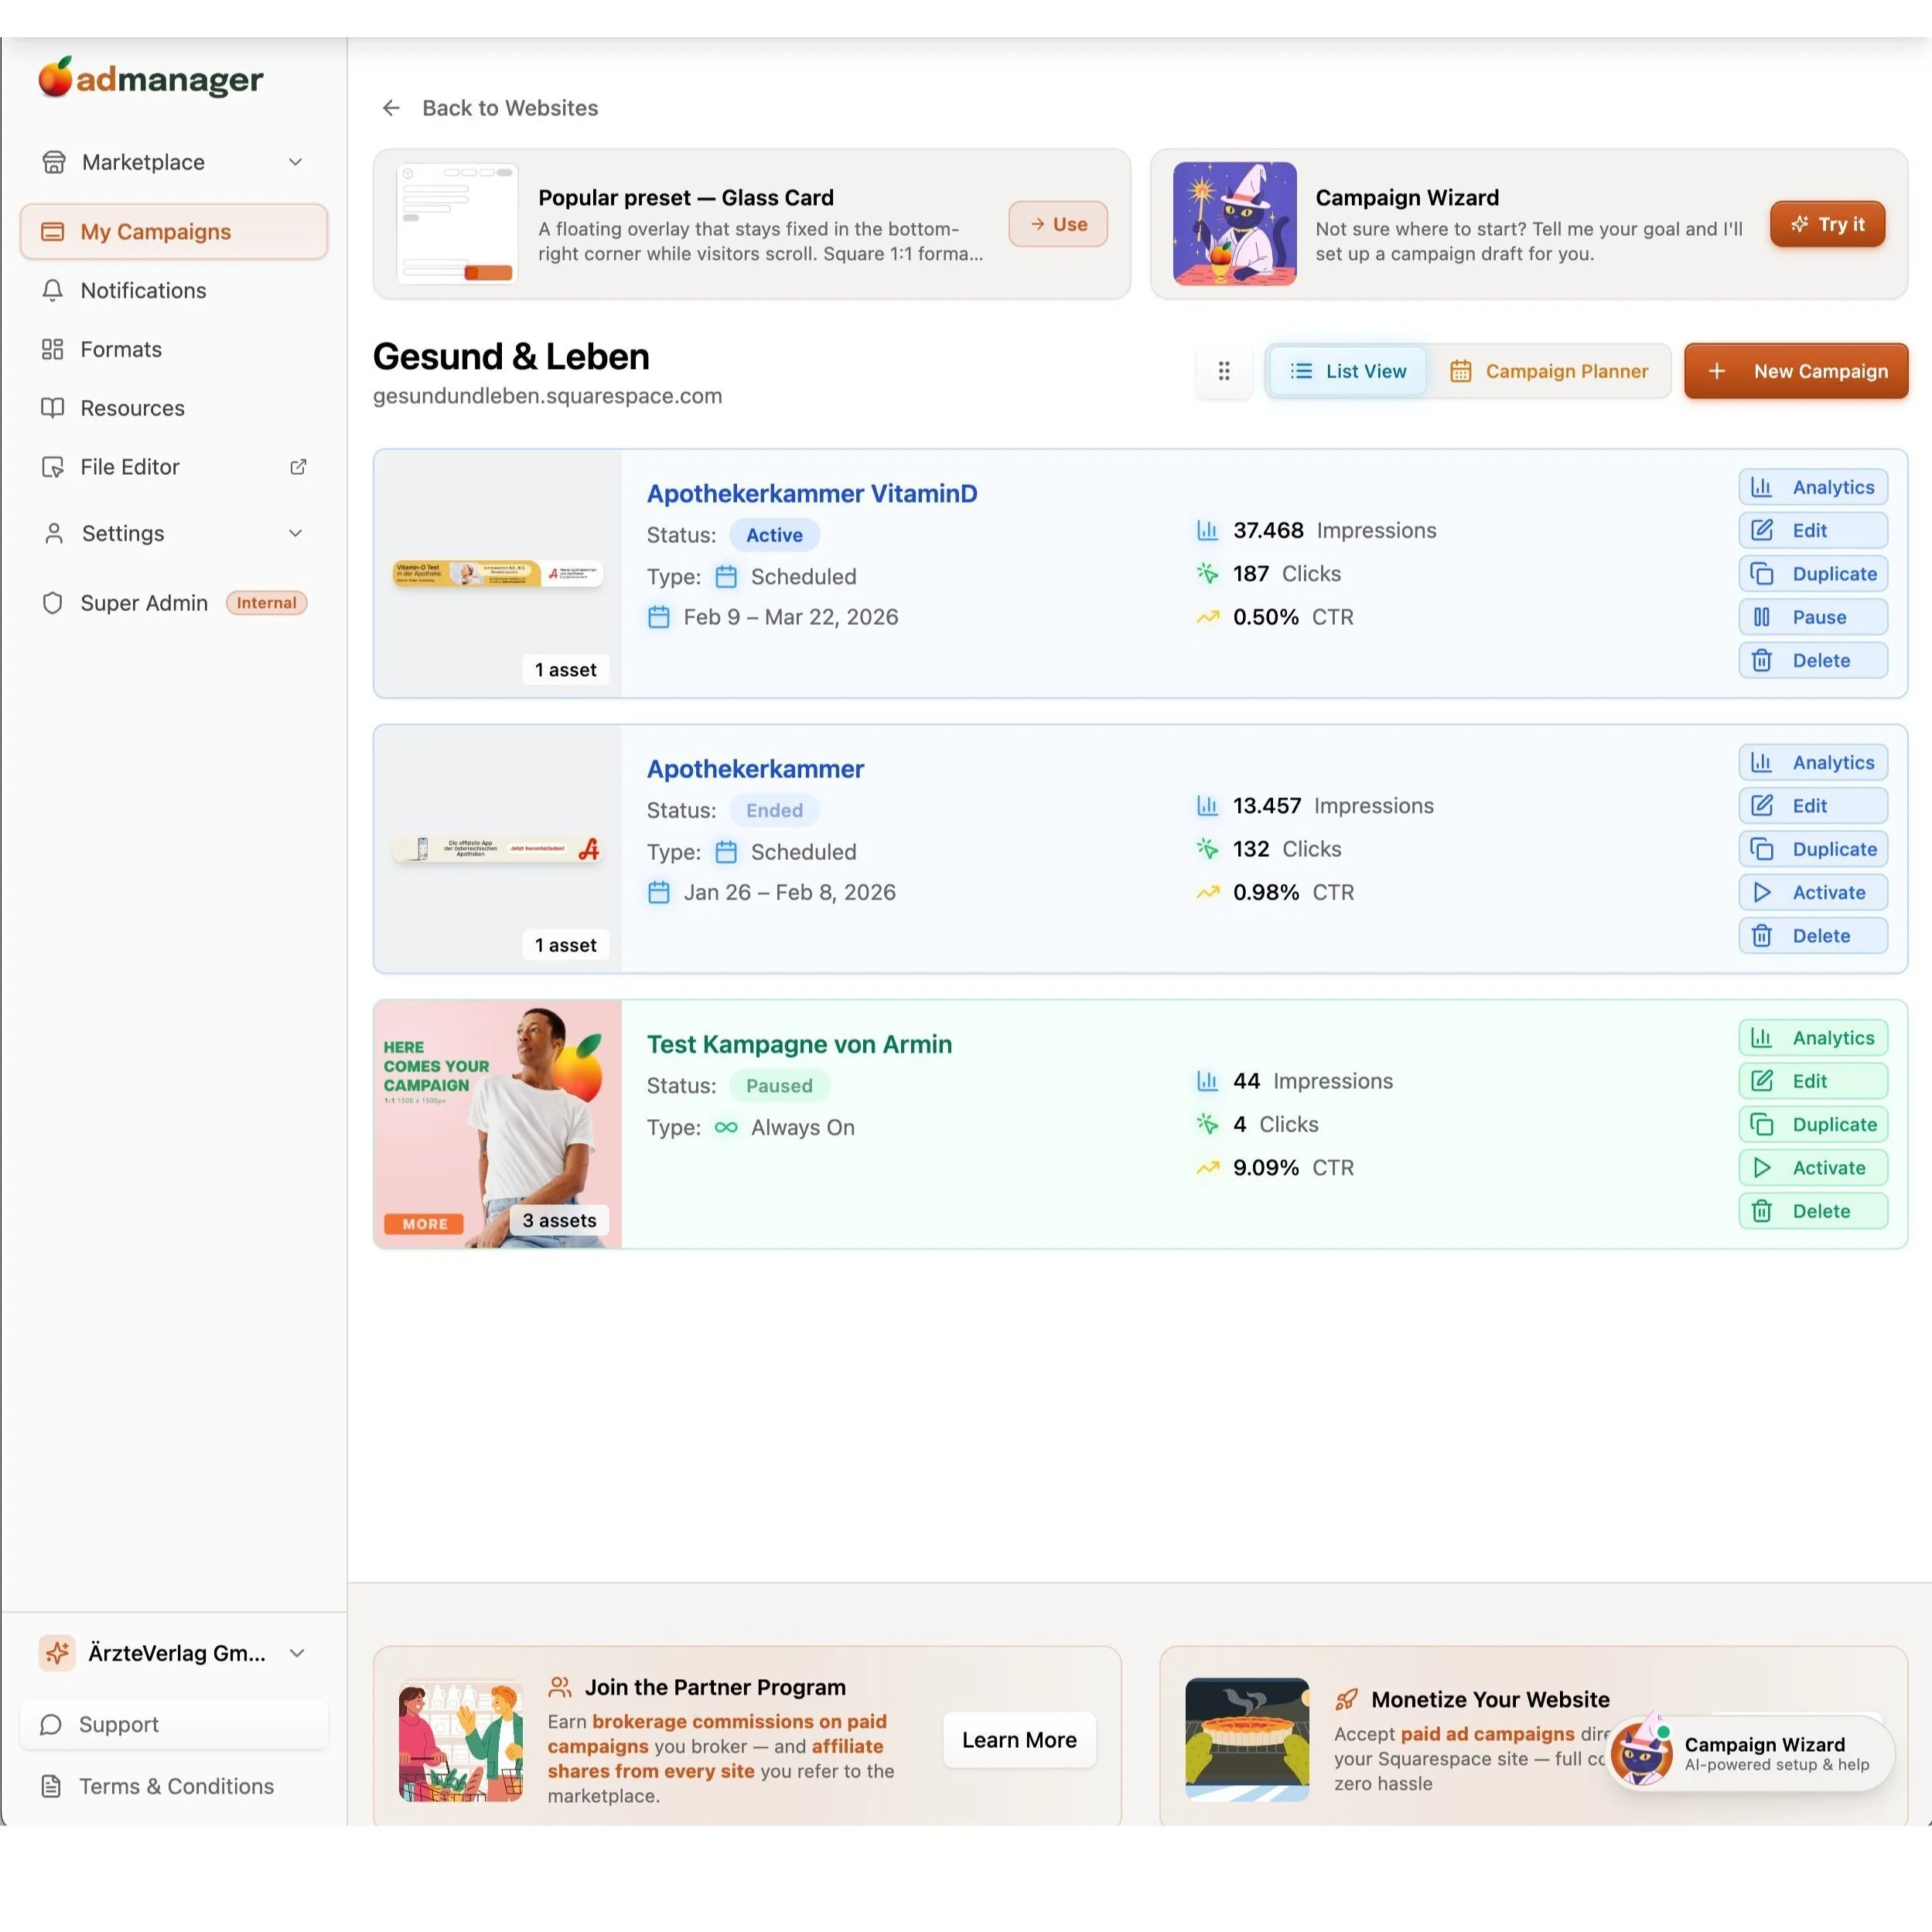
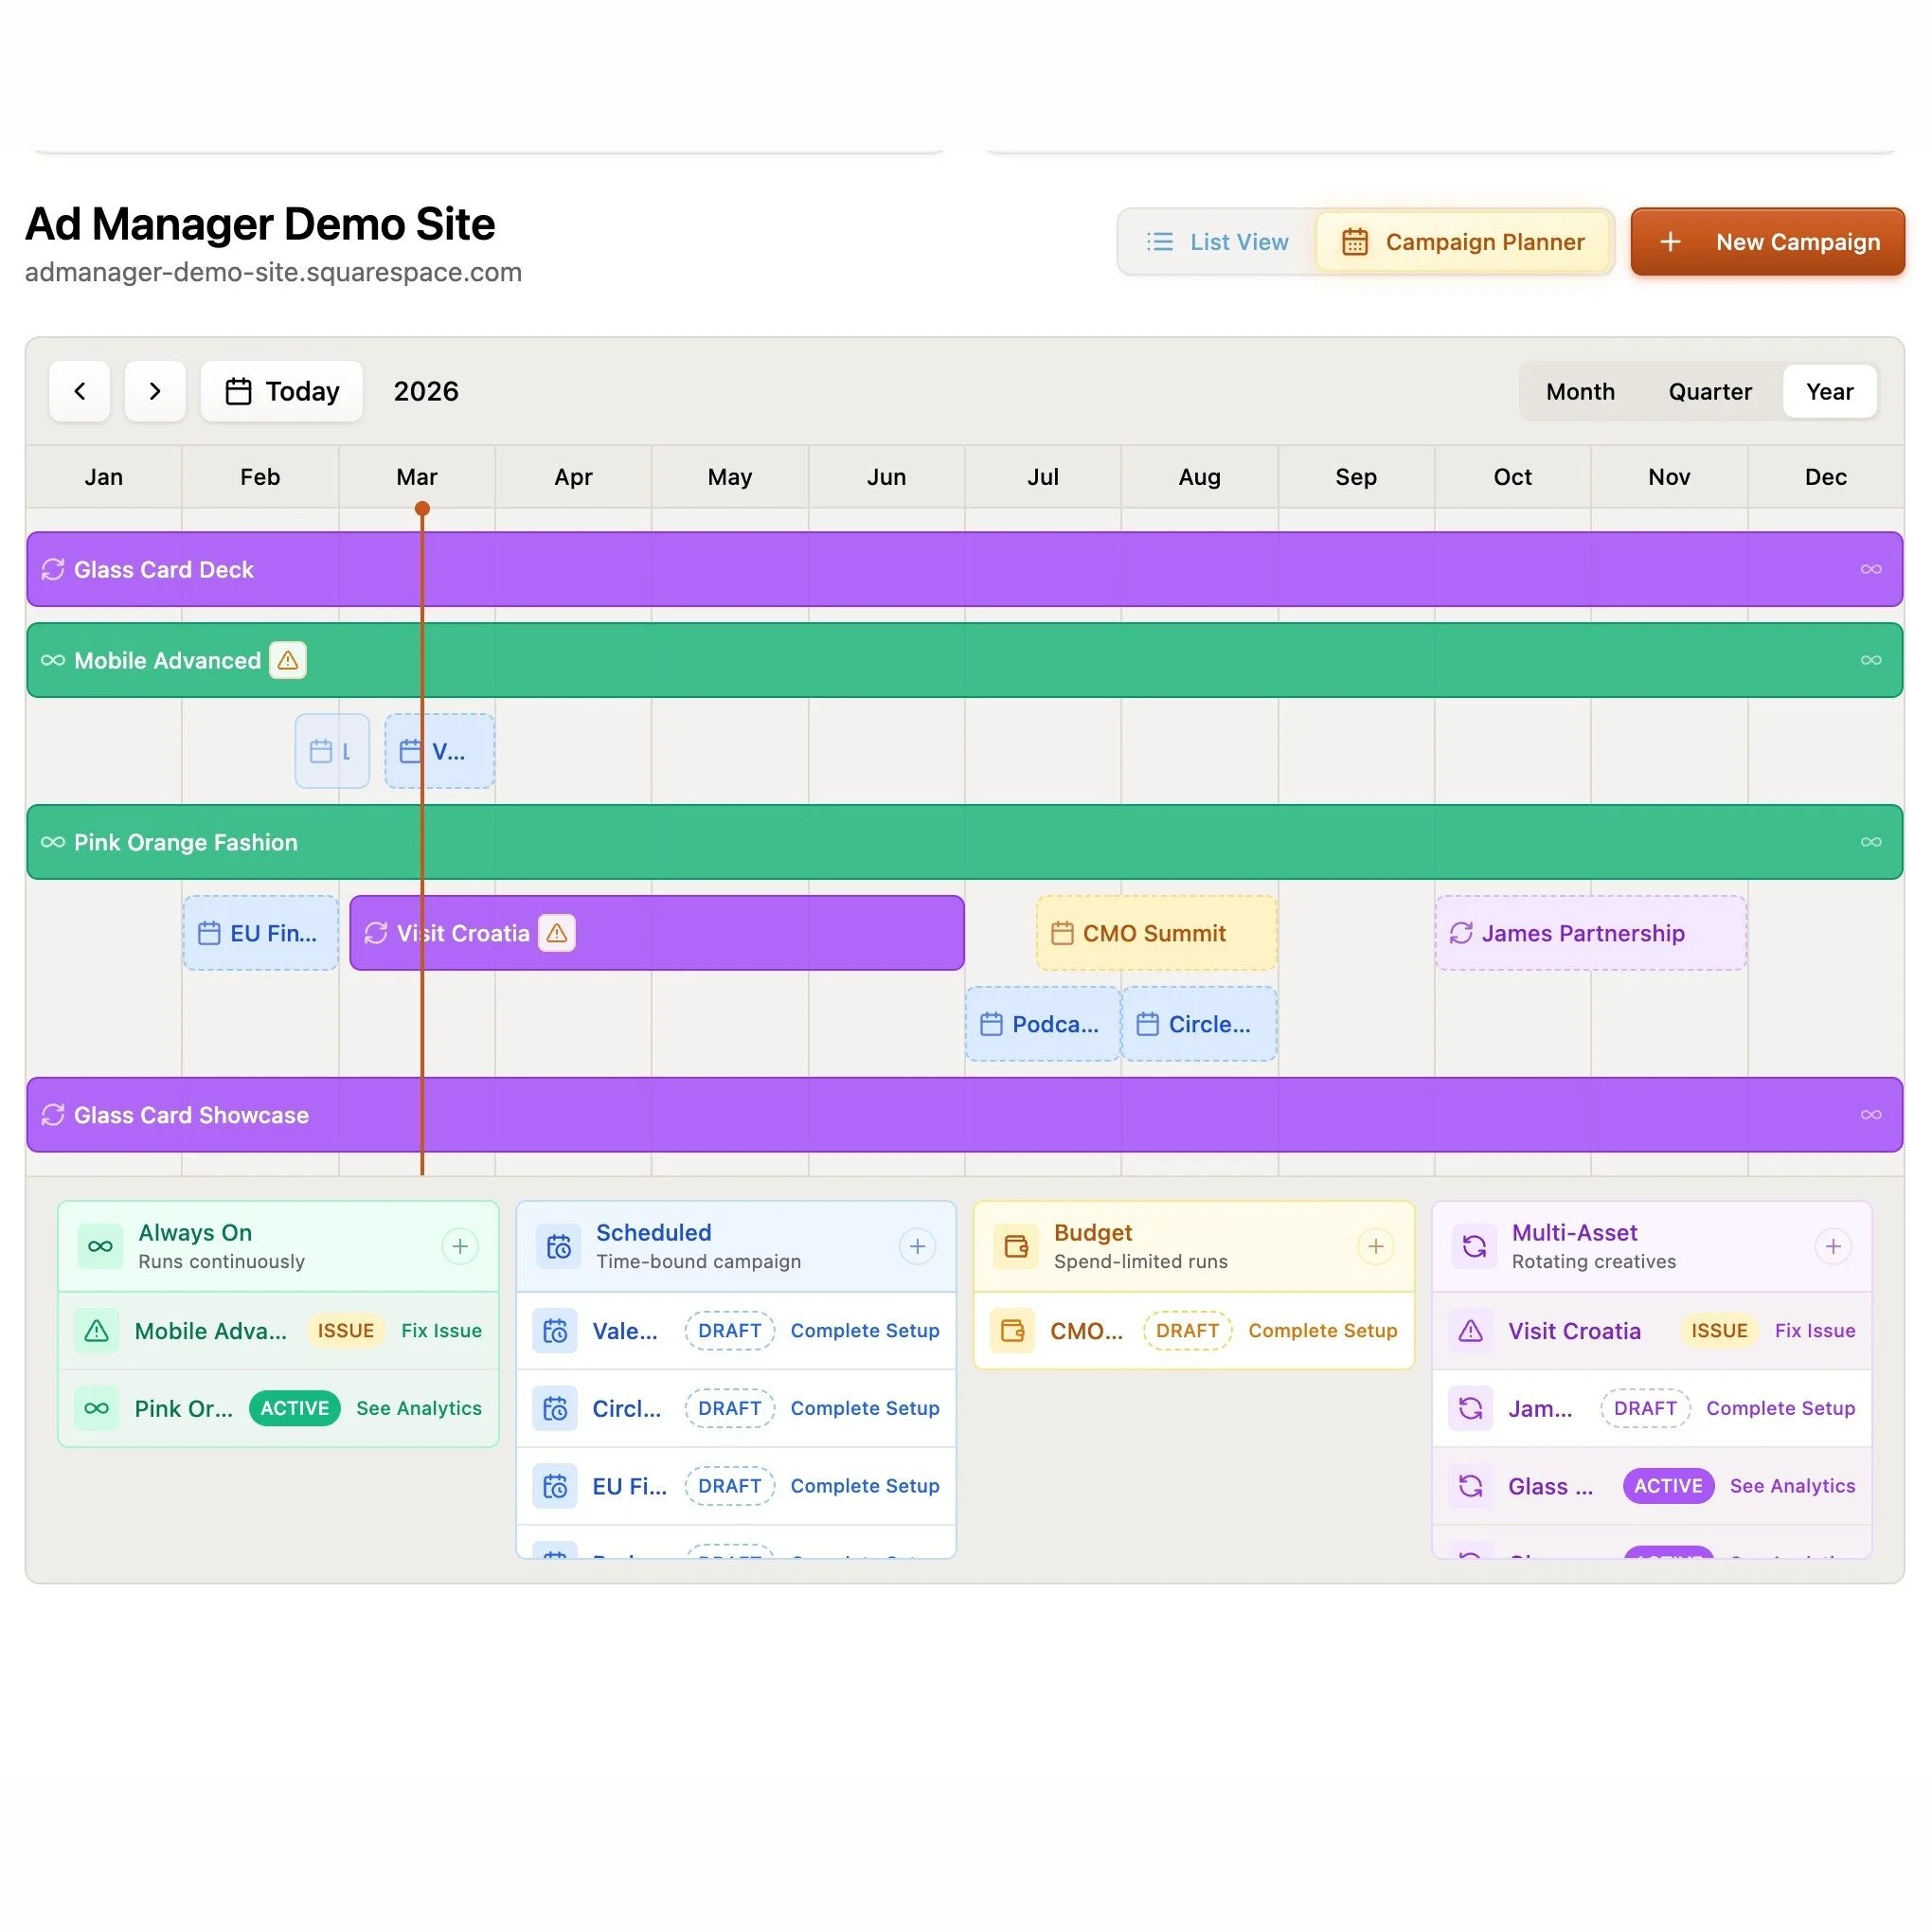
If you've ever wanted to run ads, promotions, or sponsored placements on your Squarespace site without handing the keys (or your sanity) over to Google AdSense, Ad Manager is worth a look. It was built by fellow Squarespace Platinum Partner Braunsberger Media after years of running into the same problem with clients - they wanted control over what showed up on their sites, and traditional ad networks just weren't it. I love tools built by fellow Squarespace pros because I know they have first hand knowledge of what it takes to solve real problems! With AdSense, you don't get to pick what shows up, the ads rarely match your brand, and they take a cut. Ad Manager flips that on its head.
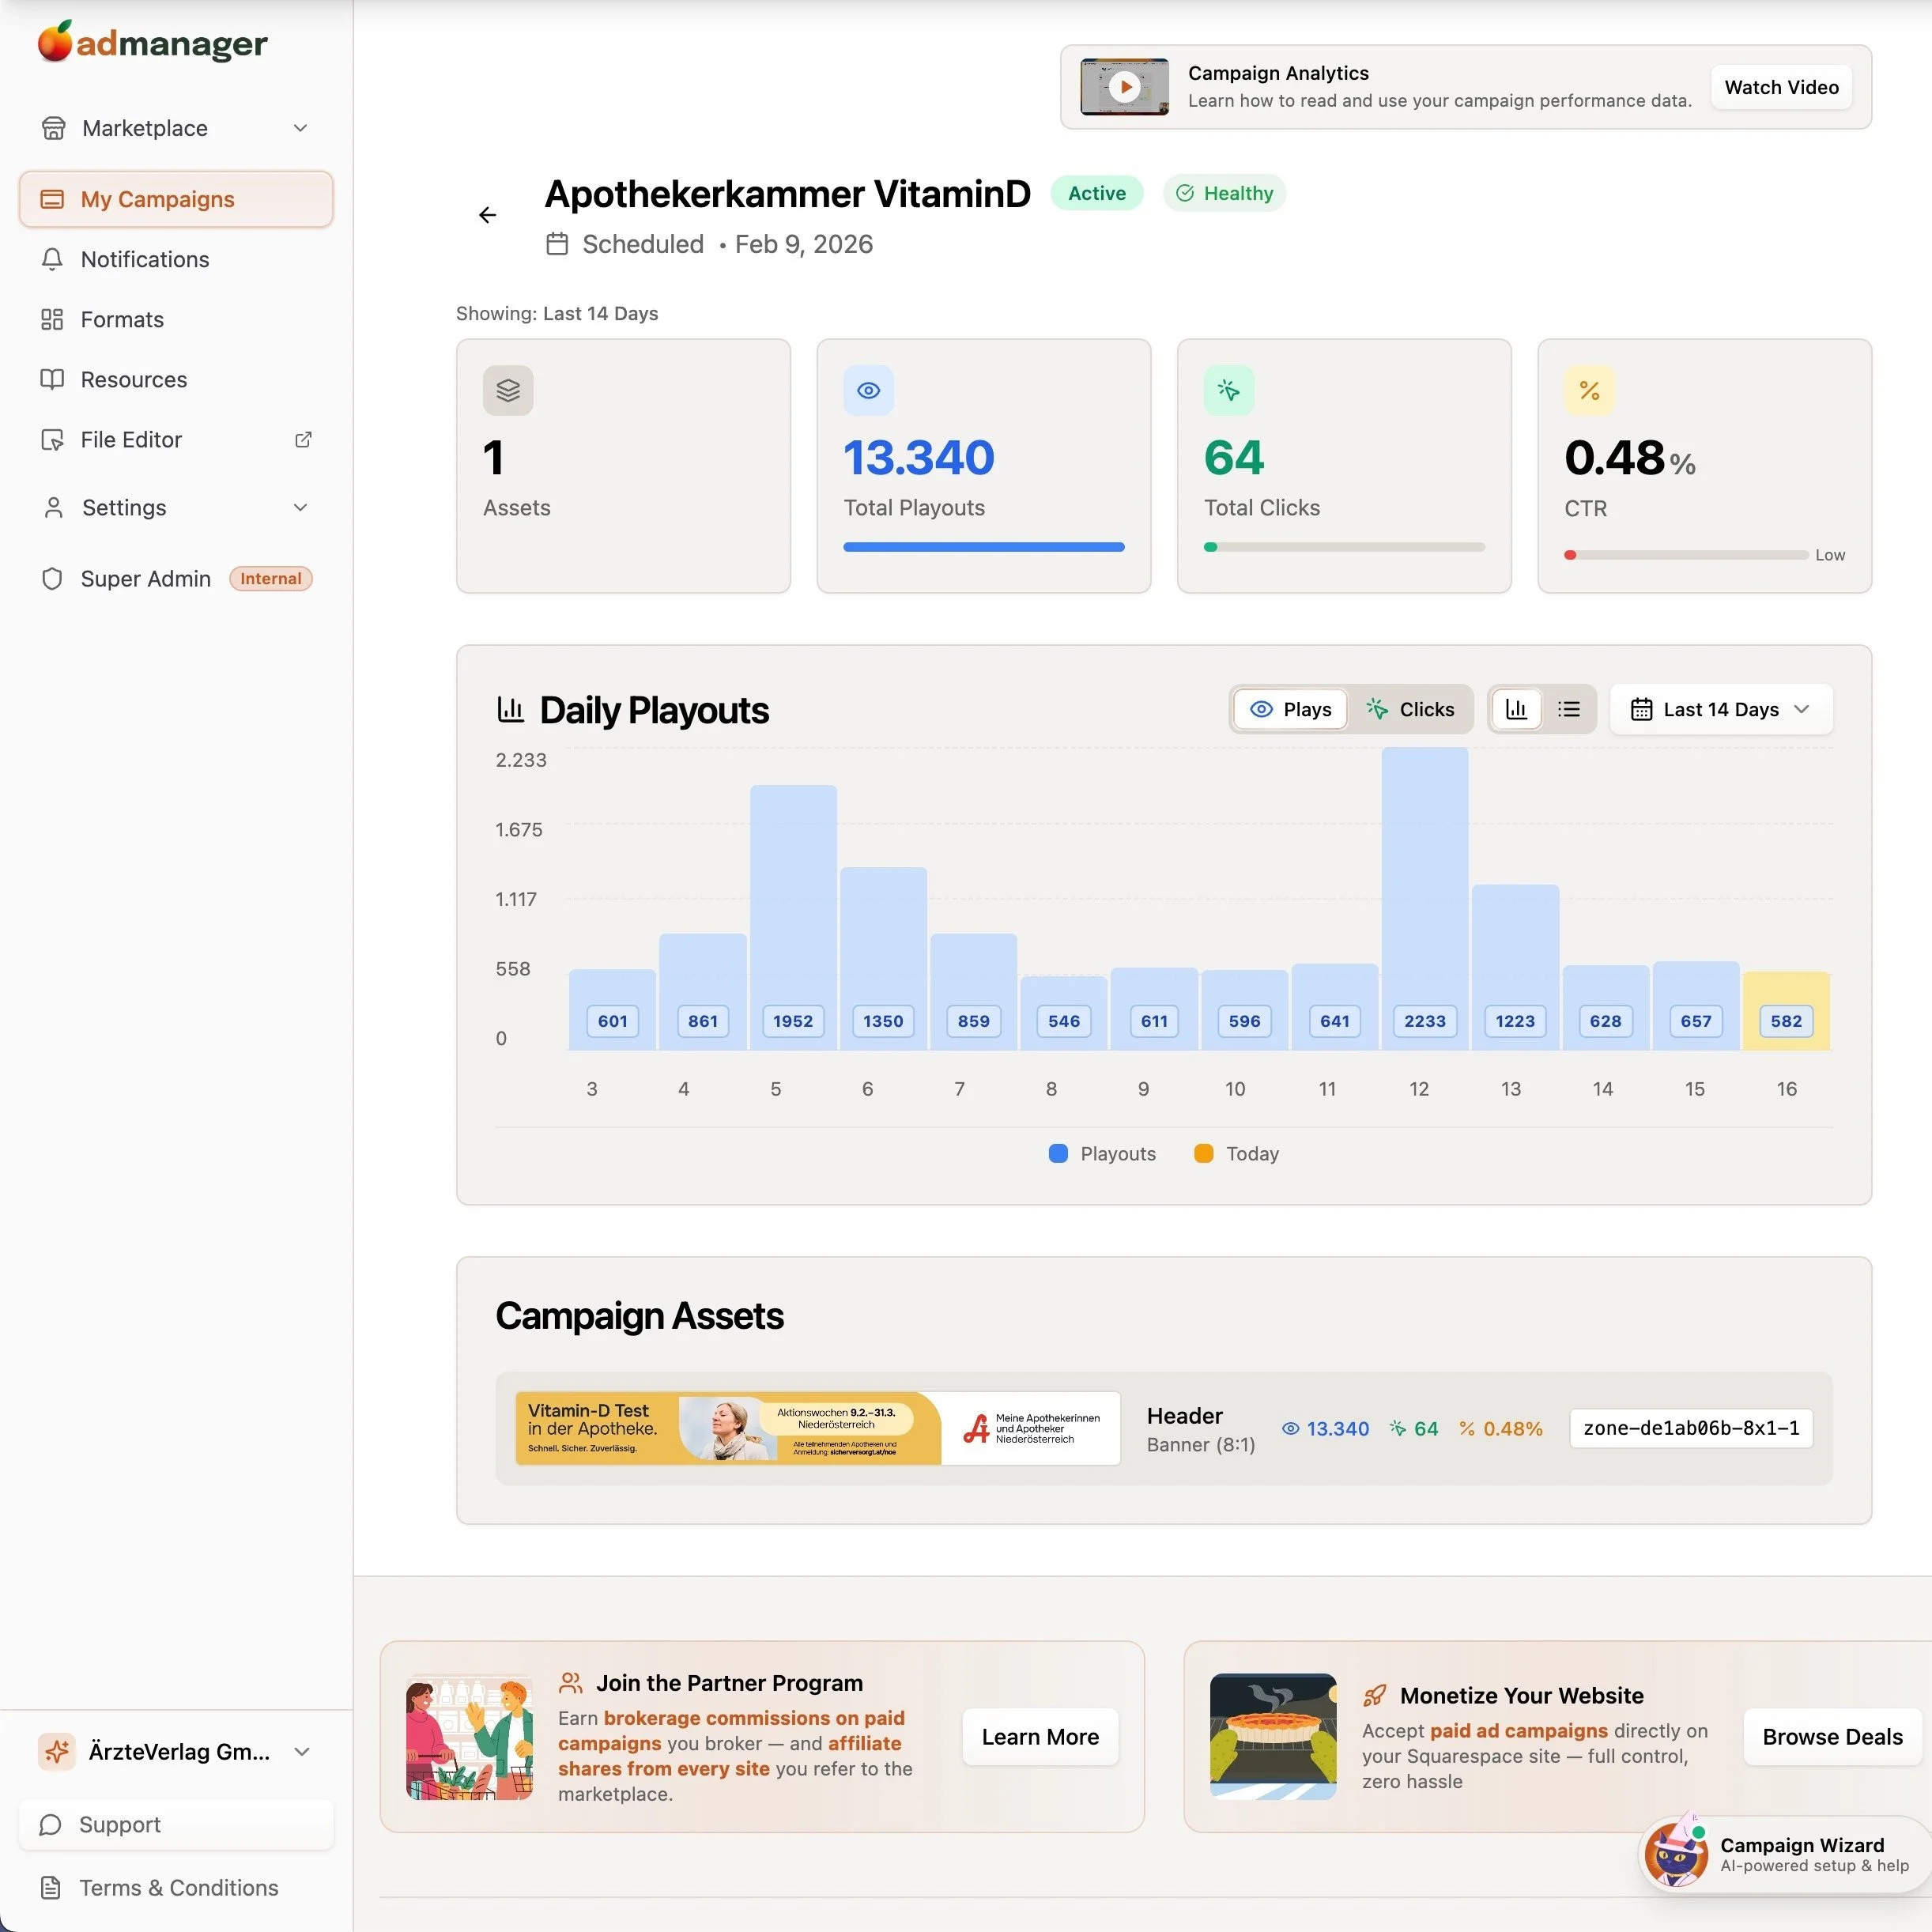

What it does:
Gives you a central dashboard to create, schedule, and track your own promotional content - banners, timed campaigns, sponsored placements, rotating creatives - directly on your Squarespace site. Setup is a one-time code injection paste and then everything else is managed from their dashboard. You also get real-time analytics for impressions, clicks, and click-through rates, plus a built-in image editor so you're not bouncing between tools.
What makes it really interesting is the marketplace model. You can collaborate with other site owners - either advertise on their websites or field proposals from brands who want to run campaigns on yours. The platform handles the money through an escrow system powered by Stripe Connect, so the website owner gets paid once the campaign has actually run. That's a smart setup for anyone looking to monetize without chasing invoices.
Who should try it:
Anyone who wants to monetize their site with ads or run partner campaigns but doesn't want a third-party network deciding what shows up. This is especially useful for bloggers, content-heavy sites, or agencies managing promotions for clients. You keep 100% of the revenue, which is a pretty big deal compared to the AdSense model.
Pricing:
You can use Ad Manager privately on up to 5 of your own websites for free. The marketplace features go beyond that, and the platform only takes a share on actual transactions - so you're not paying for something you're not using.
Delighted
Making sure that your customers had a great experience is obviously super important for brands of all sizes but Delighted makes it easy even for small businesses to get super actionable feedback from customers in the same way huge companies like Target, Uber, and Instacart do. Most importantly (to me, at least) is that it’s automated since this extension will automatically pull from your Squarespace order data.


What it does:
Allows you to send one-question surveys of several different types to customers either right after they order or on a specified delay. You can collect feedback in one area, track trends, or even automatically send responses to certain people on your team so they can follow up.
Who should try it:
Anyone looking to build up social proof with positive testimonials from customers without having to do a ton of setup tracking them down. Since the surveys are so simple and easy, customers are super likely to submit their feedback, which you can use on social media or your website to delight future customers. And the circle continues.
Pricing:
Free plan available that includes up to 1000 trackings per month and 3 users which I think would work for most teams. You only get one survey type on the free plan but everything can be automated so if you’re running a smaller shop, this would work great for you.
GoDataFeed
Not going to lie to you that setting up data feeds for shops on Facebook, Instagram, Google or Pinterest is NOT my jam. I know people who are great at this and am happy to refer them but for those that are looking to run online ads without having to worry about syncing product data across multiple channels or platforms, GoDataFeed will save you so many headaches.


What it does:
GoDataFeed automatically pulls in your Squarespace product data and optimizes your catalog for multichannel marketing. You can manage all your product info from one place, create optimized ads and make it so much easier for you to manage digital marketing campaigns in-house.
Who should try it:
Anyone who is looking to run ads or sell on platforms like Google, Facebook, Instagram, Pinterest, or 200+ marketing channels.
Pricing:
The lite plan is $39/mo will cover up to 1,000 SKUs and is still super robust in terms of all the other features (unlimited stores, users, and data modifications) compared to the Plus plan which is $99/mo. The right plan for you will really depend on how many products you have but the time GoDataFeed will save you on either plan is well worth it in my opinion.
Outfy
A lot of people have “social media” on the marketing to-do list but realize it can be… a lot. With Outfy, you can automate social media posting, saving you a ton of time working on getting new traffic to your site. You can easily create videos, GIFs, collages, or even put the whole thing into “autopilot” mode.


What it does:
Once you sync your Squarespace site to Outfy, you can easily generate ads for Facebook, Instagram, and Google for any product in your shop. Share on social media, automate posting or create graphics all from the Outfy dashboard.
Who should try it:
Anyone who wants to try their hand at social media marketing without needing to hire a graphic designer or digital marketer.
Pricing:
All the plans basically include the same features so you’re basically just going to pay for how much you use or share via the app. The free plan gets you 30 credits/month, where one credit = one post to a social network. If you want to use any of the GIF, video, or collage layouts those are more credits.
Bottom Line
Running an eCommerce business on Squarespace is made even more powerful by taking advantage of some of the extensions that are available to supercharge the experience. (See also: this post all about Squarespace shipping extensions!) If you’re looking to get more eyes on your store either through social media marketing, selling on other platforms, running digital ads, or building up a huge roster of satisfied customers, give one of the sales & marketing Squarespace extensions a try.

Advanced Product Manager for Squarespace: Finally, Bulk Editing That Actually Works
If you've ever had to update prices across 50+ products in Squarespace, you know the pain. Here's the tool that finally fixes Squarespace's biggest product management bottleneck.
If you've ever had to update prices across 50+ products in Squarespace, you know the pain. Click into product one, change the price, save. Click into product two, change the price, save. Repeat until you question your life choices.
Or maybe you've tried the CSV import route - download, edit in a spreadsheet, re-import, fix the errors it inevitably throws, re-import again, and wonder why this feels like you're working against the platform instead of with it.
Here's the thing: Squarespace Commerce can work beautifully… until you hit scale. Once you're managing a catalog of any real size, the one-by-one product editing workflow becomes the bottleneck that can keep you stuck spending more time working in your business than on it.
That's exactly the problem Advanced Product Manager from SquareHero solves - and I've been lucky to be beta testing it for the past few weeks so I can tell you exactly what it does, what it doesn't do, and whether you should add this to your toolkit.

What It Actually Does
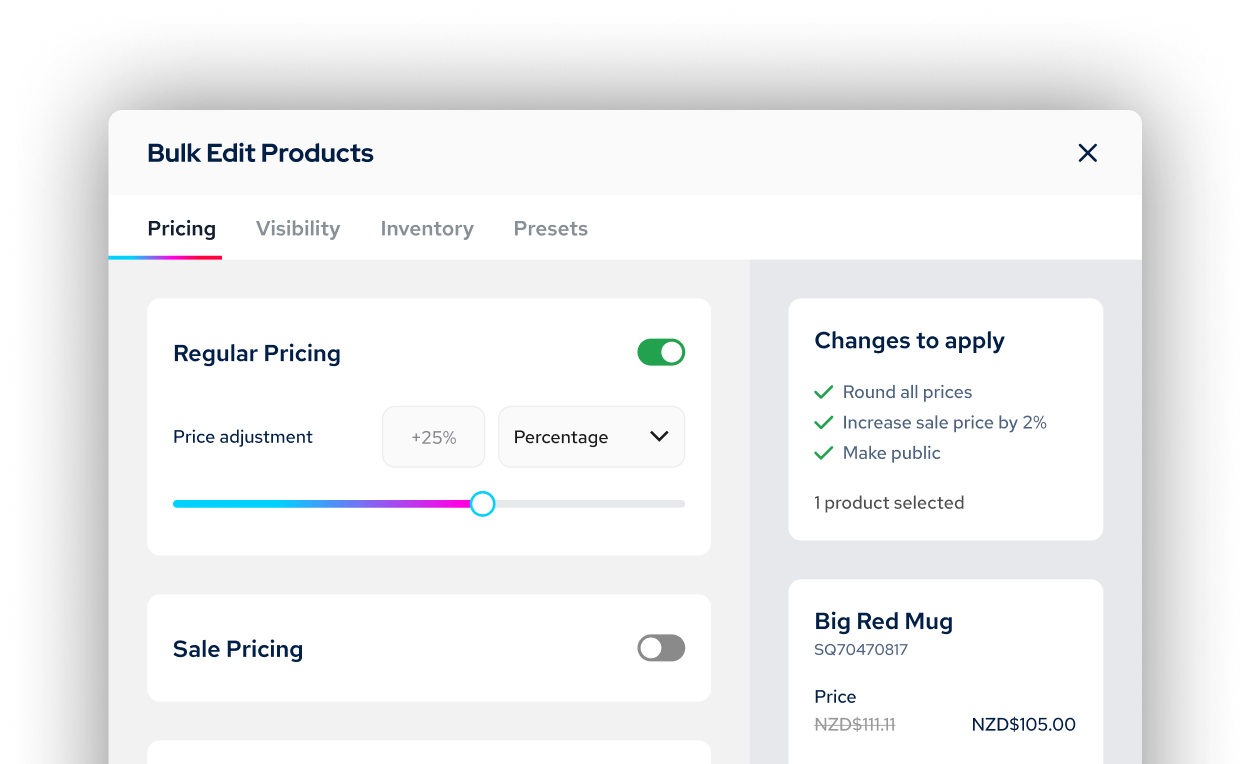
Advanced Product Manager is a plugin that gives you a spreadsheet-style view of all your Squarespace products. You can see everything in one, clean table and make changes instantly. No more clicking through products one by one every time you need to make a price increase.
Here's what you can edit in the table view (think Shopify-style spreadsheet):
Product titles: Edit product names directly in the table
URLs: Update product URL slugs
SKUs: Manage product SKUs
Categories: Add or remove categories
Pricing: Adjust regular and sale prices
Stock levels: Update inventory quantities
Bulk Editing aka The Real Magic
Things really get fun when you can make updates like this en masse:
Price changes: Adjust regular prices by percentage, dollar amount, or set a fixed price across multiple products. For sale prices, you can adjust based on the regular price (say, 25% off) or modify existing sale prices by percentage, dollar amount, or fixed price.
Smart rounding: This is particularly useful. If a 25% discount creates an awkward price like $24.93, you can set rounding rules to automatically adjust to $24.99, $24.95, a whole number, or a custom amount. The final price might not be the exact percentage you specified, but it looks better to customers.
Sale toggles: Turn sale prices on or off across multiple products at once.
Product status: Bulk change products between public, hidden, or scheduled.
Category management: Add or remove categories in bulk. This is useful when you want to do things like move everything into a "clearance" category and apply sale prices all at once 🪄
Inventory adjustments: This is for all the inventory managers out there who need to update their site to match physical stock levels. When you receive a shipment and need to add 25 units each across multiple products, you can make that adjustment in seconds rather than updating each product individually.
Who Actually Needs This
Let's be honest - if you have 10 products and update pricing once a year, you probably don't need this tool. But if any of these sound familiar, it's worth looking at:
You're running regular sales or promotions. Black Friday prep used to mean clicking through every single product to toggle sale prices on and off and entering the right prices. Now it's a bulk selection and one click. No math required.
You manage multiple collections with different pricing strategies. Think: food brands rotating seasonal menus, retail stores with different margin requirements per category, anyone managing wholesale vs. retail pricing - this saves you from juggling spreadsheets.
You're a designer managing client stores. SquareHero offers multi-site plans (3-site and 10-site options), which makes this particularly useful if you're maintaining product catalogs for multiple clients. You’ll literally look like the hero when clients ask if you can make price updates and you have that done in minutes vs. days.
You're just tired of the CSV workflow. Honestly, same - and you know I love a spreadsheet! The CSV export/import process in Squarespace works really well, but I know that it can be overwhelming for a lot of people. This is faster and, honestly, just way less frustrating.
How It Works
Installation is genuinely super simple - it's a quick code snippet added once to your site and you’re done.
Once installed, you'll see the SquareHero icon in your editor and you can click on that to display your products in a sortable, filterable table. Select the ones you want to edit, make your changes, and save. The updates happen directly in Squarespace, so everything stays in sync.
One feature I particularly appreciate: demo mode. You can try the full product before buying, no credit card required. Test it with your actual product catalog and see if it solves your specific workflow problems before committing.
The Real Talk Section
This isn't going to solve every Squarespace Commerce limitation. It won't give you more advanced selling features, it won't replace a proper POS system if that's what you need, and it won't magically make Squarespace's variant system work any differently (though it does make editing pricing for those variants much, much faster).
The tool is for pricing or inventory updates and not things like:
Editing product descriptions
Adding/removing variants
Adding/removing photos
Controlling advanced selling tool features such as product add-ons or custom forms
Editing the Additional Info section
But honestly? These are Squarespace limitations, not limitations of this tool. Within Squarespace's current constraints, this tool eliminates the most repetitive, time-consuming part of managing a Squarespace store at scale. And that's actually super valuable even if you need to do some of the other product management the old school way.

Pricing
I think the pricing structure is super fair and with single-site, 3-site and 10-site plans there’s something for you whether you’re a site owner yourself or a web designer or store manager on multiple sites. Even on the single site plan at $14/mo paid annually, I’d say if you're spending even an hour per month on bulk product updates, this pays for itself pretty quickly.
The Bottom Line
If you're running a Squarespace store with more than a handful of products and you regularly need to make bulk changes, this tool does exactly what it promises. For Squarespace users who've been stuck with one-by-one editing for years, this actually feels, dare I say, revolutionary - even if it's just bringing the platform up to what other eCommerce platforms have offered all along. But it's really well-executed - and honestly, that's what matters when you're trying to actually run a business instead of fighting with your website.
It’s quick to install, demo mode lets you test before buying, and the interface is clean enough that you won't need a tutorial to figure it out.
Squarespace Commerce is a solid platform, but the product management workflow has always been its weakest point at scale. Advanced Product Manager fixes that specific problem without overcomplicating things.
Full disclosure: I beta tested this product and received access in exchange for an honest review. This post contains affiliate links - if you purchase through them, I earn a small commission at no extra cost to you. I only recommend tools I actually use and believe solve real problems.

Think Like a Buyer: How to Map Your Customer Journey
Most websites are built like a checklist. But what if your site could do more than just… exist? Discover how thinking like a buyer and mapping their journey can transform your website into a powerful sales tool, leading to more conversions and happier clients.
Most people design their website like a checklist:
✔ Design homepage
✔ Add services page
✔ Set up contact form
And technically… they’re not wrong. But if you only focus on what you offer (and ignore what your customer actually needs), your site experience can quickly break down. So instead of just building out pages because you think you should, let’s look at what really guides your buyer’s decisions so you can create with purpose.
Because your buyer isn’t following your site structure. They’re following their own journey - one that’s part emotional, part practical, and 100% driven by how well you earn their trust.
If you want more sales, whether you provide services, digital products, or a full-blown eCommerce storefront, you can’t just think like a business owner.
You have to start thinking like a buyer.

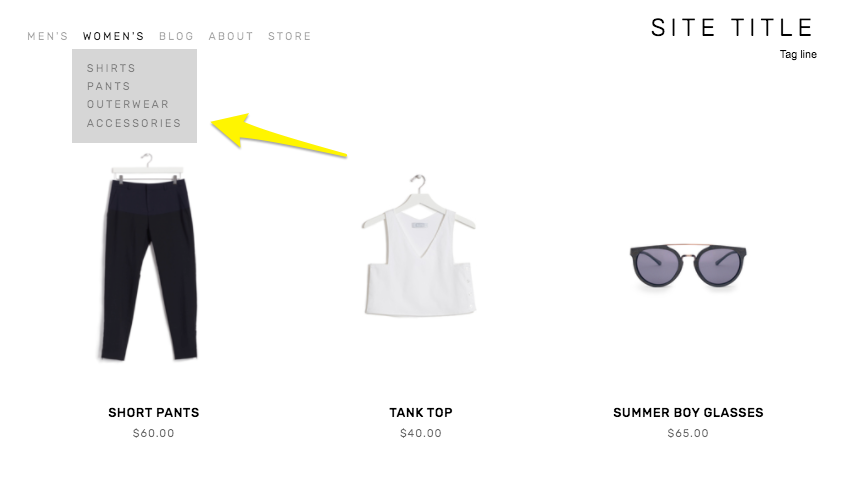
Mastering Product Variants in Squarespace
Harness the power of product variants to transform your Squarespace store. This comprehensive guide covers everything from basic setup to advanced strategies, helping you create a more efficient, user-friendly, and profitable online shop.
If you've ever felt like your product catalog is starting to resemble a digital version of that notorious junk drawer, you're in the right place. Today, we're exploring product variants - your secret weapon for turning chaos into order in your Squarespace store.
In this comprehensive guide, we'll cover everything from the basics of setting up variants to advanced strategies for optimization. You'll learn how to streamline your product offerings, improve your store's user experience, and make informed decisions about your product structure. By the end of this post, you'll have the knowledge to create a more efficient, user-friendly, and scalable Squarespace store that's primed for growth. Let’s dig in!
The Importance of Product Variants
Product variants allow you to offer multiple versions of a product without cluttering your store. While this feature is commonly used for products that come in different sizes, colors, or styles, its applications are far more versatile than you might think.
For example, if you're selling t-shirts in various sizes and colors, using variants lets you present all options under a single product listing, rather than creating separate entries for each combination. It's like having a really efficient personal shopper for your customers.
But let's think outside the box. Here are some creative ways to use variants that you might not have considered:
Customization options: Use variants to offer personalization choices, like engraving text on jewelry or selecting gift wrap styles.
Bundle building: Create a "build your own gift box" product where each variant represents a different item customers can include.
Service add-ons: For service-based businesses, use variants to offer different service levels or add-on features.
Product pairings: Use variants to suggest complementary products, like "Shirt Only" or "Shirt + Matching Accessory."
By thinking creatively about variants, you can streamline your product offerings while providing customers with more options and a smoother shopping experience while you see increased average cart values. Win-win!
ℹ️ FUN FACT! Did you know that Squarespace allows up to 6 options and 250 total variants per product, giving you ample flexibility for most product types. For context, Shopify caps at 3 options and 100 total variants without add-ons and Podia offers unlimited digital products. (Podia's living its best digital life, apparently.)
Variants vs. Separate Products: Making the Right Choice
Deciding when to use variants versus creating separate products can significantly impact your store's organization and user experience. Here's a simple decision guide:
Use variants when:
The item is essentially the same product with different options
You want to simplify inventory management
You're well within the 250 variant limit
Create separate products when:
The item has unique features beyond basic options like color or size
You need more detailed, separate tracking for inventory or analytics
You're approaching the 250 variant limit
Let's look at some examples across different industries:
Clothing Store:
Use variants: Different sizes and colors of a t-shirt design
Separate products: "Classic Tee" versus "V-Neck Tee" (different styles)
Electronics Shop:
Use variants: Storage capacity options for a smartphone (64GB, 128GB, 256GB)
Separate products: Different models of smartphones (e.g., iPhone 16 vs. iPhone 16 Plus)
Furniture Store:
Use variants: Fabric choices for a sofa
Separate products: Different sofa models (e.g., loveseat vs. sectional, or different designs)
Jewelry Business:
Use variants: Necklace chain lengths or gemstone choices
Separate products: Different jewelry types (necklaces, bracelets, earrings)
Digital Products:
Use variants: License types for a software product (personal, business, enterprise)
Separate products: Different software applications or courses
Food and Beverage:
Use variants: Different flavors of the same product
Separate products: Different product formulations (sugar free vs. regular)
Home Decor:
Use variants: Sizes of a picture frame
Separate products: Different frame styles or materials
Subscription Boxes:
Use variants: Subscription durations (3 months, 6 months, 1 year)
Separate products: Different types of subscription boxes (e.g., beauty box vs. snack box)
The key is to use variants when the differences are primarily in options or customizations of the same basic product. Create separate products when the items have distinct features, purposes, or when you need to manage them independently for inventory or analytics purposes.
How variants (or the lack thereof) can make better product pages:
There's another significant benefit to creating separate products: it allows you to craft more specific and tailored product descriptions and pages. When you're not trying to cover multiple variants in a single description, you can:
Focus on unique features: Highlight the specific benefits and features of each product without diluting the message to cover all variants.
Target specific customer needs: Speak directly to the customer who's looking for this particular item, addressing their unique pain points and desires.
Optimize for specific keywords: Create more focused SEO strategies for each product, potentially improving your search rankings for specific terms. (More on this below! 😉)
Provide detailed information: Include in-depth specifications, use cases, and customer testimonials that are relevant to the specific product.
Showcase product-specific imagery: Use photos and videos that highlight the unique aspects of each item without confusing customers about which variant they're viewing.
Tailor your call-to-action: Create more compelling and specific calls-to-action that resonate with the target audience for each product.
By not offering too many options on a single page, you can really cater to the needs of customers interested in each specific item. This approach allows you to communicate more effectively about the benefits and features of each product, rather than trying to cover all bases with a broader, less focused description.
Understanding Variant Calculations
Calculating the total number of variants is straightforward but crucial for planning your product structure. Here's how it works:
Total Variants = Option 1 choices × Option 2 choices × Option 3 choices (and so on)
For instance:
A t-shirt with 4 sizes and 3 colors: 4 × 3 = 12 variants
Adding just 3 additional colors and 5 design choices to the above: 4 × 6 × 5 = 120 variants
As you can see, the number of variants can increase rapidly as you add options! It's important to plan your variant structure carefully to avoid hitting Squarespace's 250 variant limit unexpectedly. Trust me, hitting that limit is no fun because it forces you to go back and rethink your product strategy when you’d probably rather just get to selling.
Optimizing Your Product Page for Variants
Now that you know a bit more about product variants, when to use them and how they work, let's talk about how to display your product options effectively on your product details pages. A well-designed product page is crucial for effectively presenting variants to your customers so it’s important to pay attention to the details. Here are some best practices:

Use visual elements: Implement color swatches or pattern images for relevant options. This helps customers quickly understand and select their preferred choice.
Utilize button options: For options like size or style, buttons keep the interface clean and options easy to navigate.
Clear impact display: Ensure that customers can easily see how their variant choices affect price and availability.
Descriptive labels: Use specific, clear labels for each option. "Size" is more helpful than "Option 1." After all, we're not playing a game of "Guess What This Dropdown Does."
Logical ordering: Present the most important variant options first, typically size for clothing or main feature for other products.
ℹ️ TIP! If you’ve set up specific images for each product variant (as you should), they will only display after ALL options are selected. This means that if you have a shirt in 5 sizes and 3 designs that the thumbnail will only change to match the selected after both size AND design have been selected. In this case, I would always recommend having size as the first option and the design as the second one so that as soon as the design is selected the corresponding thumbnail will display.
The key takeaway here is that a well-optimized product page with variants should be intuitive and easy to use. It should guide customers smoothly through their options without overwhelming them with choices.
I’m going to start to sound like I’m repeating myself, but it’s just SO important: your goal should always be to make the shopping experience as easy as possible, not over-complicate it. A clear, well-organized variant display can significantly reduce decision fatigue and increase conversion rates. On the flip side, a confusing or cluttered variant setup can lead to abandoned carts and lost sales. This means that when you’re thinking of how to set up your products, you’re really aiming for that perfect balance between offering variety and maintaining simplicity.
SEO and Inventory Considerations
When dealing with product variants, it's crucial to consider both search engine optimization (SEO) and inventory management. These elements can significantly impact your store's visibility on the front end and operational efficiency on the back end.
SEO for Variant-Rich Products
Optimizing variant-rich products for search engines requires a strategic approach. You need to balance providing detailed information for each variant while maintaining a cohesive overall product page. Here are some key tactics:
Strong main product title and description: This forms the SEO foundation for all variants. Ensure it encompasses the core product while hinting at the variety available.
Include key variants in the product title if commonly searched: "Women's T-Shirt - Sizes XS to 3XL" is more informative than just "Women's T-Shirt."
Use alt text on variant images: "Red V-neck T-shirt front view" is better for SEO (and accessibility) than "DSC12345.jpg".
Create unique content for significant variants: If certain variants are particularly popular or distinct, consider creating separate sections on the page with unique descriptions for these. (ℹ️ TIP! The Squarespace product additional info section is perfect for this!)
Google isn't psychic (yet 😬) so if you help it understand your products, it'll help customers find you. Create rich, informative pages that serve both your human visitors and search engine crawlers effectively. (For more on SEO, check out this video on my most recommended Squarespace SEO tool.)
Inventory Management
Effective inventory management is crucial for businesses with variant-rich products. Squarespace offers tools to help you stay on top of your stock levels across all variants. Here's how you can leverage these features:
Squarespace allows you to track stock for each variant separately. This means you can:
Set different inventory levels for each variant
Receive notifications when a specific variant is running low
Display "Out of Stock" messages for unavailable variants without removing the entire product
To make the most of these features:
Regularly review your inventory levels: Set aside time to regularly assess which variants are selling well and which might need to be discounted or discontinued.
Use low stock alerts: Set up notifications to alert you when variants reach a certain threshold, allowing you to reorder in time.
Analyze sales patterns: Use the data from your variant sales to inform future purchasing decisions and identify trends in customer preferences.
ℹ️ TIP! Use out-of-stock variants as an opportunity to collect email addresses for restock notifications. It's like turning lemons into lemonade, except the lemons are disappointed customers and the lemonade is future sales 🍋 This not only helps retain potential customers but also gives you valuable data on demand for specific variants!
Good inventory management isn't just about keeping products in stock—it's about optimizing your inventory to meet customer demand while minimizing holding costs. Your variant strategy plays a crucial role in striking this balance.
Money Talk: Variant Pricing Strategies
When it comes to pricing in Squarespace, it's important to understand the platform's capabilities and limitations. Here are some strategies you can implement:
Flat pricing: Set the same price for all variants of a product. This is the simplest approach and works well for products where all options have similar production costs.
Variant-specific pricing: Charge different prices for different variants. This is useful when some options (like different colors or premium materials) cost more to produce.
Product-level sales: While you can't discount specific variants, you can put entire products on sale. This can be useful for clearing out inventory or running promotions.
Limited-time offers: Use Squarespace's sale feature to create urgency around entire products or categories for a set period.
Here's how these strategies might look in practice:
Strategy: Flat Pricing
When to Use: Simple products with similar costs across variants
Example: All t-shirt sizes and colors for $25
Strategy: Variant Pricing
When to Use: When some options cost more to produce
Example: All red shirts are $25 but black shirts are $30
Strategy: Product-level Sales
When to Use: Clearing inventory, seasonal promotions
Example: 20% off a specific t-shirt product for a week
Strategy: Limited-Time Offers
When to Use: Create urgency, boost sales during slow periods
Example: lash sale: 15% off all hoodies for 48 hours
Remember, while Squarespace has some limitations, you can get creative within these constraints:
Create 'bundle' products: If you want to offer a deal on multiple items, create a new product that represents the bundle. (More on bundling & kitting on Squarespace.)
Use tiered products: Instead of variants, create separate products for "Standard," "Deluxe," and "Premium" versions if the differences are significant.
Leverage your product descriptions: Use this space to explain the value of higher-priced variants or to highlight limited-time offers.
ℹ️ TIP! While you can't automatically apply discounts to specific variants, you can manually adjust variant prices for sales. Just remember to change them back when the sale ends!
The key is to work smartly within Squarespace's framework. Your pricing should still reflect your brand positioning and target market. It's about finding the right balance between simplicity (which Squarespace enforces) and the flexibility your business needs.
User Experience: Don't Make Your Customers Play Hide and Seek
A great variant setup means nothing if your customers can't find what they're looking for. Here's how to ensure your store is more "helpful librarian" and less "labyrinth designed by M.C. Escher":
Organize categories logically: Group similar products together. "Tops" can include t-shirts, blouses, and sweaters, each with their own variants.
Use clear, descriptive category names: "Women's Tops" is better than "Upper Body Decor."
Implement robust filtering options: Let customers filter by size, color, style, etc. The easier it is to find, the easier it is to buy!
Optimize site search: Ensure your search function can handle variant-specific queries like "red XL t-shirt."
Create intuitive navigation paths: Think about your customer's journey. For instance, a path like Home > Women's > Tops > T-Shirts > Graphic Tees guides the user naturally through your store hierarchy.
Use breadcrumbs: These not only help with navigation but also with SEO.
Consider a mega menu: For stores with many categories and variants, a well-designed mega menu can provide an at-a-glance view of your product structure. (ℹ️ TIP! Looking for a mega menu? I love this plugin from Will Myers!)
Mobile optimization: Ensure your category structure and filters work well on mobile devices. Remember, a significant portion of your customers may be shopping on their phones.
Use the related products feature smartly: Many people use Squarespace’s built-in related products feature to display related products but did you know that you can specify exactly which categories you’d like to display for each product? This may be better than the default which is just going to show products at random based on either stock levels or what’s been most recently added to your store.
A/B test your navigation: What works best can vary depending on your specific audience. Don't be afraid to test different category structures or menu designs to see what resonates with your customers.
Ultimately, your site structure should feel invisible—guiding customers to their desired products without them having to think about the navigation process.
Future-Proofing Your Variant Strategy
As your business grows, so might your product offerings. Here's how to ensure your variant strategy scales with you:
Monitor your numbers & consider splitting high-variant products: Regularly check how close you're getting to that 250 variant limit. If you're approaching the limit, it’s probably time to think about creating separate product lines.
Consolidate when possible: Do you really need 15 ever so slightly different shades of blue tees? Would your sales really drop if you offered fewer options?
Plan for scalability: When adding new products or options, consider how they'll fit into your existing structure.
Stay flexible: The eCommerce world moves fast. Be ready to adapt your strategy as your business evolves.
Bottom Line
We've covered a lot of ground, from understanding the basics of product variants to strategizing for the future. Armed with this knowledge, you're now ready to transform your Squarespace store into a well-oiled, variant-powered machine.
Remember, mastering product variants is about finding the right balance - offering enough options to meet your customers' needs without overwhelming them (or yourself). It's about creating a shopping experience that's intuitive, efficient, and dare I say, even enjoyable.

How to Connect Shopify to Squarespace
For most sellers, there’s no need to try to connect Shopify and Squarespace. You should be looking instead at choosing which platform is best for you and going all-in on it. But for some specific use cases, the Shopify Buy Button is a great way to have a great-looking Squarespace website powered by a Shopify back end for commerce.
Updated June 2024
I usually advocate for just picking one website platform and sticking with it. This isn't just to make life simpler, it's also because stringing a bunch of systems together often means you have more opportunities for those systems to fail. It can also be wishful thinking to think that doubling up on website platforms (in this case, Squarespace + Shopify) will allow you to have your cake and eat it too. In reality, both platforms have their pros and cons and while my expert opinion is that Squarespace is the best choice for small business eCommerce websites, there may be some specific use cases where it pays to connect the two via the Shopify Buy Button.
Example Use Cases
Adding another subscription to the mix needs to make sense and there have to be compelling reasons to do it. At face value, it would seem that the Shopify Buy Button is kinda pointless; Squarespace offers eCommerce and Shopify allows you to build a website. But there are exceptions. If you really want to stick with your Squarespace website but are dealing with any of the following issues, the Shopify Buy Button may be a good solution for you:
You use a specific accounting system or POS that only connects to Shopify
You use a third-party logistics company that only offers a Shopify integration
You have multiple locations you need to either ship or sell in person from
As you can see, the reasons to connect Shopify & Squarespace usually have to do with some sort of limitation of a third-party platform and have nothing to do with any perceived limitations to Squarespace’s commerce abilities. It’s also worth noting that Squarespace has accounting, POS, and 3PL options as well so before trying to force a Squarespace/Shopify integration you may also want to just consider other third-party software that plays nice with your website platform of choice instead of the other way around.
Ok. Now that I’ve sufficiently tried to talk you out of this, here’s how to do it! 😂
About the Shopify Buy Button

The trick to connecting a Shopify shop to a Squarespace website is the Shopify Buy Button. It allows you to basically embed your Shopify shop on any Squarespace page using a small bit of code. You have the option to embed just one product or show entire collections.
The Cost
In order to score Shopify Buy Button capabilities, you’ll need to spring for the Shopify Starter plan which is $5/month. (Side note: since you won’t be needing all the commerce features on the Squarespace side of things you can probably get by with the Business plan there.)
Limitations
Important things to note if you’re considering this duo as an option:
You cannot use any apps from the Shopify app store in conjunction with the Buy Button so if one of the reasons why you were eyeing Shopify was to expand your Squarespace commerce capabilities via a third-party app or extension then this will not work for you.
Although you can provide checkout links via social media with the Buy Button and also add Facebook Messenger as a sales channel, this isn’t the same as having a fully shoppable social media or Instagram like is offered on a full Shopify plan.
How to Get Started

Adding the Buy Button Sales Channel and Creating a Buy Button in the Shopify Admin
If you’d like to give the Squarespace + Shopify combo a try and have your site ready to go on Squarespace, here’s an overview of all the steps at a high level:
Start on Shopify by signing up for a free trial here. You’ll then need to subscribe to the Shopify Starter plan as directed (don’t worry you won’t be charged until after your free trial ends).
Add your products to Shopify (Products > Add Product)
Enable the Buy Button sales channel and then follow the steps to create and style your Buy Button code
Copy the Buy Button embed code provided on Shopify anywhere on Squarespace using a Code Block!
2 Ways to Embed Your Shopify Code Into Squarespace
There are two ways to go about embedding things from Shopify and which one you choose will determine how you treat inventory on your Squarespace site:
Embed entire collections (Collection Buy Button) - You can embed entire collections onto Squarespace in one fell swoop. This tends to work best if you have a large shop because it automatically includes all products and all variants of those products.
Embed individual products (Product Buy Button) - Alternatively, you can generate embed codes for individual Shopify products one at a time. With a Product Buy Button, you are given the option of including all product variants or selecting just the product variant(s) you want to include.
Styling Shopify Buy Buttons to Match Your Squarespace site
Before generating your Shopify embed code, you are given options to customize how it will look and how it behaves on Squarespace. You can control:
Button Color
Button Size
Button Font
What happens when the button is clicked & whether it opens in a new browser window or not.
It’s important to customize the button to match the style and look of your Squarespace as closely as possible to create a seamless experience for your customers. You can preview and test how your Buy Button will look by clicking preview. Note that once your code is embedded, you cannot make changes to how it looks or acts so if you make changes you’ll need to start over to create a new button and then replace the old embed code on Squarespace with the new one.
Layout Options
There are three layout options you can select from for your Buy Button. The difference between them basically boils down to how much information is included with the embed:
Basic Layout - the embed code will just create a button for the product you choose. There won’t be an image included. This is useful if you have product images on Squarespace and then just want to put “Add to Cart” buttons below each of them to make them shoppable.
Classic Layout - this will generate an embed code that includes a product image and price next to a Buy Button. Since this doesn’t include any product details, it would probably only be useful for embedding on pages where you want to offer a quick overview of a product instead of a more complete shop page. (Just like Squarespace’s Product Block.)
Full View Layout - this will create a layout that most closely emulates a full product details page. It includes the product image, price, and description in addition to the Add to Cart button.
Bottom Line
For most sellers, there’s no need to try to connect Shopify and Squarespace. You should be looking instead at choosing which platform is best for you and going all-in on it. But for some specific use cases, the Shopify Buy Button is a great way to have a great-looking Squarespace website powered by a Shopify back end for commerce.

Squarespace Store Management: Streamline Your Online Shop
Save hours of headaches by streamlining order fulfillment, inventory, taxes and more using Squarespace as your all-in-one CRM. I'll help you master the backend to efficiently manage orders, track customer details, and simplify eCommerce operations!
Save hours of headaches by streamlining order fulfillment, inventory, taxes and more using Squarespace as your all-in-one CRM. I'll help you master the backend to efficiently manage orders, track customer details, and simplify eCommerce operations!
My Take on Squarespace Store Management
Streamlining ecommerce store management doesn’t have to be a headache, even as your orders, inventory and customers grow. The key is leveraging tools that simplify operations in one centralized place.
Enter Squarespace, your website host + an all-in-one CRM with features tailored specifically for selling online. Whether you need to wrangle inventory counts, manage fulfillment or get insight into your customers, Squarespace equips you to handle it without costly or complex add-ons.
Here are some other things you can do to help make store management on Squarespace a breeze:
Set up custom product categories and tags to make inventory easy to filter and find. Strategically organizing items helps shoppers discover products faster.
Enable product add-ons like gift wrapping to boost order value. Used strategically, this Squarespace feature can help you increase profit per sale without doing any sleazy selling.
Use CSV files to bulk upload inventory or edit products saving hours of manual data entry time. A few tweaks in a spreadsheet lets changes ripple across your catalog instantly. Magic.
Integrate a return management platform like Aftership for smooth returns keeping customers happy. Automation and tracking removes headaches for merchants.
Create automatic post-purchase and shipping emails to delight customers. Personalized messaging post-sale improves perception of your brand.
Configure customer profiles and purchase history for personalized communication at scale. Data and insights on buyers allows tailored customer service.
Implement TaxJar to automatically calculate sales tax by location, taking the guesswork out of all the insane tax rules. Accurate totals at checkout build trust (and keep you out of trouble with the IRS)!
Take advantage of built-in functionality for discounts and promotions letting you easily highlight deals. Special offers encourage purchasing urgency.
By mastering Squarespace’s built-in capabilities, you can save hours a week previously lost in spreadsheets, notes and manual processes. Operations become streamlined. Tax and accounting simplify. And you gain time to focus on growing the business.
The result is the ultimate merchant toolbox allowing even the smallest of teams to nimbly manage big businesses. Let me show you how with tailored guidance on the settings and workflows that alleviate ecommerce headaches at scale.
How's this? I aimed to highlight more specific features including your recommendations on add-ons and apps. Let me know if you'd like me to elaborate on any aspect more to turn this into a true standalone guide.
Blog Posts about Squarespace Store Management
Videos about Squarespace Store Management
Common Squarespace Store Management FAQs
-
The secret here is to use Squarespace categories and, to a lesser extent, tags. By grouping products together in categories, you can provide a logical way for customers to discover your products and find what they’re looking for faster. Think of categories as the departments of a department store (men, women, shoes, jewelry, etc.) or aisles of a grocery store (produce, canned goods, dairy, freezer, etc.).
If you have a lot of products, it’s also really helpful to create nested categories. This allows people to drill into a broad category and see a filtered view of products in a subcategory. If you’re using our grocery store example, above, you might have a main category called “Produce” and subcategories underneath that for vegetables, fruits, etc. On Squarespace, you can have up to three levels of shop navigation in total.
Tags are also helpful for grouping things that appear in different categories so think of things like tagging by season, collection, vendor, color, fabric type or other attributes that might be meaningful to your customers and relevant to your products.
Strategic organization empowers you to efficiently locate, update or showcase segments of inventory as needed, especially as your store’s offerings grow. Learn more about categories & tags in this post.
-
Built-in Squarespace functionality allows you to configure flat rate or weight-based shipping rates, present accurate pricing in cart, automatically print shipping labels, and send delivery confirmations and tracking info to customers. Extensions like EasyShip or ShipStation then provide additional optimizations like rate shopping across carriers, batch label printing, custom pack station integration and more.
Shipping can get pretty complex which is why I recommend a super simple shipping strategy that’s also very highly converting. One of the biggest questions I’m often asked is whether it’s worth it to offer free shipping? The answer is an unequivocal yes! Here’s why:
Free shipping is super simple for buyers to understand ✅
Free shipping has become an expectation for many shoppers ✅
Free shipping can reduce cart abandonment rates ✅
Free shipping can increase conversion rates ✅
Free shipping can reduce customer service costs for returns (if things ship for free there’s no reimbursement of shipping costs) ✅
Squarespace makes it easy to set up a profitable shipping strategy, especially when paired with a shipping extension. For more on how those work, check out this post!
-
Adding some strategic discounts into the mix can be a great way to drive sales and delight customers. But before dreaming up any promos, decide if deals jive with your brand vibe, as I break down in this post.
Assuming discounts get the green light, Squarespace makes it easy to set them up. You can offer percentage off or dollar amount discounts that are applied automatically or via custom coupon codes. You can even have codes and discounts targeting all orders, only specific products or even specific categories. You can get all the specifics in my discount rules post.
The one thing to remember when constructing your coupon lineup is that simplicity rules. You can spotlight free shipping, limit usage, set expirations and automate applications to reduce friction. You can time launches around occasions like new product releases or changing seasons to leverage buzz.
But avoid overdoing it. You don’t want to risk training buyers to only purchase when discounted, especially if you have a luxury or more exclusive brand. Consider separate sales sections or showing offers only once abandoned.
Sending targeted emails to specific customer segments as opposed to publishing codes publicly can create a sense of exclusivity and also help you grow your email list! For more on strategizing sales, check out this post. With the right blend of discounts and timing, you can bake up some serious sales success!
-
Squarespace offers robust tools for tracking customer details and site analytics right within your backend, eliminating the need for a separate CRM system. Take advantage of:
Automatic customer profiles that compile key metrics like lifetime spend, order history, and communication records into easy-to-access individual overviews as covered here.
Custom tags to manually indicate preferences, history and other traits to enable personalized communication at scale.
Saved customer segments based on criteria like first-time buyer status or product interest so you can target relevant offers.
Integrated analytics dashboards visualize macro trends related to traffic sources, audience demographics, popular products, sales velocities and more as outlined here.
Exportable reports help uncover granular insights that inform marketing campaigns, inventory decisions and new product development.
By centralizing audience data and past interactions within Squarespace’s elegant interface, you gain an invaluable merchant toolbox. No need for complex software when the insights required are already at your fingertips! For even more on Squarespace analytics check out this post!
Top 3 Squarespace Store Management Resources

Aftership Returns
Discerning customers know to look for a generous return policy (and easy returns process!) before making a purchase so implementing a program such as Aftership Returns is as much about landing the sale as it is managing returns. But, hey, it’s a win-win.

Squarespace App
Manage your store on the go with Squarespace’s free app! Available for Android or iOS, the Squarespace app allows you to manage & fulfill orders, make quick website edits, accept in-person payments and even act as your POS system.

ConvertKit
Following up with customers is super easy thanks to ConvertKit’s built-in Squarespace integration. If there’s one tool that you add-on to extend Squarespace’s built-in capabilities I would say it’s this one. (Check out this post about for more on this perfect power couple.)

Top 5 Squarespace Shop Mistakes & How to Fix Them
Squarespace makes opening an online store smooth but scaling operations takes strategy. This post reveals the top 5 store management mistakes that may be hurting your growth and actionable ways to get back on track.
Listen, I get it. Setting up an online store via Squarespace offers a ton of out-of-the-box simplicity compared to tackling site design and a pile of code, and the beautiful templates and intuitive CMS make opening up shop online a breeze.
But don’t let that ease fool you - scaling eCommerce operations into a high-performing machine still takes savvy strategy. Without thoughtful setup and smart management choices, what seems straightforward can quickly snowball into an overwhelming headache.
Over my years building websites and consulting for scaling entrepreneurs looking to unlock growth through eCommerce, I’ve seen merchants make some common Squarespace store management mistakes that shoot future success in the foot.
Lucky for you though, these pitfalls are avoidable if you know what to watch out for! In this post, we’ll review five frequent problem areas and - more importantly - how to course correct.
Mistake #1
Improper Inventory Tracking
Without careful record keeping, items get lost in distribution centers and warehouses faster than a banana bread disappears at a farmer’s market.
Problem: Failing to thoughtfully organize inventory into Squarespace’s categories, tags or other filters makes scaling untenable. Plus not actively monitoring stock levels and reordering timeframes means unpleasant sell outs and scrambling to restock hot items.
Outcome: You can’t find product inventory when needed for an order. Items sell out and diehard customers get turned away empty handed. Massive revenue opportunity cost.
Solution: First, logically segment your catalog with categories and nested subcategories so both you and shoppers can navigate quickly at scale. For example, categorize apparel by type (shirts, pants), further broken down by style (casual, dress), gender, brand, etc.
Monitor best selling items and set minimum stock alerts tied to reorder timeframes by leveraging Squarespace’s built-in analytics and integrating an inventory management extension. Data is your friend!
Mistake #2
Complicated Shipping Options
Free shipping or no free shipping? Zones or flat rates? Tiered pricing by item cost or calculated by carrier? Decisions, decisions.
Problem: It’s easy to get excited by Squarespace’s expansive built-in shipping functionality and go overboard configuring a confusing spider web of custom rates, surcharges, and limitations. But this complexity quickly becomes a barrier preventing checkout and you’ll start to see abandoned cart rates skyrocket.
Outcome: Customers bounce from cart when they can’t clearly understand shipping fees or find an option that seems reasonably priced. Plus you sink unnecessary hours fielding customer service inquiries trying to explain variances.
Solution: I cannot stress enough - simple is best! Studies show free shipping dramatically increases conversion. So make that your hero offer as much as possible by baking modest shipping costs into base prices.
For supplementary paid shipping, configure just 2-3 flat rate tiers based on cart value brackets like under $50, $50-$100, and over $100. Publish handling times by common carriers. Be transparent upfront to set expectations. (p.s. This is all great info for an FAQ page.)
Mistake #3
Discounts Devaluing Products
Everyone loves a deal, there’s no doubt about it. But the lure of juicing short-term sales through discounts often backfires over the long haul.
Problem: Rather than special limited-time or targeted offers, you fall into the trap of keeping items perpetually “on sale” through sitewide promo codes plastered on your site.
Outcome: Customers quickly become trained to only purchase when receiving a discount and abandon carts or hold off buying items at full retail value. Your products seem meaningless without deals.
Solution: Shift promotional focus from widespread price cuts to exclusivity. Highlight specialty collaborations driving scarcity. Use segmented emails with special subscriber sales. Offer new customer discounts but fade them over time through customer lifetime value marketing.
Sparingly advertise discounts around seasonal launches or holidays using banners - then quickly revert back to regular prices. You want to seem generous at times without eroding product value. (Check out this post for more pricing psychology tips.)
Mistake #4
Gaps in Inventory & Order Visibility
With countless product details and customer orders to track daily, it's easy for gaps in visibility to emerge if you’re not proactive.
Problem: Relying on manual spreadsheets and notes rather than a centralized system leads to order processing delays, inventory blindspots, lack of customer purchase history, and more.
Outcome: You oversell out-of-stock items, mishandle customer data, respond slowly to fulfill orders without a 360-degree view. And with no analytics insights, you miss sales trends.
Solution: Eliminate blindspots by centralizing critical info and workflows into Squarespace’s stock tracking, order management, and customer profiles. Standardize order processing procedures. Export analytics reports to make smart decisions based on data.
Staying on top of the details can help you know when to cut items from your inventory, understand which customers purchase most often and help you streamline your back office procedures. Start leveraging the platform tools available to you!
Mistake #5
Transactional vs. Personalized Customer Experience
In the early days of your business, my guess is that you were on a first name basis with every shopper. And while growth is good, it’s easy to forget how important personalization was in making it all happen.
Problem: Once you scaled, customers became faceless transactions rather than unique individuals with preferences and a previous purchase history with your brand.
Outcome: Failure to make shoppers feel special can send them elsewhere to shop, which also means you miss out on referrals and community enthusiasm from loyal brand advocates.
Solution: Tap back into the CRM power built right into Squarespace like saved customer profiles and order data. Segment users by lifetime value bands so your VIP shoppers feel appreciated through special treatment and exclusive offers.
Send post-purchase surveys to identify pain points requiring attention across the buying journey. Personally respond to negative reviews. Have loyalty or affiliate programs that foster community among top fans.
Remember - personalized customer experiences drive measurable revenue gains, increased retention, valuable insights, and free word-of-mouth promotion! Don’t leave that money on the table.
Bottom Line
While it's easy to fall into these common eCommerce pitfalls, the good news is that they are all avoidable with a bit of diligent preparation and process focus upfront. Leverage the tools already available in your Squarespace platform and think proactively. Carefully organize behind-the-scenes workflows just as thoughtfully as you design the customer-facing storefront. Monitor key metrics. Continuously gather feedback. And never lose sight of the individual people who make this business possible - your customers!
By taking the time to purposefully streamline operations and experiences, you equip your brand for scalable, sustainable growth. So be confident in your path forward, learn from mistakes, and continue delighting shoppers - that's the recipe for long-term eCommerce success.

How to Use Product Categories & Tags in Squarespace
In this post, we’ll discover the difference between a category & a tag (hint: they aren’t the same!), how to incorporate them into your site’s navigation and how to create shop subcategories on Squarespace. Plus, I’ll share 4 of my favorite ways to use categories and tags that you may not have thought of yet!
Updated November 2023
Product categories and tags sometimes get relegated to the “I’ll take care of that later” pile for busy eCommerce sellers. But I say put this off at your own peril because categories and tags are AWESOME. Not only can they help people quickly and easily find things, they also have SEO-boosting secret powers! It’s definitely worth it to think strategically about how you can use product categories and tags on Squarespace to help your customers or clients find what you’re selling, discover new things and understand what you’re all about at a quick glance. In this post, we’ll discover the difference between a category & a tag (hint: they aren’t the same!), how to incorporate them into your site’s navigation and how to create shop subcategories on Squarespace. Plus, I’ll share 4 of my favorite ways to use categories and tags that you may not have thought of yet! Let’s get started!
What’s the difference between a category & a tag?
Great question. At first glance, there doesn’t seem to be any difference between these two different classifications. However, these should not be used interchangeably and you definitely want to plan out how you’ll use them before you just go willy nilly tagging products with all sorts of crazy things.
I always use the example of a t-shirt shop because it’s pretty easy to understand but you don’t have to sell physical products to use categories or tags! So, pretend we have a t-shirt shop and we want people to be able to find what they are looking for quickly. Think of categories as the “departments” of a department store. They are what organizes what you offer by subject or category. Smart categories might be :
Men’s
Women's
Kids
Tags, on the other hand, are descriptions of products in each of those categories. So, in the example of our t-shirt shop, some helpful tags might be:
Colors (red, blue, yellow, etc.)
Brand (Hanes, Bella/Canvas, Under Armour, etc.)
Material (Cotton, Polyester, Triblend, etc.)
Another way to think about the difference between categories & tags is that most products/services will fall into only one category but may have several different tags. So a blue, cotton, Hanes youth tee is going to be in just the “Kids” category but then be tagged blue + cotton + Hanes.
Categories are great for SEO
I wasn’t lying when I said that categories have SEO-boosting secret powers! Why? Because categories and tags are considered “metadata” and it’s little language snippets like these that search engines like Google can pick up on to help decipher what you’re all about. Turns out it doesn’t take a ton of artificial intelligence to figure out that if my store’s categories are:
Haircuts
Color
Blowouts
Styling
… that I’m probably operating a salon.
Video: More on categories & tags, when to use them, and why they matter
During a live November 2023 webinar with Squarespace called Five eCommerce Tips, a viewer asked a great question about categories & tags! Check out my answer for more about how to use categories & tags on Squarespace:

Incorporating Categories Into Your Site’s Navigation
Here’s the other awesome thing about product categories on Squarespace: every category is automatically added to the navigation area of your shop. Magic. But, also: dangerous. This is why it’s so, so, so important to make sure that you have a plan in place for your categories. You don’t want your navigation to be too long or cluttered.
It’s also important to note that categories and tags are case sensitive so if you create categories named: Womens, womens and WOMENS you’ll end up with THREE navigation links in your shop with all essentially the same name but none of the same products. Messy!
Another way to use category or tag landing pages in your site’s navigation is to use them to create drop-down navigation menus. This allows you to create another layer of organization.
Creating Nested Categories
Creating multiple levels of shop navigation is like making sure your department store is organized logically into different departments, each with its own little “sub-departments” within them. This makes it easy for people to find what they are looking for quickly, which can reduce frustration and lead to higher conversion rates.
Let’s consider an expanded example from our simple t-shirt shop and pretend we have a full-fledged department store. It would make sense that the navigation would need to visually allow us to “nest” categories within each other. So instead of just lumping everything together in one category called “Women’s” you can instead make subcategories like this:
Women’s
Tops
Tees
Hoodies
Bottoms
Denim
Joggers
Accessories
Sunglasses
Bags
* Note that if you want to create nested subcategories like above that you can add up to three levels max. This means you can have Main Category > Subcategory > Subcategory like in the example above. You would not be able to break the Denim category into more subcategories. If you wanted to do something like that, I would recommend just moving the category up the food chain. If you have enough products that you need more than two subcategories beneath it, that probably means it’s important enough to be the main category all by itself.

Look how fast we can find exactly what we’re looking for!
Other Ways To Use Categories & Tags on Squarespace
Link to filtered collections - Another benefit of creating categories and subcategories is that doing so creates individual page path URLs for each category, optimized for SEO and allowing categories to act as standalone pages. This means that if you are running an ad or a promo for all blue shoes, you can link people right to the filtered subcategory: Shoes > Blue. 🤯 For more on this, check out this Squarespace help article.
Make summary blocks smarter - This is one of my absolute favorite things about Squarespace summary blocks! I almost always add one to a home page design as a way to feature selected categories of products… or to feature “featured” products! Doing this is simple by just clicking on the content tab of your summary block settings and then choosing “Filter Items” to have that block only show what you want it to.
Influence what related products are displayed - I recommend everyone turn on the Related Products feature in their commerce settings because why not?? This is such an amazing built-in Squarespace selling tool that I think gets underutilized by most new sellers. Not only does it help keep people on your site longer by showing them more to look at it, but it can also actually show them more of what they WANT to look at. By default, products that share the same first category are shown in the related products section. If your product happens to not have a category, then matches using the first tag will be shown. If you’re into related products, you might also like this post: How to Upsell & Cross-Sell on Your Online Store.
Display more accurate search results - Adding search blocks or using your store’s built-in search page are other ways to help customers find what they are looking for. And, you guessed it, adding categories to your products helps here too! This is because both categories and tags are indexed for search results in addition to being indexed by major search engines such as Google.
Who should be using categories & tags?
I think everyone could benefit from using categories and tags, if only for their aforementioned SEO benefits! From a size standpoint, you probably don’t need to worry about people not finding what they’re looking for if you only sell one signature service or only a handful of products. But even if you have a small shop with just a dozen or so products or services, why not add that layer of categorization to help people be able to decide what is best for them? For example, if you’re an interior designer and offer multiple virtual design sessions you could categorize them by investment level:
$
$$
$$$
This would help people self-sort and see just the services that they can afford. When you start to think about tags & categories as strategic tools to help visitors find what they need on their own, all sorts of doors start to open up! Done right, taking advantage of this simple feature can boost your SEO, help reduce visitor frustration and increase sales. Thinking about what you sell in terms of categories (and tags, to a lesser extent) can help you create ways for customers to easily discover more and help you create a more dynamic eCommerce website.

How to Set Up Product Add-Ons on Squarespace
Learn how to set up add-on products in your Squarespace shop to offer complementary items and increase your average cart value. Follow a step-by-step guide to enable the add-on feature and link add-on products to your main shop. Boost your sales and enhance your customers' shopping experience!
UPDATED 11/29/23
Watch The Videos
Read The Steps
I have a cool update from Squarespace to share with you that can make your Squarespace shop even better. In this blog post, I'll show you step-by-step how to set up add-on products in your Squarespace shop. It's a great way to offer complementary items to your customers and increase your average cart value. So let's dive in!
First things first, log in to your Squarespace account and go to your shop dashboard. Once you're there, follow these simple steps:
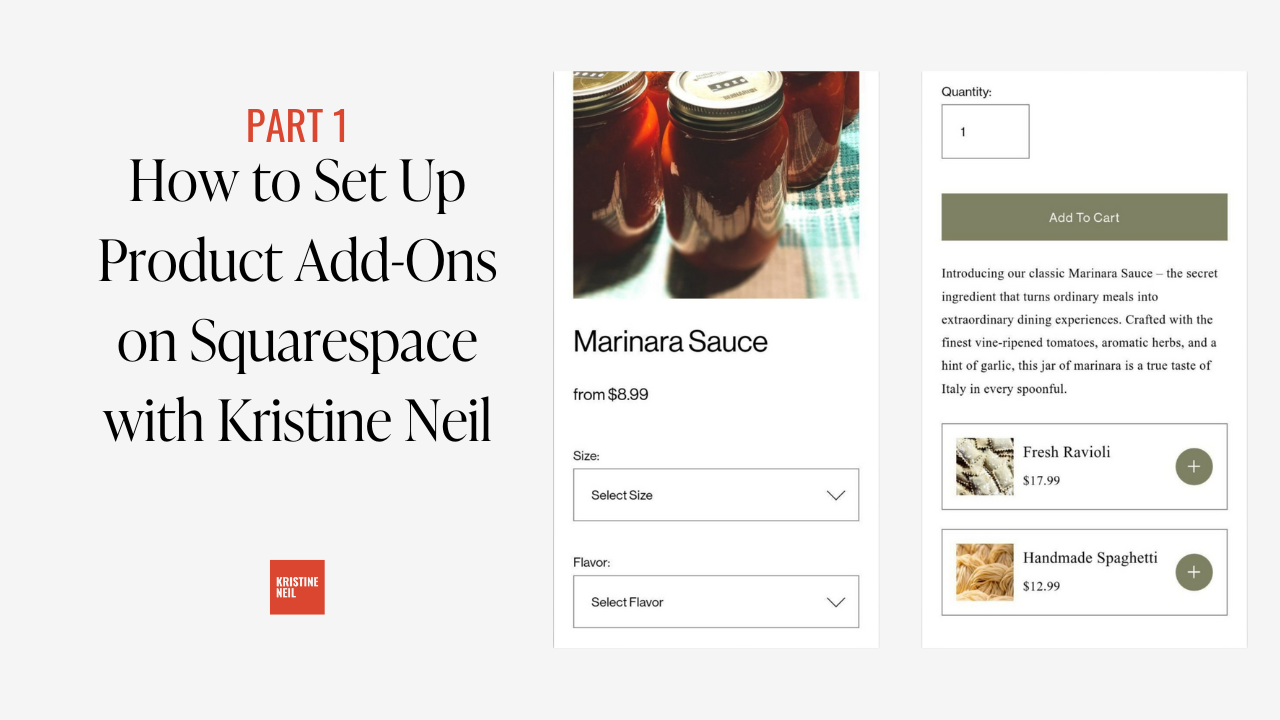
Choose the product you want to add an add-on to: Let's say you're selling a delicious marinara sauce. To set up an add-on product, go to the product page and click on "Edit Product".
Scroll down to the "Selling Tools" section: You'll find it by scrolling down the page or clicking on "Settings" and then "Selling Tools".
Enable the add-on feature: Squarespace has made it super easy for you to include a product add-on on your product page. Look for the option that says "Product Add-On" and click on it.
Add the add-on product: You can add up to two four products as add-ons. Keep in mind that the add-on products need to be physical, service, or digital products. They can't be subscription-based, and they can have up to one product variation. In our example, let's add some fresh ravioli as an add-on to the marinara sauce.
Save and publish: Once you've added the add-on product, click on "Save" and let Squarespace do its magic. Now, when your customers visit the marinara sauce product page, they'll have the option to add the fresh ravioli as well.
Repeat the process for other products: If you have another product, like pesto sauce, that you want to offer add-ons for, simply go to the product page, click on "Edit Product", and follow the same steps to set up the add-on.
Remember, if a product has multiple variations such as both size and flavor, like our marinara sauce, that product can’t be set up as an add-on to any other product. However, if a product such as the parmesan which only has one product variation (size) or no product variations (ravioli) that can be set up as an add-on to another product.
But what if you want to offer an add-on that is not available in your main shop? No worries! Squarespace has a solution for that too. Here's what you can do:
Create a new store: In your shop dashboard, click on the plus icon and select "Store". Instead of adding a new category in your existing shop, create a new store.
Add the add-on product: Let's say you want to offer handmade spaghetti as an add-on. Fill in the necessary details like title, description, image, and price. Don't worry, this new store won't be visible to your customers.
Link the add-on to your main shop: Go back to your main shop, choose the product you want to add the add-on to, and follow the same steps as before. This time, you'll find your handmade spaghetti available as an add-on.
And that's it! With Squarespace's new add-on feature, you can easily set up add-on products in your Squarespace shop. It's a fantastic way to offer complementary items and enhance your customers' shopping experience.
I hope this step-by-step guide has been helpful to you as a small business owner running your eCommerce business on Squarespace. Give it a try and see how it can boost your sales. Happy selling!

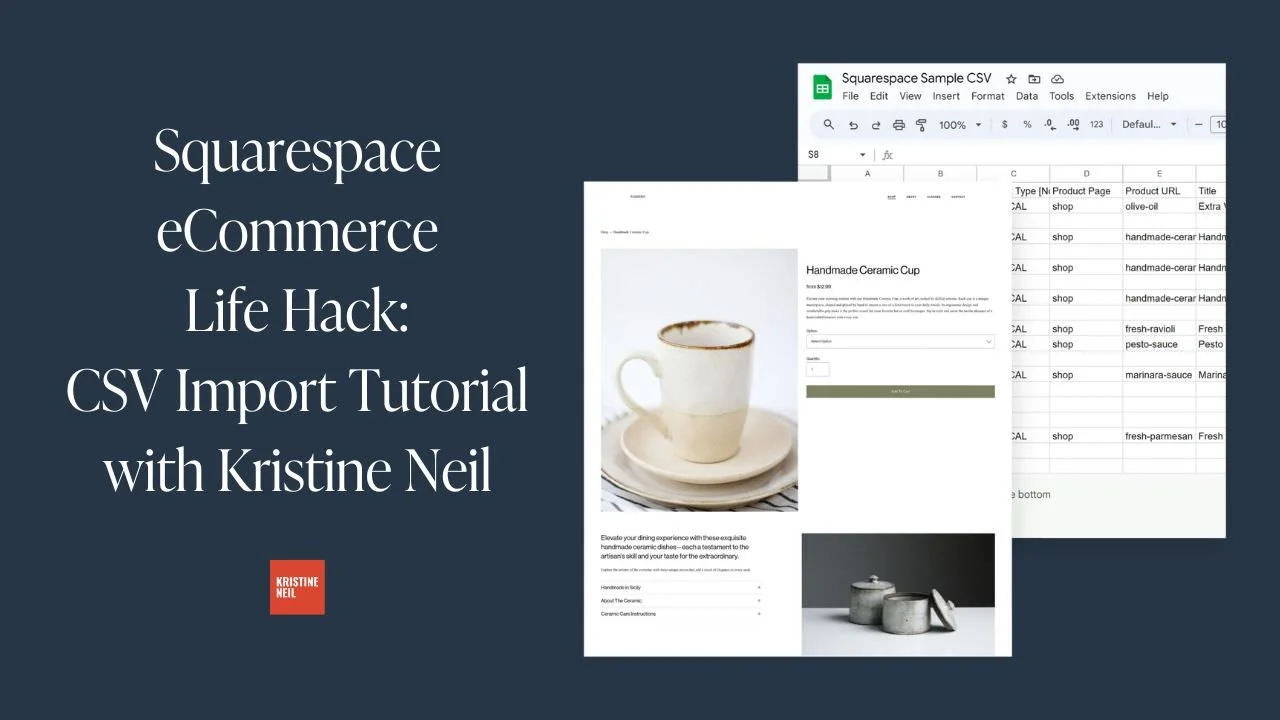
Squarespace eCommerce Life Hack: CSV Import Tutorial
Check out my latest YouTube video all about how I use CSV files to make uploading and managing inventory on Squarespace eCommerce websites fast and easy!
Updated May 2025
If you’re tired of manually adding products one by one to your Squarespace shop, this is the video you’ve been waiting for. I’m walking you through the process of using CSV imports to bulk upload products and save yourself a ton of time (and headaches).
In this step-by-step tutorial, I show you how to customize Squarespace’s CSV template, add all your product details in one place, and import them into your store with just a few clicks. Whether you’re setting up a brand new shop or doing a seasonal update with a bunch of new products, CSV imports can seriously streamline your workflow.
This tip came straight from audience questions after my presentation at Squarespace Circle Day in August 2023. So many of you wanted to know: “How do I efficiently manage larger inventories on Squarespace?” This is how.
It might seem a little intimidating if you’re not a “spreadsheet person,” but I promise it’s doable — and honestly kind of satisfying once you get the hang of it. Plus, this method helps reduce errors compared to adding items manually (been there, made that typo).
If you’re a fellow Squarespace web designer, this is also a great trick to have in your toolbox when working with client shops. It’s faster, more scalable, and gives you a solid process for handling larger product catalogs.
👉 Ready to learn? Watch the full tutorial below and follow along.
Got questions about using CSV files in Squarespace? Or maybe you’ve got your own tips for managing eCommerce shops more efficiently? I’d love to hear your thoughts — drop a comment on the YouTube video and let’s chat.

Maximizing Your Squarespace Site with Extensions, Plugins, and Code Snippets: A Comprehensive Guide
Maximize your Squarespace site with this guide to extensions, plugins, code snippets, and apps. Learn the differences between these tools and discover every Squarespace extension available, along with trusted plugin and code resources.
If you're using Squarespace to create your website, you're probably aware that extensions, plugins, code snippets, and apps can help you do so much more with your site. But, do you know the differences between them and how to use them effectively?
In this post, I’ll go over everything you need to know about Squarespace extensions, plugins, code snippets, and apps. I'll explain the differences between them and provide useful tips for using them in the most effective way possible.
I'll also give you a rundown of every single Squarespace extension currently available. That's right, every.single.one! We’re talking extensions for shipping and fulfillment, finance, inventory and products, sales and marketing, and more. You'll get a comprehensive list of all the add-ons that integrate seamlessly with Squarespace, and to help you get to the bottom of things quickly I'll even highlight my favorite ones.
And, since I know that finding the right plugin or code snippet can be a daunting task, I’ve got some trusted plugin and code resources to check out. Whether you're a beginner or an experienced Squarespace user, you'll find something useful in this post.
So, if you're ready to take your Squarespace site to the next level, keep reading! I'll help you make the most of Squarespace extensions, plugins, code snippets, and apps.
Extensions, Plugins, Code Snippets, Apps - what’s the difference?
Plugins can be anything from short code snippets to more complex code solutions. Most Squarespace plugins allow you to change the look of something on your site with CSS or to do something that isn’t necessarily possible by Squarespace right out of the box using JavaScript. These are all written and created by third-party developers outside of Squarespace.
Extensions are third-party apps or programs to help you manage, optimize, and expand your site’s functionality or help you in some tangentially related aspect of business (such as with accounting, taxes or shipping). Think of these as “official” Squarespace plugins or Squarespace apps if Squarespace had an app store.
3 Squarespace Code & Plugin Tips
Less is More - I usually advise that extra code and plugins are added sparingly. Consider these the “accessories” to a really great outfit instead of the main show. You’re always best off doing as much as possible sans code (and that’s actually quite a lot, thanks to Squarespace 7.1’s Fluid Engine!) and then peppering in a few impactful code tweaks just to personalize things a touch. This not only makes it a lot easier (less custom code to sort through!) but can also help ensure that your site loads quickly which is great for SEO.
Know Your Platform - There’s a lot of legacy code floating around out there for Squarespace 7.0 but all new sites are built on Squarespace 7.1 and the code is often not applicable to both platforms! A good code developer will make sure to indicate which platforms (or themes for 7.0 sites) their code works on but if you find something out there that’s not working the first thing I would check is that you’ve found code that applies to the platform you’re currently on.
Test Thoroughly - It’s easy on Squarespace to add in some code and just walk away but you always want to be sure to to test that things are working as expected when you’re not in edit mode. View your site in an incognito window and on different screen sizes. Does everything look and act as it should? Is your code having any unintended impact on other areas of your site? Even well-written code snippets and plugins can have some negative interactions with other customizations you may have added so test, test and test again just to be on the safe side.
What doesn’t require an extension on Squarespace?
There are so many different things that don’t require any additional add-ons or extras on Squarespace that I think they’re worth mentioning! These are all things that often require extra third-party apps or add-ons on other platforms but that are just built right in on Squarespace.
Social Media - Facebook, Instagram, LinkedIn, Pinterest
Content - YouTube, Vimeo, Spotify, SoundCloud
Payments - Stripe, PayPal, Apple Pay, Afterpay
Shipping - USPS, FedEx, UPS
Files - Google Sheets, Dropbox
Google Things - Google Search Console, Google Analytics
To connect any of the things above, you can do so right from within Squarespace!
A Brief Rundown of Every Single Squarespace Extension Currently Available
As mentioned above, consider this list of Squarespace Extensions like the “Squarespace App Store.” All of these add-ons integrate seamlessly with Squarespace - they have the official Squarespace stamp of approval! (p.s. This is a looooong list so I’ve highlighted my faves 😉)
Shipping & Fulfillment
Aftership - Boost sales with branded tracking pages, proactive notifications, and actionable shipping insights (Related post: How to Send Delivery Confirmation Messages with Squarespace)
Easyship - Save up to 91% on shipping across 550+ courier services & boost global revenue growth 56% with this feature-rich platform (Related post: How To Set Up a Profitable Shipping Strategy on Squarespace)
Order Desk - Order management app that helps you automate your order fulfillment process
Returns Center by Aftership - Frictionless self-service returns management portal to give smooth returns experiences (Related post: How to Manage eCommerce Returns on Your Small Business Website)
ShipBob - Simple, fast, affordable two-day fulfillment from a global fulfillment network
Shippo - Save time and money on shipping
ShipStation - Import, organize, and ship orders from over 180 channels, carriers, and fulfillment providers
Finance
Avalara - Create ready-to-file sales tax returns
Dext - Simplify, standardize and streamline your digital sales accounting with Dext Commerce (formerly Greenback)
FreshBooks - Generate reports and automatically sync clients, items, and orders from all your sales channels
MYOB - Automate the flow of your Squarespace sales, payment and tax information into your MYOB file through a daily sync.
Quickbooks Online - Connect Squarespace to QuickBooks Online to automate accounting of your sales data
TaxJar - Automated sales tax calculations, reporting, and filing (Related post: The Definitive Guide to Squarespace Sales Tax)
Xero - Automate the flow of your Squarespace sales, payment and tax information into your Xero file through a daily sync.
Inventory & Products
Art of Where - Design your custom printed products made on-demand. Leggings, silk scarves, t-shirts, handbags, notebooks & more
Candid Wholesale - A better way to buy, sell, and pay for wholesale (Related post: How to Set up a Wholesale Shop on Squarespace)
Printful - Print on demand for your Squarespace site powered by Printful (Related post: 3 Ways to Crush This Holiday Selling Season with Your Squarespace eCommerce Website)
inFlow Cloud - A complete inventory management system (Related post: A Minimalist’s Guide to Squarespace Inventory & Product Extensions)
LitCommerce - Enable Multichannel Selling: Bulk List Products & Sync Orders with the top-global marketplaces such as Amazon, eBay, Etsy, Walmart, TikTok Shop, etc.
Printify - Create, sell, and ship custom products anywhere in the world (Related post: Creating a Custom Print-on-Demand Store with Squarespace)
Printique - Professional photo lab delivering high quality fine art prints, frames, canvas, acrylic, and metal
Soona - Meet Soona. The virtual content studio for e-commerce product photography and video. Over 15k brands love Soona. Only pay for the content you love. $39/photo and $93/video. (Related post: 6 Simple Tips for eCommerce Photography that Converts)
Spocket - Add dropshipping products from US & EU suppliers directly to your store
SPOD - Design & sell custom products
Syncee - Find products for your dropshipping business
Trunk - Multi-channel real-time stock syncing and bundling (Related post: How to Sell Bundles & Kits on Squarespace)
Sales & Marketing
Channable - Empowering your eCommerce growth
Delighted - Automate post-purchase customer feedback surveys
EZ Texting - Send Smarter text promotions and automated SMS campaigns to your customers
GoDataFeed - Transform static product catalogs into dynamic product feeds for hundreds of channels like Google, Facebook, and Amazon
Judge.me - Product reviews with free photos & videos for social proof
LiveChat - Delight your customers and fuel your sales with a complete customer service platform (Related post: How to Add LiveChat to Squarespace)
MailChimp for Commerce - Drive traffic and sales with personalized marketing
Outfy - Create stunning social media graphics and automate social media posts
Progressier - Transform your Squarespace site into a mobile app and deliver push notifications
Sprout - Use Sprout to easily plant trees, become more sustainable, and reach eco-conscious customers.
Weglot Translate - Translate your website into multiple languages
Want to connect something not on the list above? Don’t worry - it’s probably still possible through the use of the Squarespace Commerce API + Zapier!
My Most Trusted Plugin & Code Resources
Will Myers’ Curious Coder Membership - If you’d like to learn a little behind how code works (or even how to write some yourself), I highly recommend Will’s Curious Code Membership! There are some code snippets you can just copy and paste which is nice when you’re in a hurry to just solve a problem but the real magic is in Will’s super easy-to-understand videos where he explains how and why things work the way they do.
Inside The Square - Becca’s YouTube is filled with answers to all of your most frequently asked Squarespace code questions and she always keeps it fun and high energy.
Chris Schwartz-Edmisten - Chris has a really great way of explaining things that I also really enjoy.
Beatriz Caraballo - Beatriz has a ton of great code resources, especially if you’re a fellow Squarespace web designer.
Ghost Plugins - My favorite all-around source for plugins is Ghost because I trust that they’ll all work well and they’re curated and sourced from the best Squarespace pros around (including yours truly).
For specific plugins that I use & recommend, check out one of these round-up posts:
Bottom Line
You now know all the basic ins and outs on Squarespace extensions, plugins, code snippets, and apps! With this knowledge, you can now explore the vast world of Squarespace customization and know when and how you can get the most out of your Squarespace website. By experimenting with different plugins, code snippets, and apps, you can add exciting new features and functionalities to your site and make it even more effective and impressive. Whether you want to optimize your site for search engines, enhance its performance, or simply make it look more beautiful, Squarespace has everything you need to achieve your goals. So go ahead and try new things and experiment with different tools and techniques. With Squarespace, the sky's the limit!

Squarespace Holiday Selling Guide: Boost Your eCommerce Success
Are you ready for the 2023 holiday selling season? Discover 10 essential tips and strategies to maximize your eCommerce success on Squarespace. From chat widgets to free shipping and personalized checkout forms, my comprehensive guide will help you navigate the holiday rush and boost your sales.
Are you ready for the 2023 holiday selling season? The holiday shopping season provides a huge opportunity to bring in business from new and returning customers, and it's the most wonderful time of the year to spread some holiday cheer while boosting your sales. There’s a reason it’s called Black Friday, after all!
We all know that Black Friday and Cyber Monday are known for incredible deals and major discounts, setting the stage for a frenzy of shopping both in real life and online. The weeks between Thanksgiving and New Year's Day are the most hectic time of the year for brick-and-mortar retailers in the U.S., but eCommerce sellers tend to have a much longer crazy period. (In 2022, Black Friday generated a record-breaking $10.8 billion in online sales, making it the largest online spending day in U.S. history. Not to be outdone, Cyber Monday recorded a staggering $11.0 billion in online sales, surpassing Black Friday as the top online spending day ever.) What’s important to note is that the holiday season has expanded way beyond the traditional Thanksgiving weekend, encompassing the entire period from late November to early January. Shoppers now spread their purchases across several weeks and months, making it crucial for businesses to maintain consistent marketing efforts and be at the top of their games throughout the entire season.
To get ahead of this months-long holiday rush, here are my top 10 tips to get your brand ready for the season:
1. Have a Clear Return Policy (& Offer Free Returns)
One of the best eCommerce tips I can offer is to have a clear return policy and offer free returns. This will increase online sales, build trust with customers, and reduce abandonment rates. Customers may feel hesitant to make a purchase if they think they won't be able to return it if it's not what they expected. In fact, I've personally decided not to shop with companies that don't offer returns or exchanges. This time of year is a great opportunity to make sure your return policy is clear and easy to use. You don't want to be the scrooge that ruins a great experience with your stingy policies! For more information on setting up a self-serve returns portal, check out this post!
2. Offer Free Shipping
It's no secret that customers love free shipping, especially during the holiday season. This is why it’s a cornerstone of my most recommended shipping strategy! Even if you don’t do it the rest of the year (even though you should) offering free shipping as a way to incentivize shoppers to make a purchase is a great idea during the holidays. You can choose to provide free shipping on orders over a specific amount or for a limited time. This strategy not only encourages customers to buy but also eliminates any hesitation they may have due to additional shipping costs. Spread the holiday cheer by offering free shipping!
3. Turn on Afterpay
Many people prefer to spread out their purchases over time without relying on credit cards. It's similar to how your grandma might have put something on layaway at Kmart in the summer and paid it off over several months just in time for Christmas. However, with Afterpay, customers receive their order right away and pay Afterpay back over time. (Don't worry, you still receive 100% payment up front!) To learn more about how Afterpay works and how to enable it on your shop, check out this post.
4. Add Gift Cards
Gift cards are a fantastic option for shoppers who may be unsure of what to buy or prefer to let the recipient choose their own present. Some people think that gift cards are impersonal but I say that’s only true if the gift card is from a big box retailer. People LOVE shopping with small brands so consider adding gift cards to your product offerings. You can allow customers to purchase gift cards directly from your website by simply adding a new product and choosing the gift card option. This not only expands your sales opportunities but also caters to a wider range of customer preferences. Spread the joy of giving with the flexibility of gift cards.
5. Use Your Announcement Bar
The announcement bar on your website is valuable real estate for sharing important information with your customers. During the holiday season, make the most of this space by displaying enticing offers, shipping cut-off dates, or any other promotions you want to highlight. Captivate your visitors' attention and drive them towards making a purchase by leveraging the power of your announcement bar. 💡Bonus tip: if you’re looking to jazz up your announcement bar, I love this code from my pal Becca!
6. Reward Loyal Shoppers
Last Christmas, my family and I did a “favorite things” party instead of traditional Christmas gifts. The point was to share a little something that you used and loved throughout the year. The gifts weren’t necessarily huge or fancy - a really great pair of socks, a jar of someone’s favorite local-made hot sauce, another person’s must have scented candle. The point is that this is the time of year people are looking to the brands they already know and trust for gifts. Rewards could be simple (a special coupon code sent out to your VIP customer list) or more complex (I’m loving Offerwhere for a loyalty program that integrates amazingly with Squarespace) - whatever works best for you!
7. Add a Chat Widget
The holiday season can get pretty hectic, and this is when providing exceptional customer service is mission crucial. A chat widget (my favorite is LiveChat - all about that here!) can be a game-changer. By implementing a chatbot on your website, you can quickly address frequently asked questions, guide customers through the checkout process, provide product recommendations, and offer support in real-time. This efficient tool will help your customers feel heard and attended to, even during the busiest shopping days.
8. Offer Local Pickup
Even in the world of eCommerce, supporting local customers is important. By offering a local pickup option, you provide convenience to those who prefer to avoid shipping costs and long delivery times. Local pickup also gives you the opportunity to connect with your community and foster a sense of local pride. Don't forget to highlight this option on your website and let your customers know they can shop local even in the digital realm. For more on this, check out this post on how to set up local pickup or curbside delivery on Squarespace.
9. Add a Custom Checkout Form
Personalize the gift-giving experience by adding a custom checkout form to your website. This is such a simple way to allow customers to include a heartfelt gift note with their orders or offer them the option to add gift wrapping, if you offer it. Don’t forget, for those who want their purchases shipped directly to recipients, at checkout customers can enter the recipient's address in the shipping section instead of their own. You could use a custom form to allow people to indicate that the order is a gift and to not include any billing info along with the shipment. This small touch goes a long way in adding a personal and thoughtful element to each order that goes out this holiday season.
10. Create Gift Guides
Holiday shopping can sometimes feel overwhelming, with countless options to choose from. (And people are notoriously bad at making decisions when given too many options.) Help your customers navigate the gifting process by creating thoughtful gift guides. Curate collections for different categories of recipients, such as "gifts for him," "gifts for kids," or "gifts for the home." Include a mix of your own products and/or complementary offerings from other brands. By providing curated options, you make it easier for shoppers to find the perfect gifts and increase the likelihood of making a purchase. 💡Bonus tip! - an easy way to create shoppable gift categories is by using tags or categories to help shoppers filter their search!
As the holiday season approaches, it's essential to prepare your eCommerce business for the bustling days ahead. By following these tips, you can optimize your online presence, engage with customers effectively, and boost your sales during this festive time of year. Embrace the spirit of the season, spread holiday cheer, and get ready for a successful sales season!

Creating a Custom Print on Demand Store with Squarespace
Discover how to create a custom print-on-demand (POD) store with Squarespace and stand out in the competitive eCommerce market. This step-by-step guide will help you set up your Squarespace store, choose a POD provider, optimize your website for SEO, and launch your store to start selling customized products worldwide.
The eCommerce market provides a huge opportunity for entrepreneurs to start their own successful businesses. However, given the huge number of opportunities, the industry swells with competition too.
Customers today are more likely to buy from online retailers who have well-designed websites. After all, things might get a bit boring if everyone follows the same format and offers the same things in the online stores that all look the same. Therefore, one of the keys to eCommerce success is finding ways to differentiate yourself from the competition.
It's always beneficial to have an advantage over the opposition with a well-designed online store that will attract more customers and result in more purchases. The good news is that those who have joined the most recent waves of online businesses can rely on Squarespace for being their hidden weapon.
Wondering how to get started? In this article, I’ll help you create your very own custom print-on-demand (POD) store with Squarespace.
Benefits of Having a Print-on-Demand Store With Squarespace
With a POD business, you partner with a third-party vendor that prints out individual orders as they come in from your customers. So, for example, if you’re selling custom tumblers, they will only manufacture it when someone places an order for it on your website.
One major perk is that you and others like you may launch a business without having to worry about the hassle of investing in an inventory or managing it. You can focus on running your company while your POD partner handles production, packaging, and shipping.
There are several options for setting up a POD storefront, including eCommerce platforms, such as Shopify, WooCommerce, BigCommerce, etc. Out of these, Squarespace makes a compelling case for why it should be your ideal website builder. They offer superior graphic power, ease of use, and overall value for your money. A personal domain name and unlimited storage space are both included.
Steps to Create a Custom Print-on-Demand Store With Squarespace
Now that you understand why creating a POD website with Squarespace is your best bet let’s help you set up a store and start earning.
1. Set Up Your Squarespace Store
To set up your Squarespace store, you’ll need to first create an account. Squarespace provides a 14-day free trial that allows you access to all its tools. (p.s. When you’re ready to subscribe, you can use my code KRISTINE10 to save 10% on your annual subscription!)
After you’ve created an account, choose a template or design your own! You will have lots of options to choose from but this post will help you know what to look for.
Simply enter your email address or use your Google account to sign in to Squarespace. The next page will prompt you to enter a title for your website before providing some general editing tips. Depending on your vision for your website, you can:
Add pages
Organize the structure for easy navigation
Add content
Choose color scheme
Add branding elements like logos, fonts, store policies, etc.
Once your store is all set up, you’re ready to move to the next step.
2. Pick Print-on-Demand Provider
You may connect to a number of print-on-demand services with Squarespace Extensions. The success of your print-on-demand venture hinges on picking the right POD partner to work with your eCommerce platform. But how do you choose the best POD service when there are so many? Here's a rundown of some things to think about:

Your budget
The catalog size
Quality of products
Customization options
Delivery timeline
Quality of support
Ease of integration
I like Printify because it provides an extensive catalog of more than 800 high-quality white-label products. You can sell anything and everything from custom jackets to custom phone cases, stickers to shoes - whatever you can think of! They also have a free mockup generator that helps you create beautiful designs easily and create 3D mockups. Lastly, they guarantee a production time of 10 days. If they don’t meet the timeline, they’ll process a refund! And if you ever get stuck, they’re available around the clock to help you with any issues.
Once you’ve selected your POD provider, it’s time to understand what it’ll take to survive and thrive in the market. For that, we move on to the next step!
3. Do a Competitive Analysis
Competitive analysis is a technique for gauging the business's market standing in relation to that of its competitors. It is a technique for gathering information and making it useful.
Conducting a comprehensive competitive analysis positions you to outperform the competition and win over loyal customers. Competitor analysis is an integral part of developing a successful company plan. A thorough competitor analysis will help you in the following ways:
Learn more about the current corporate climate, which may assist you in better positioning your brand;
Find your niche and stand out from the competition;
Take note of the areas in which your rivals excel;
Use opportunities to benefit you and take advantage of your rivals' shortcomings.
Learn from the marketing moves made by your competitors and use those lessons in your own approach.
4. Choose Your Products and Upload them to the Store
After the competitor analysis, you should be clear about what you want to offer. Now, link your POD provider with Squarespace and display your products on your website.
With Squarespace and Printify working together with its integration, this is a breeze. Browse the comprehensive collection and pick the items that you believe will appeal best to your intended audience.
Using Printify's straightforward interface, you can add your company's logo or other custom artwork to any of your selected products. You may easily customize the appearance of your products by uploading and positioning your own custom artwork. You can personalize your products with art, typography, and more with Printify's mockup generator and state-of-the-art design tools.
Once your designs are ready, simply upload them to your store with a descriptive title, compelling description, and the selling price.
5. Create a Marketing Strategy
Online retailers need to work harder to attract customers than traditional stores since they can't just rely on foot traffic. You can't expect clients to appear out of thin air if you launch an online store.
While the products offered in each online store may be unique, their marketing approaches are consistent. To help you replicate this strategy on your own, you’ll have to do the following:
Define your unique selling point, meaning what makes you stand out from your competitors.
Create a marketing funnel from discovery to purchase to understand the customer journey.
Set marketing objectives for each stage of the funnel and how you’ll achieve them.
Define your budget and determine what methods you can afford.
Define your marketing channels and key performance indicators (KPI) to measure progress.
Determine a timeline to implement the strategies and stick to them.
Track your progress, see what you can do better, and implement changes.
Related Post: Crash Course: The Squarespace Commerce Analytics Panel
6. Launch Your Store
Once your marketing strategy is in place, it’s time for action! Find out what kind of fulfillment alternatives and shipping costs the POD provider offers before you start selling online. Some POD services may have the ability to fulfill and ship orders mechanically.
Make sure your shipping policies are in line with the requirements of the POD supplier you plan to use before you announce them to the public.
That’s it launch your store and publish it on all marketing channels to start making sales!
More Tips While Creating a Custom Print-on-Demand Store With Squarespace
Squarespace websites are built keeping search engine indexing in mind, but how well people find your new store still depends heavily on the material you provide as well as how you exhibit it. I strongly suggest you take advantage of the SEO tools that Squarespace provides or use a tool like SEOSpace to help your site get noticed. You can also optimize your Squarespace website by:
Targeting keywords
Optimizing product pages, their images, title, and description
Creating regular content in the form of blogs
Creating inbound and outbound links
and following other SEO practices found on their official checklist.
Another strategy you can implement is setting up an affiliate or referral program for your shop. Adding an affiliate strategy will boost your marketing returns multi folds and visibly show results with increased brand awareness, customer loyalty, generation of leads, and conversion rates. For more on my favorite affiliate and referral marketing tool check out this post!
Conclusion
The eCommerce industry is booming with opportunities, and Squarespace provides a great solution for entrepreneurs to create visually stunning websites with little to no coding knowledge. You have a lot of freedom with Squarespace when it comes to designing your eCommerce platform and handling client orders, including the option to use POD services. With this article, you’re equipped to start your own print-on-demand store and sell customized items to the world. Get started with your very own POD store on a Squarespace website today!

The Best Alternative Checkout Methods
Squarespace offers a way to sell almost everything almost everywhere, but sometimes you just need another option. Whether it’s because you sell something super custom or because you’re just wanting to create a specific user experience for your customers - here are the best alternative checkout methods that can all be embedded or linked to from your current website.
Updated April 2023
Squarespace offers the ability to sell so many different types of things but sometimes you might need to look to an alternate checkout method. This could be because you’re selling something super unique that doesn’t fit well within Squarespace’s existing checkout options or because you use other business tools that integrate better with other options. Whatever the case may be, there are a number of alternate checkout methods that you can integrate into your current Squarespace website and still offer a streamlined way to get paid. Check out some of my favorite options below but be sure not to miss my final notes at the very bottom of this post with some tips on how to pull this off seamlessly!
Stripe
There’s a reason this is at the top of the list, and that’s because if you’re going to circumvent the built-in checkout system on your website, you might as well go straight to who was going to be processing the payments anyways, which in 99% of cases is Stripe. Stripe has been rolling out some awesome no-code and low-code solutions that offer some powerful ways to get paid while still keeping that sleek, minimalist design that makes my heart sing.
What I would use this for:
Pricing tables
Subscriptions
Client Portals
Payment Links
Quoting
What it costs: 2.9% + 30¢ which is the same rate as you’d be charged for accepting credit card payments through your site. (There are some additional features that come with additional fees, but most elements are included at no extra charge. See Stripe’s pricing page here.)
Flodesk Checkout
Most people know Flodesk for their great-looking email templates and easy-to-use email marketing platform, but they recently released Flodesk Checkout, which allows you to sell services, digital products, access to a course, or membership - whatever it is you sell! The process is smooth and, in true Flodesk fashion, pretty stylish too! This is an especially attractive solution because Flodesk automatically segments customers based on purchase activity, so you can seamlessly send targeted follow-up emails.
What I would use this for:
Digital goods or services
One-click upsells
Mini sales pages
Targeted email campaigns as a result of a purchase
What it costs: $35/mo as a standalone product; $59/mo to access all of the Email features in addition to Checkout. There are no other platform fees or limits, just the standard Stripe processing fee of 2.9% + 30¢ per transaction.
ConvertKit Commerce
ConvertKit is another popular email marketing platform (and the one I love most), and it has its own built-in way to get paid for things like ebooks, music, presets, or coaching. The biggest difference between Flodesk Checkout, above, and CovertKit Commerce is that you can set up subscription options. This means that in addition to all the regular digital or service products, you could also use ConvertKit to set up a subscription-only email newsletter or other services with recurring billing.
What I would use this for:
Digital goods, services, or subscriptions
Embeddable “buy now” buttons
Multiple pricing options: standard, subscription, donation, or payment plans
Targeted email campaigns as a result of a purchase
What it costs: ConvertKit has a free plan, but most people will want to be on the Creator plan, which starts at $9/mo. Commerce purchases are charged a 3.5% + 30¢ transaction fee.
Gumroad
Gumroad is a great option if you’re interested in spending less time tinkering around with the platform you’re selling on and more time creating whatever it is you sell! You can really get up and running in no time at all on Gumroad because it’s just so simple and well-designed. Another thing that sets Gumroad apart is that you can create a little community of people, not just customers. People can follow your page, and you can even embed a “follow” button on your website. They also recently launched the ability to offer upsells (an upgrade to whatever they intended to purchase) and cross-sells (new products that might pair well with what they’re purchasing. You can offer discounts on these and completely customize the experience for users.
What I would use this for:
One-click upsells & cross-sells
Digital services, memberships, subscriptions
Selling software or other licensed products
Selling multiple versions of products
Accepting payments in multiple currencies
What it costs: 10% flat (plus the standard i.e. 2.9% + 30¢ per transaction for Stripe).
Buy Me a Coffee
If you’re looking for a simple alternative checkout method that allows you to accept donations, sell memberships or offer commissions, you should definitely consider Buy Me a Coffee! You can even use it as a digital tip jar (like I do here 😉) or build wishlists for your fans to buy from. I really like the public-facing landing page that Buy Me a Coffee creates for you, and there are also options to embed your BMAC link on your site or even create a QR code for people to scan and pay you. It’s overall just so easy to use for all!
What I would use this for:
Memberships, services, donations
Commissions and physical products
Embeddable widgets
One Tap Payments
What it costs: There is no fee to create a Buy Me a Coffee account, and you can use all features like email and publishing for free. There is a 5% transaction fee charged for things aside from donations, in which case you’re just charged Stripe’s transaction fee (2.9% + 30¢ per transaction), which you can opt to cover for your customers or choose to have them pay for.
Paperform
I’ve written before about how Paperform can be used to create a custom order form for Squarespace, but the commerce capabilities really need more of a shout out! On Paperform you can create products, set up subscriptions, book paid appointments or other services on a calendar, and collect as much or as little extra information as you need from your customers in the process. I love how customizable Paperform is and how simple it is to create a really nice-looking checkout process that you can either embed on your own site or link out to, depending on the flow you’re going for.
What I would use this for:
Services or bookings
Subscriptions
Complex or highly customizable products that require advanced calculations or conditional formatting
Any instance where you also need to collect extra info at the time of checkout
What it costs: There are no transaction fees charged by Paperform - just the standard processing fees by Stripe or Paypal. Paperform subscriptions start at $24/month but I would suggest an annual Pro subscription ($40/mo) for most.
Proceed With Caution: Drawbacks to Keep in Mind
If you decide to implement one of the options above, you’ll need to keep in mind that doing so bypasses Squarespace Commerce entirely, which means that you’ll need to take care of things like order confirmation emails and reporting on your own somehow. Most of the options listed have some of their own options for things like this, but some don’t.
Just know that any products, services, classes, subscriptions, or downloads you sell through an alternate checkout method will NOT show up on Squarespace, and you may need to take some extra steps to do things like generate shipping labels (for physical products) or make sure your customers receive adequate communication from you about their purchases.
This isn’t to say that one of the above options isn’t a perfectly good solution for your unique business needs, just a reminder to think about the whole experience from start to finish for both you and your customer!

How to Display Your Products on Google for Free
I bet you didn’t know that one of the easiest tools you have out there to get your products seen in Google search results and across Google is not only easy to set up, but it’s also completely free to do so! Here are the steps you need to take to set up a free Google Merchant Center account and sync your Squarespace eCommerce site up to it.
I bet you didn’t know that one of the easiest tools you have out there to get your products seen in Google search results and across Google is not only easy to set up, it’s completely free to do so! Here are the exact steps you need to take to set up a free Google Merchant Center account and sync your Squarespace eCommerce site up to it.
Bonuses:
🚫 No confusing CSV files to format.
🚫 No manually adding products to Google one-by-one.
🚫 No need to update Google anytime you make a change to your shop’s inventory.
🆓 (Did I mention it’s free??)
What is Google Merchant Center & Where Do Products Display?
Google Merchant Center is the place where you’re basically telling Google what it is you sell and how you sell it. It’s where you can set up and manage free product listings that control how your products are displayed across Google’s various products, such as:


Create a Google Merchant Center Account & Connect It To Squarespace
Connecting your eCommerce site to Google Merchant Center is the way to go because it allows you to automatically sync all your products to Google versus having to add them one by one or worrying about formatting everything correctly. Here are step-by-step instructions on how to display your Squarespace products in Google Product Listings:
On your Squarespace site, go to the Commerce panel and then click on Google under Sales Channels.
At the bottom of the page click on “Sign Up With Google.” Assuming you don’t already have a Google Merchant Center account, you’ll be presented with a few prompts to help you create a new account. (Alternatively, you can also go directly to Google Merchant Center here and create your account first. The steps will be the same from here.)
Once you’ve create your Google Merchant Center Account, click Verify & Claim Website and copy the code provided for the HTML tag.
Back on Squarespace, click on the "Paste Google verification code into site header” button which will jump you to that section of Squarespace. (You can also get there by going to Settings > Advanced > Code Injection.) Paste the code provided by Google into the Header Code Injection area which is the top box on that page.
Click Save!
What happens next?
Now that you’ve connected your site and store to Google, all the physical products that you sell will be automatically synced and sent to Google Product Listings. If you’d like to check on the sync status, you can always head back to Commerce > Google right within Squarespace.
Squarespace + Google Merchant Center FAQs
-
A google-based email address (note: this does NOT mean you need a gmail.com address but just a business email address that’s through Google Workspace)
A business phone number that you can receive a phone or text on for verification purposes
-
If you’re having issues creating a Google Merchant Center account or connecting it to Squarespace, make sure you meet the following requirements:
You sell physical products. Google Merchant Center doesn’t work for service-based products. (Note: you can sell both on your site, but only the physical products will sync.)
Make sure your site language is set to English (United States). (Sorry, this is the only one it works with for now!)
Make sure that you’ve already set up at least one shipping option in Squarespace.
-
LOL I understand the skepticism.
Of course, Google would love it if you also decided to pay for Google Ads after you have all your products set up BUT, yes, displaying your products and store on Google is completely free.
Think of it this way: adding your products to Google allows them to be seen in search results just like how your site shows up on Google BUT if you want to jump to the very top of that list you’ll need to pay for it.
-
Yes! Why wouldn’t you take every free opportunity out there to get your products on Google’s radar? You can set this all up and never mess with paid Google ads if you don’t want to. But the potential payoff here is pretty big considering the set up process is so simple!
-
Once you’re all connected (meaning your site is claimed & verified by pasting the Google code on your Squarespace site), you can always check on the sync status for your physical products by going to Commerce > Google.
If you want more information, you can also log in directly to Google Merchant Center.
-
Nope. It’s all or nothing for all the physical products you sell. However, if you log in to your Google Merchant Center account you can see some more options for managing how your products are displayed.
-
Once your Squarespace site is set up and connected to Google Merchant Center, any product changes you make on Squarespace are automatically synced to Google meaning you never really need to do anything else. Magic! 🔮
If you’ve got 15 minutes, you can get your Squarespace products synced to Google!

My Favorite Squarespace Plugins & Extensions for eCommerce
Squarespace has (almost) everything you need built right in for eCommerce but when you’re ready to take things to the next level or want to boost your customer’s experience in your online shop, check out these favorites I turn to time and again.
One of my favorite things about Squarespace is that almost everything you need to run your eCommerce business is built right in. Believe it or not, there are some website platforms where adding simple things like an Instagram feed or a contact form require (paid) third party apps (lookin’ at you, Shopify 😬). Luckily, Squarespace does both of those things - and much more - for us! However, there are a few areas where you may still need to look to a few strategic add-ons to enhance the eCommerce experience for your customers, or make life easier on you as the store owner. Here are the Squarespace plugins and third party apps I look to time and again for almost every eCommerce project I do on Squarespace.
Plugins
Squarespace plugins are little code snippets that allow you to extend or customize the way Squarespace looks or functions. Most plugins come with a one-time upfront cost and once you add the code to your site you’re done.

Custom Order Confirmation Page
FREE
This plugin from Ghost is quick and easy to install - the perfect way to add a little personality to your site and replace the boring order confirmation page with something that matches your brand and personality.

Custom Cart Slide Out Plugin
$40
This plugin makes it so your customer don’t have to scroll back up to hunt for their cart. It’s easy to install and offers a lot of customizable options.

Breadcrumbs Plugin
$37
Breadcrumbs are the little bits of navigation that help shoppers remember where they’ve been or how they got to the page they’re on. As a default, Squarespace shows only the first page and current page - and no steps in between! This plugin is probably one of my most often used and adds true breadcrumbs to your shop’s navigation.

Product Color Image Swatch Plugin
Change up those boring text dropdowns to color icons! You can even upload your own images to show different patterns or textures - whatever you’d like! This plugin is a must for any sort of apparel or fashion site.

Sync Product Variant Images Plugin
$49
This plugin works great on it’s own or in conjunction with the swatch plugin above. This plugin extends the way product variant images are displayed. By default, Squarespace will show a variant image (assuming you’ve assigned one) but it only works in one direction and doesn’t allow you to group images based on the variant selected.

Upsell Plugin
FREE
It’s easy to add an upsell page to Squarespace using this plugin! The way this works is that your customers are redirected to a landing page after they add something to their cart. This plugin is great because you can design the landing page however you like.

Universal Filter Plugin
$70
This plugin is probably the most intensive as far as coding goes but also one of the most powerful! I would say it is a necessity if you have a lot of categories or tags you’d like shoppers to be able to search and filter by. This functionality here blows Squarespace’s built-in search out of the water!
Extensions
Unlike plugins, Squarespace extensions typically come with a monthly subscription cost. They aren’t just code snippet you copy and paste into your site, they are third party apps that you can sync up to your Squarespace shop to extend the functionality of your site.
Aftership Tracking
PLANS START AT $11/MO
This extension allows you to provide customers with a branded tracking page and even send updates about deliveries - which I love! You can even use the tracking page to add links to other offers or specials to attract people back to your shop.
Easyship
PLANS START AT $29/MO
My hands down favorite shipping extension that I think everyone should be using. Easyship makes it… easy to fulfill orders with the added benefit of discounted shipping rates versus paying retail or printing labels directly through Squarespace.

Aftership Returns
PLANS START AT $11/MO
Even if you never process a single return, this extension is worth the minimum plan since customers LOVE being able to see that they could return if they wanted to. This extension creates a self-service returns portal just like all the major eCommerce brands have.

Candid Wholesale
PLANS START AT $39/MO
If you’re selling wholesale another way now - or looking to add a wholesale channel in the future - save yourself the headaches, skip all other options, and go with Candid. Everything you need to manage those relationships and sell in a secure way to your wholesale partners.

Trunk
PLANS START AT $35/MO
If you’re selling on multiple channels (think Etsy, Amazon, Shopify) OR you sell bundles or kits on Squarespace, this nifty little app will help you keep your inventory in check. Update in one place and -magic!- all your various sales channels follow suit.
LiveChat
PLANS START AT $20/MO
Personal story time: since adding LiveChat to my site people rarely fill out my contact form. Why? People trust a live chat widget more than they do a form and it’s everyone’s favorite way to communicate! LiveChat is simple to install and you can get started really fast!
Bottom Line
With a few simple, strategic add-ons you can take your basic Squarespace site and turn it into a stellar eCommerce powerhouse. With the right plugins and extensions you can customize the customer experience, improve your metrics and even see more sales! Thankfully, most of what we need to sell on Squarespace is already built right in but these tools come in handy when you just want to go the extra mile.

How to Enable AfterPay on Squarespace
Setting up AfterPay as a payment option on Squarespace is easy but there are some limitations and caveats to keep in mind. Here are the (super easy) instructions on how to enable this payment option plus answers to common questions about how it works.
Updated: Nov 2022
If you’ve checked out this post: Should You Offer “Buy Now, Pay Later” Options On Your eCommerce Website and decided that you’d like to give this a try, here’s how simple it is to set up! It’s almost embarrassingly easy! If you haven’t checked out that post and want the quick scoop here it is: Afterpay is a payment processor that allows your customers to pay for purchases on your site in installments with 0% interest. Afterpay basically becomes a lender to them. If a customer chooses this as a payment option, you still get paid the full amount upfront at the time of purchase. Your customer will then pay Afterpay back in four equal payments over 2 months.
How to Enable Afterpay on Squarespace
To get started you’ll need to have also set up Stripe as your merchant processor. You probably already have this enabled but if not you’ll need to take just a few minutes to sign up for and connect your account to Squarespace. From there, you’re only a few clicks away from being able to offer AfterPay! What I love about this integration is that unlike on other platforms, you don’t have to jump through any additional sign-up or application hoops.
From the Home menu > Settings > Selling > Store Payments > Stripe and then toggle the Afterpay option to On.
That’s it!
What Your Customers See at checkout
At checkout, customers will select Afterpay as their preferred payment option. After entering their billing address they will click continue and be prompted to log in to their Afterpay account. (If they don’t yet have an account, they can opt to create a new one.)
They will see a summary of their future payments for the purchase from your shop and have to accept the terms. Once they do this they will be redirected back to your site’s normal Order Confirmation page and get the same order confirmation emails as they would if they had chosen any other payment option.
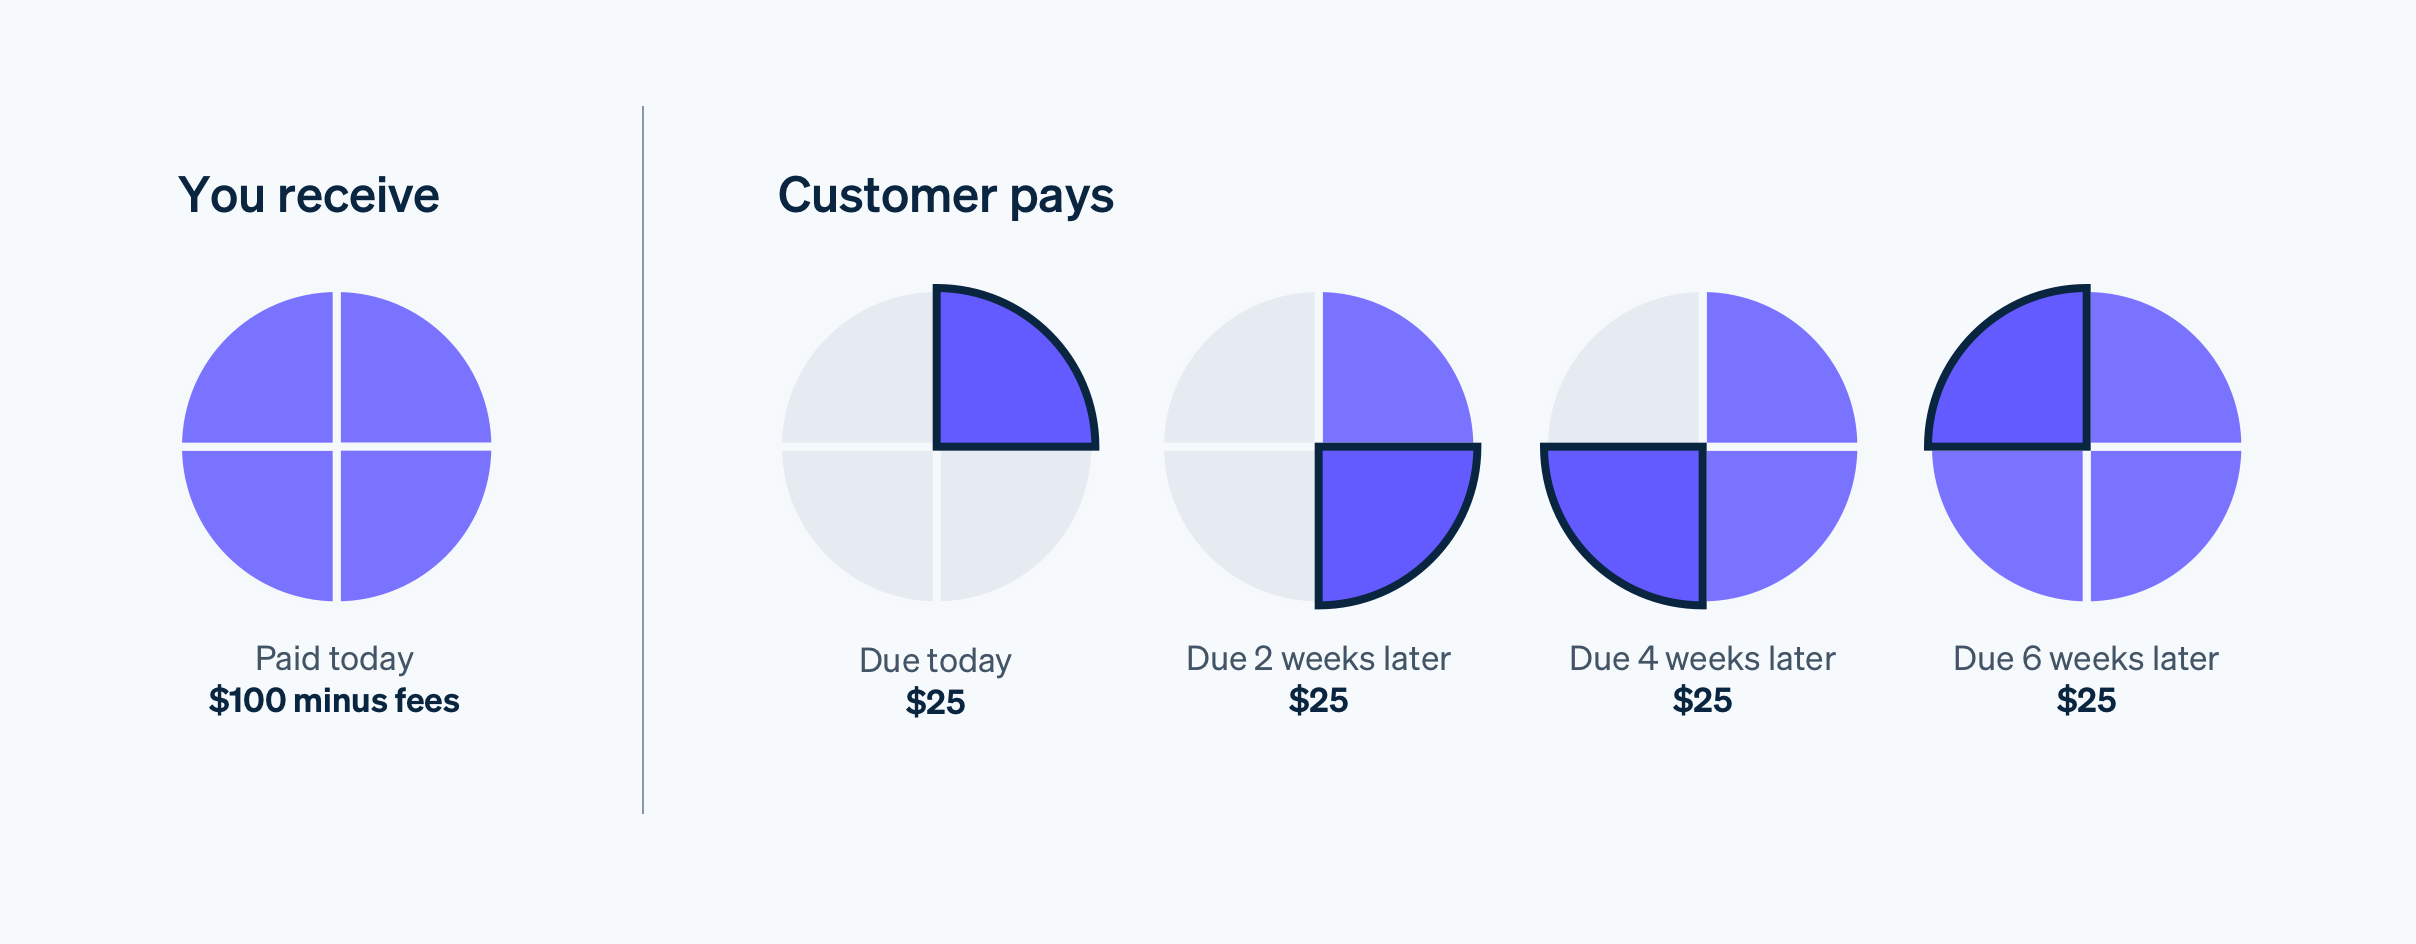
While pricing for Afterpay is set at 6% + 30c per successful payment, businesses that offer Afterpay on Stripe have seen, on average, a 40% increase in average order value and a 22% increase in cart conversion. Afterpay can be used for orders ranging from $1 to $2,000 and is frequently offered by businesses that have an average order value of $100+. You are not responsible for any consumer credit or fraud risk for purchases with Afterpay. (Source: Stripe)
Common Questions:
What happens if customers miss payments? You still get paid just like if a customer misses a credit card payment. The terms including what happens if payments are missed or late are entirely between your customer and Afterpay.
What does this cost you as the merchant? The total fee is 6% of the order total plus $0.30. This includes your normal Stripe processing fee of 2.9%. So the additional cost to you for offering this option is ~3%.
Can any customer choose this option? Customers do have to have applied and been approved for an Afterpay account. They’ll need to meet Afterpay’s eligibility requirements and be under their approved credit limit. There are also spending limits that vary by country. These are determined by Afterpay, not Stripe or Squarespace. Just like a credit card, their total spending limit includes purchases they’ve made at all stores, not just yours.
What happens if an order is canceled or refunded? The payment is returned to Afterpay. This happens automatically when you mark an order as canceled or refunded in Squarespace. On the customer side, they will receive a refund of their initial payment plus any additional payment installments they’ve already made. If you issue a partial refund to a customer, the amount they owe Afterpay is adjusted to reflect the new balance. Note that Afterpay’s transaction fees are nonrefundable.
Limitations
AfterPay is only available for physical products and won’t be displayed as an option for digital, service, or subscription products.
It’s currently only available if you are located in the United States, Canada, New Zealand, or Australia AND your customers are in the same country as you. For example, Canadian customers will not see this option on a site based in the US and vice versa.
You must be on either the Commerce Basic or Commerce Advanced plan (which I recommend anyway).

10 Simple Ways to Prep Your eCommerce Shop for the Holidays
Getting ready for holiday sales doesn’t have to be overwhelming! The 10 simple things on this list will help you make sure that you’re ready for the influx of orders and inquiries that come with running an eCommerce business this time of year.
If you’re looking to make sure that your site and store are all prepped and ready for online sales this holiday shopping season, you’re in the right place! Even though I personally tend to prefer a strategic product drop or flash sale that doesn’t depend on seasonality, it never hurts to make sure that your site is in tip-top shape. The 10 simple things on this list will help you make sure that you’re ready for the influx of orders and inquiries that come with running an eCommerce business this time of year!
1. Make sure you’re using Squarespace to track your inventory.
And that your inventory counts are accurate and up to date! Correct inventory counts can help you know what you need to order more of, what you should discount or put on sale, prevent overselling, and create a sense of urgency to buyers. If you sell on multiple platforms or need to sync inventory into Quickbooks for accounting purposes, try Trunk (review in this post) which keeps everything synced up automatically!
2. Customize your store’s notification & cart abandonment emails.
While this is something you want to do anyways, making sure that your emails are personalized is a great tip around holiday time. Including special information about shipping timelines or return policies can help reduce the number of customer service inquiries you receive so that you and your team can focus on fulfillment instead. Personalizing your shop’s emails can also help you build a sense of community around your brand, helping boost loyalty and repeat business. And don’t forget about your cart abandonment email! Updating it so it feels relevant to the season can make it stand out and provide a gentle little nudge to come back to your site and complete their purchase. For more on customizing your Squarespace eCommerce emails, click here!
3. Connect a shipping extension to your site to make fulfillment easier.
I mean, unless waiting in line at the post office on Christmas Eve is your thing I guess? 🤷♀️ A shipping extension is basically the friendly little office assistant you never knew you always needed. The right one will select the best courier, generate labels for you and automatically update Squarespace to mark the order as fulfilled with the tracking number. You can check out this post for a review of all the available shipping extension options on Squarespace but my fave by far is Easyship.
Bonus: sign up for a new account using code GWZMUM and get a $20 account credit. Thanks, Easyship!
4. Offer FREE shipping.
The reason behind this is simple: shipping fees kill conversions. Even if you don’t want to include free shipping as part of your strategy year-round, adding a free shipping tier will help you be more competitive during the holiday shopping season. You don’t have to give it all away, though! Use an automatic discount to limit free shipping on only orders over a certain amount. This will help boost conversions AND increase average cart value! (For more on this topic, check out How to Set Up a Profitable Shipping Strategy on Squarespace.)
5. Set up local pick-up.
If recent years have taught us anything it’s that the number of people shopping online for the holidays has totally inundated carriers like UPS, FedEx, and USPS. To prevent shipping delays causing major holiday disappointment, offer your local customers the option to pick up their online orders in person. This means they can shop right up until the last minute (something they can’t do from other online retailers who’ve had to cut off shipping for the season) and could also lead to some last-minute in-person buys. Win-win! For more on exactly how to set this up, check out this post.
6. Update your FAQ page.
I love a great FAQ page. Done right, it can help your customers find instant answers to their questions and reduce customer service inquiries about basic or routine things, freeing you up to focus on more important issues. Setting up an FAQ page on Squarespace is easy (here are some tips on how to do it!) but the most important thing is obviously the content. Anticipate the needs of your customers and make it easy for them to have everything they need to feel comfortable shopping with you.
7. Add an announcement bar to highlight shipping & promo info.
Among all the built-in features to help you sell on Squarespace, I really love using an announcement bar around holiday time to keep people up to date on shipping cutoffs, promos, or any other relevant information that might motivate them to buy. If you have a lot of info, don’t try to cram it all into your announcement bar. Instead, use that real estate to link out to your FAQ page or a landing page dedicated to holiday info.
8. Offer gift cards.
Of all the things you can sell on Squarespace, gift cards are probably the easiest to set up and make perfect sense for the holidays! While I usually move gift cards to the bottom of the heap in larger stores, during the holidays I would actually do the opposite and move them right to the top! You can even feature them in a pop-up or in a prominent place on your homepage to make them a convenient option for people looking to give an easy gift.
9. Be smart about your discounts & sales.
Even though the holiday season can feel like a total frenzy doesn’t mean that you shouldn’t take the time to be methodical in what you put on sale or what discounts and promos you plan on running. All of this is a long way of saying don’t just go marking things down or making up offers willy nilly. Start by making sure you understand how discounts work on Squarespace and then make sure to check your Squarespace commerce analytics panel.
10. Hit up your mailing list!
You’ve put in all this hard work and now it’s time to tell everyone all about it! Stats always say that it costs way less to sell to an existing customer than to acquire a new one and there’s no time like the holidays to take care of your VIPs! If you’ve been using customer profiles to track your customers and their activity throughout the year, it’s easy to add frequent customers or big spenders to a special segment of your email list. Send them things like special offers or advanced notice of sales via Squarespace Email Campaigns -- everyone loves feeling like they’re in the insider’s club!

How to Set up a Wholesale Shop on Squarespace
Wondering how to sell wholesale on your Squarespace site? I've got you covered with several different ways you can make this happen! Plus, who should (and shouldn’t) give wholesale selling a try, my recommended wholesale tool and 4 wholesale tips to help you sell more confidently.
Updated: Sept 2023
There’s a lot to love about Squarespace Commerce (exhibit A, exhibit B, exhibit C, etc.) but if you’re interested in adding wholesale to the mix, you may have found you need something… more. This is because, in addition to normal eCommerce functionalities, B2B sellers might need to offer things like tiered pricing structures, alternate invoicing or net payment options, or ways to keep wholesale prices hidden from the public, among other features.
Ultimately, I think the fact that these things aren’t necessarily built-in to Squarespace isn’t a shortcoming at all; you wouldn’t be upset if your shipping software didn’t also manage your social media posts – these are just very different tools! In the same way, traditional eCommerce and wholesale are two very different things.
So let’s dig into a bit about wholesale, who should do it (and who shouldn’t), my recommendations for how to get started, and tips from some of my friends in the biz that know wholesale better than anyone. Stick around for some wholesale FAQs at the bottom of this post. Here we go!
First, is your business too small for wholesale?
Adding a wholesale arm to your eCommerce business can be a beneficial thing for many small to medium businesses (even startups!) and I would say the biggest mistake is waiting too long to get started! Establishing even a few solid wholesale connections early on can help you get your name out there and help you build a following.
This isn’t something just for the big guys or those who’ve already made a name for themselves. I would even say that forging some strong wholesale relationships early on can be a great indicator of long-term success. So if this is something you’ve been considering or sitting on - don’t wait!
Options for Setting up a Wholesale Shop on Squarespace
Once you’ve decided to start selling wholesale, you probably started tinkering around with the specifics of how to actually make that happen and quickly became stuck. I don’t blame you! If there are a million moving parts to traditional eCommerce, there are a billion more for a business looking to sell wholesale. But it doesn’t have to be scary or overwhelming! Below are some ideas on how to start selling wholesale on your Squarespace website.
Create a second shop and password protect it.
This solution is pretty low-tech (Squarespace does all the heavy lifting for you) but it’s not without several drawbacks. Running two mirror images of the same store (one for retail and the other for wholesale) may technically work but you’ll need to think about how you’ll manage inventory levels, what to do about duplicate SKUs and how you’ll take care of the administrative side of things.
Also, since commerce settings are set at the website level on Squarespace things like what shipping methods you offer and what payments you accept need to be able to apply to all shop pages on your site; there’s no way to offer different options that would be tailored to a wholesale customer’s needs and keep those out of sight to your retail customers.
And don’t even get me started on what happens if and when you need to change the password on the wholesale shop! What do you do then? Email all your wholesale customers with the new password?! Awkward.
Use a Wishlist Plugin
If you’re only selling wholesale and want to be able to have potential customers essentially “request a quote” from your online shop, you could look at using SF Digital’s Product Wishlist Extension. This plugin replaces your traditional cart functionality with a custom form that allows customers to send you their “wishlists” without needing to enter any payment or shipping information. I’ve used this plugin for just this purpose before and it works great with a few (kinda) major caveats.
The first big thing is that you cannot use this plugin on any site that you also want to have a traditional eCommerce shop on. So this may work well if you don’t have a retail shop and are only selling wholesale but not if you’d ever like to be able to do any B2C selling on your site.
The other things to consider are similar to the duplicate shop scenario, above. With the Wishlist Plugin, you’ll need to have systems in place to manually calculate shipping, process payments, and communicate with your customers. You’ll have all your inventory set up on Squarespace but all the commerce functionality as far as getting paid and sending notifications, etc. will need to occur off the platform. Where and how is up to you.
Use Custom Coupon Codes
Ok, ok. So we’ve encountered two not-so-perfect scenarios. What about just creating coupon or discount codes for each wholesale buyer? Not a bad idea at first. The good: you can control who has access to discounts on an individual account basis and can provide different wholesale buyers with various discount levels.
I’ve had some clients set up systems like this for things like influencer marketing, creating individual codes to distribute to each person they’re working with. Depending on how many accounts you have this system can quickly be hard to manage though and it’s very difficult to gain access to helpful metrics and analytics on usage. (Tip: in the case of influencer marketing, I would check out my tips for setting up an affiliate or referral program instead.)
For wholesale, I would say this is also a passable but imperfect solution. Just like in the duplicate shop scenario, it also assumes that your wholesale customers are interested in the same shipping and payment options as your retail customers and I can see the mess of tracking spreadsheets and semi-canned emails quickly making you swear off what could otherwise be a profitable venture.
Try Candid Wholesale (My Recommend Method!)
I’m always keeping my eye out for solutions that I feel I can wholeheartedly recommend to you and you know I’m keen on keeping a lean tech stack, meaning I never recommend adding third-party solutions haphazardly. They’ve got to do what they say they will, and they’ve got to do it well.
Meet: Candid Wholesale
Candid Wholesale is an official Squarespace Extension that makes managing the wholesale side of your business a breeze. Remember what we said about choosing the right tool for the job? This is it.
At its simplest, Candid is a wholesale order management tool but it's really a robust CRM system geared towards helping you grow your entire wholesale business. With Candid you can take orders, send quotes, set up custom invoices, create a custom wholesale storefront, manage your customer relationships, and more.
Candid is going to take care of the problems some of our other imperfect solutions couldn't, such as: syncing up SKUs and shipping information, providing meaningful data to help you make informed decisions, and creating a wholesale experience for your customers that’s as great as your products are.
You can keep your current retail side of things exactly as they are and Candid will automatically keep the wholesale side of things in sync. You can choose which products you want to show in your wholesale catalog, how you want them organized, and quickly set prices for your wholesale customers.
Other Notable Candid Wholesale Features:

Create collaborative order forms that you can send directly to your wholesale clients.
An integrated message system keeps conversations in one place.
Accept payments online - or not. (Perfect if you accept check payments from accounts with net terms.)
Send reminders for past-due invoices.
Track shipments and invoices in real-time.
Control access to your wholesale catalog.
All plans include unlimited orders and no commissions, you just pay one flat monthly fee. There are three pricing tiers and while the Pro Plan is going to be great for most, I really love the embedding feature of the Complete plan!
Wholesale Tips from The Pros at Candid Wholesale
I recently had a great conversation with the co-founders of Candid Wholesale, Avery Bloom & Dave Lowensohn. In addition to talking about Candid's features and some of the “why” behind the business, I asked if they had any sage wholesale advice to share. Here were their top tips:
Consider the benefits to your brand that come with being featured in someone else’s shop. Selling wholesale is about more than just the individual sale; a retailer that’s willing to stake their own business on your products is the ultimate endorsement! This can be a great way to get your name and brand out there and build relationships with more established sellers with their devoted followers.
Don’t think of wholesale as a feature that you can just turn on or off. Selling wholesale is more than just offering discounted prices in your regular eCommerce shop, as you can tell from the pros and cons of some of the solutions outlined above. You want to be able to offer payment terms, a clear and easy ordering process, and an experience that’s tailored to the wholesale experience.
Think about economies of scale. Selling wholesale can help you take advantage of price breaks on your raw materials or other components that go into your products. Instead of buying 10 of something, you’re able to buy 100 at a better unit price. Hint: this can also help you improve profit margins on all those retail orders as well!
Focus on building relationships. While we talk a lot about ways to personalize and customize the traditional eCommerce shopping experience, wholesale is in many ways still pretty old-fashioned. Great wholesale partnerships can last decades meaning it’s worth it to invest in the tools and systems to make those relationships successful and ensure you can consistently deliver on your promises.
Wholesale FAQs
-
Yes! Wholesale is not for everyone. Wholesale probably isn’t a good fit for your business if:
You’re selling products with already very thin profit margins. In this case, you probably don’t have any room to discount to a point that would be attractive to wholesale buyers. You never want to be swapping high-profit margin retail sales for lower-profit margin wholesale ones if you can’t do both.
You don’t have a way to keep up with accounts or manage the additional sales volume. It’s easy to let things fall through the cracks without good systems in place and failing to deliver for your wholesale clients can send things south fast.
-
Oh, I’m glad you asked! First, if you’re unfamiliar with Faire – it’s an online wholesale marketplace where sellers can post their goods and buyers can browse from a bunch of sellers all in one place. Think of it kind of like Etsy meets Match but for wholesale.
Faire’s pitch to sellers is seemingly attractive at first glance. They promise no setup fees, no long-term commitments, and access to thousands of eager buyers. It would be easy to assume that you’re just going to sign up and then sit back and watch the wholesale orders come rolling in. The reality is pretty bleak, though.
The truth is that if you sell on any sort of online marketplace, including Faire, you’re not doing anything to build your own brand. You don’t own the relationships you’ve built there and you don’t have any control of how your company is represented. There’s no promise that the marketplace will continue to exist - or that you won’t get kicked off the platform at any point for selling to customers 1:1, which is a violation of their terms of service. And where would you be then? (Hint: I take the same stance when it comes to selling exclusively on social media.)
It’s simple when you think about the economics of a marketplace that only makes money when they connect buyers to new sellers. Simply put: it means that it’s in Faire’s best interest to introduce your customers to your competitors. Faire may not charge a commission if those customers bought from you, but they make 25-30% if they connect them to your competition.
Bottom line: in an industry built on long-term personal relationships, be wary of anything that promises anything sounding too much like a “get rich quick” scheme. If it sounds too good to be true, it probably is.
-
One of my favorite myths to bust! Just like Squarespace, Shopify is a traditional B2C eCommerce platform. This means that all the same issues I talked about above for Squarespace apply to Shopify as well. They are simply not a wholesale platform out of the box. However, there are technically three ways to sell wholesale on Shopify which I’ll quickly cover here.
The first is via Shopify’s wholesale marketplace called Handshake. Let’s just say that all my warnings about Faire apply 100% to Handshake as well. I’m not even going to link to it. Caveat emptor.
The second is by adding the wholesale sales channel to your existing Shopify store to (wait for it) create a separate, password-protected storefront. Sound familiar? And don’t assume that just because it’s on Shopify that it’s somehow better than on Squarespace (it’s not). First of all, the fine print on the wholesale sales channel is that it is only available if you’re on Shopify Plus which starts at $2k per month and goes up from there based on sales volume.
Assuming you’ve passed on both of the options above, you could always head over to the Shopify app store and search for a suite of plugins to add to try to emulate wholesale functionality in a meaningful way. You’re going to need something for price lists, another for user/login management, something to create and manage client portals, another thing to host your catalogs, and something else to manage your bulk shipping options. Never mind that each of these apps comes with its own monthly cost, the likelihood of everything working together as it should and details not slipping through the cracks is crazy small. Another inelegant solution.
A Final Note on Wholesale
First and foremost, you’re never too small to give wholesale a try! Successful wholesale relationships can become a source of stable income and help you get your business and products out there. Using the right tools for the job, such as Candid Wholesale, can make the process smooth and easy for both you and your wholesale partners. Just remember to always keep your eyes on your margins and focus on building your own site where you can own and control the experience.
Ready to give wholesale a try? Get Started With a 7 Day Free Trial of Candid Wholesale PRO!

Should You Offer Free Shipping?
Free shipping is popular but may not be the best solution for everyone. Learn when it works, when it doesn’t, and 6 strategies to explore if you’re thinking of offering it as a shipping option for your online store.
If there’s an area where every single online seller seems to struggle, it’s trying to figure out what to charge for shipping and delivery. It’s such a challenge because there’s a very fine line between a solution that eats into your profits as little as possible and one that doesn’t completely turn customers off at checkout.
I tell nearly every client I work with that they absolutely should be offering some form of free shipping. It can be a hard pill to swallow but if you consider that more than 80% of U.S. shoppers say that shipping cost (combined with shipping speed) is one of the biggest factors that influence whether they’re going to buy at all.
That’s right. Your products could be amazing and the fact that you’re charging too much for delivery that takes too long is what’s tanking your sales.
So, what is it about things like free shipping that make us all feel like we just got away with sticking it to the man? Why don’t we like transparency when it comes to shipping costs? As an online seller, what are the pros and cons of offering free shipping? How do you offer free shipping without seeing red?
As a store owner, should you even consider offering free shipping?!
Keep reading for answers to all these questions + 6 strategies to explore if you’re thinking of offering free shipping in your online store.
First, Why We All Love Free Shipping
There’s probably no better way to explain it than via meme:
So true, right? To the average shopper, there’s just something magical about free shipping. This is probably because for most shoppers, we assigned a higher value to the cost of shipping than it actual is. (Or, transversely, perhaps we’ve undervalued the cost of whatever it is we’re buying.) Whatever it is, we like the word free. Seeing a free shipping offer is like an aphrodisiac to any online shopper - enticing us to buy things we honestly may not have otherwise.
When viewed from this standpoint, offering free shipping is really no different than running any other sale or promotion. It's a marketing tactic deployed based on the assumption that people wouldn’t buy without it. The shipping cost is just the amount of money we’re willing to spend to get the sale. (Hold this thought. We’re going to circle back to it in a minute.)
Why We Love Transparency (Except for When It Comes to Shipping Costs)
It’s funny when you look at trends in one area of business and how they compare/contrast to trends in other areas. Case in point: brands that have publicly embraced “transparency” as one of their core values are seemingly everywhere these days. There’s something raw and authentic-seeming about a company that will just lay it all out there and tell you everything: how much their CEO makes, where they source materials, how things work behind the scenes.
Instagram and social media has helped as all feel like we know the people and happenings behind the brands we shop from - and this can be a major marketing tactic.
There’s just one area it seems no one wants to see the real truth of: shipping.
I’m sure there is some psychological pricing word for this but it seems to boil down to the fact that most of us just don’t want to know how the sausage is made. We kind of just want to know the total cost and be offered some sort of guaranteed delivery date and we don’t really care how the places we buy from make that happen.
It used to be that “shipping & handling” was seen as just a necessary evil of shopping online. If you wanted something that was sold somewhere not local to you, it made sense that you’d have to pay to ship it. But we’re all too savvy & spoiled for that now. Basically, we want free 2-day shipping to apply to everything we buy ever. So the total cost matters more to us than the breakdown. We’d rather pay $30 for something and get it shipped for “free” than buy a $25 product with a $5 shipping cost.
Free Shipping Pros
Free shipping is super simple for buyers to understand
Free shipping has become an expectation for many shoppers
Free shipping can reduce cart abandonment rates
Free shipping can increase conversion rates
Free shipping can reduce customer service costs for returns (if things ship for free there’s no reimbursement of shipping costs)
Free Shipping Cons
Free shipping isn’t actually “free”
More orders don’t necessarily mean more profits
It can be hard to forecast and budget for the unknown
There may be cheaper ways to “advertise” depending on your product(s) or target demographic
Bottom Line
So, what’s the bottom line? Should you or shouldn’t you offer free shipping?
I say that if you’re a high volume shipper with products that are relatively small, lightweight, and/or similarly sized (i.e. not a lot of variation in product dims and weight) it would probably work well for you. On the other hand, if you sell products with a lot of variability in size, weight, or destination or have too low of volume to be able to average out the highs and lows, there may be better solutions (see some ideas below such as only offering free shipping on specific products, or only if a certain order minimum is met, etc.).
The last thing to consider (and I hinted at this above) is that this really boils down to a difference in mindset (and accounting). If you would like to do a promotion for free shipping or you think that offering it might help you increase the number of sales in the short term, the cost of shipping is essentially a marketing expense.
If offering free shipping is a long-term strategy or something that you just consider “the cost of doing business” then it would be considered a direct cost and classified as a Cost of Goods Sold. (BTW, just because you include it as part of your COGS doesn’t mean you can’t market it as a perk you offer on your website.)
The reason I mention this is because all too often I talk with merchants who only think of shipping costs as an expense. They then turn around and spend thousands on things like Google ads or promoted social posts. If they thought of free shipping as a marketing tool and invested in it the same way, I can almost guarantee they’d see a better ROI than any of that ad spend.
How to Offer Free Shipping And Not Lose Your Shirt
If you decide to offer free shipping, or just want to try it out for a while to see how it affects your conversion rates and the bottom line here are some tips to keep in mind:
If your product isn’t a highly commoditized one, just bake shipping costs into your product prices and just raise prices. (This is my #1 piece of advice for a reason!)
Make limitations on the shipping method that will be “free” i.e. only ground shipping is free but overnight or 2-day is an upcharge. Interestingly, people are willing to pay for express shipping so long as it is their choice to do so and they know that they had an opportunity for free (slower) shipping. In this way, any express shipping orders are a bonus since you’ve already included the cost of “free” shipping in their prices.
Offer free shipping only to certain geographic locations (sorry Alaska, Hawaii, Canada and others!)
Set a “minimum order” requirement to qualify for free shipping. This is a great way to boost average cart values as people are very often willing to spend a little more on product so long as shipping is free.
Offer free shipping only as a short term promotion for a limited period of time. This can be a good way to try it out and see how your customers respond to it.
Add free shipping as a membership perk or to reward your most loyal/repeat customers. This can give you some recurring/passive income in the form of membership payments that can then be used to offset shipping costs.
Bonus! If you decide you don’t want to offer free shipping, try these other “free” alternatives which can be just as enticing: free in-store pickup or local delivery, or free returns/exchanges.
My last piece of advice is to pick a strategy and stick with it - at least for a while. Customers will appreciate that they know what to expect when shopping with you and you’ll have enough time to gather data to determine whether your initiative was successful. You can always tweak down the road as needed. That being said, I do think that offering free shipping in some form is useful for nearly every online seller so I hope you give it a try!

Kristine Neil
Fractional Web Partner
I'm Kristine Neil - a communications strategist who has spent 20+ years designing websites, first running a full-scale design and marketing agency, and now leading my own studio. I've been the creative director managing the work, the coder quietly fixing what others couldn't, and the strategist in the room asking why before how. Somewhere between the MBA and the other degrees, I decided web design was just one tool in a much bigger toolbox - the real work is figuring out what you're trying to say, who needs to hear it, and what's getting in the way. A website is just where all of that comes to life.
I build on Squarespace, and after years deep in the platform I know how far it can go and when to push past its limits. These days, I'm especially drawn to working as a fractional partner - getting to know an organization over time and helping with whatever moves them forward, whether that's a full redesign, an ongoing hand with content and strategy, or just being the person who knows their site best. I write here about eCommerce, web strategy, and making the complex feel a little more human.