

Notes on building smarter websites for actual humans.

How to Price Your eCommerce Shipping Options
Should you offer free shipping or flat rate shipping? Is there a way to get people to spend more on your site, abandon their carts less often and make them happier? How do you calculate the perfect free shipping threshold? Check out this post for answers to all these questions & more!
Your shipping strategy is arguably one of the most integral parts of your whole eCommerce setup. It’s how you can easily lose money if you’re not paying attention to the details… but also how you can gain tons of loyal fans if you dial things in right. Customers expect orders to arrive fast and cheap - even when shopping for higher-end, luxury items. Most eCommerce shoppers expect some sort of deal for free or reduced shipping and want to see packages at their door in no more than a week. Long story short: it’s a lot to ask of the average small business owner to deliver on!
In this post, I’ll walk you through the most common eCommerce shipping options. We’ll uncover which one (or ones!) I recommend most to help you keep your customers happy AND keep some money in your pocket.
FIRST THINGS FIRST
Figure Out What Shipping Actually Costs You
Look, I know this seems obvious but you’d be surprised how many merchants I talk to who haven’t thoroughly worked through how much it actually costs them to ship each and every product in their inventory. 😲 Now, you don’t have to be a spreadsheet person but you are going to have to break out the calculator here. Also, I’ll admit that in a former life I managed shipping & logistics for a large company so things like shipping zones and carrier contract negotiations, and packaging pricing come naturally to me. Don’t worry if they don’t for you - all the details you need to get started are below!
Make note of each product’s specific weight and dimensions. When you’re running sample rates through carriers, you’ll need this info. If products normally ship on their own in one box, the weight should be the total of the item PLUS the packaging itself and the dimensions are of the box. If customers normally order multiple items, you probably have one or two boxes that are most popular. Use those package dimensions as your baseline and then calculate what it costs to ship it at various weights.
Factor in where shipments are going & how they’re getting there. Other factors that play into your actual shipping costs are the destination and the shipping method. For US domestic shipments, shipping is figured based on zip code; international orders will depend on the country + postal code. Since i’s not really reasonable to have five zillion different shipping rates based on all the possible destinations & methods available to you, I recommend just lumping things into buckets. For merchants in the US, you might have groupings such as contiguous US, Alaska & HI, Canada, and everywhere else. You may also decide that you’d like to offer two service options: priority/express delivery and ground/economy delivery. In which case, make note of the costs for both of those for all your buckets.
Don’t forget to include packaging & pack-in costs. You can sometimes score free boxes from carriers like USPS or FedEx depending on your volume but once you start seriously selling, you’re probably going to want to upgrade to branded packaging. It just looks so much better and goes a long way in building your brand. When tallying up your costs, you’ll want to include not only the cost of the boxes themselves but also any fill you use or other materials such as tissue paper, packing peanuts, etc. Lastly, if you include anything special like a postcard, flyer, brochure, or stickers in each box don’t forget to include that in the cost as well! While these are usually just a few cents each, you have to account for it somewhere otherwise it’s just a loss. (p.s. If those pack-ins weigh more than a few ounces be sure to include them in the total weight of each package as well!)
If you want to establish a solid eCommerce brand, it’s best to invest in custom box packaging for your business. Seeing your brand logo in the packaging improves brand recall, which is a great marketing strategy. This helps boost brand awareness and enhance the customer experience. Above all, it gives your customers the impression that your brand is legit and serious about doing business.
Optional: Run a Shipping Audit
If you’re already busy shipping orders, a shipping audit can really help you check in on how things are going. I used to do this quarterly when I was a shipping & logistics manager as a way to keep a pulse on how our expected costs were stacking up against actuals. This doesn’t have to be super complicated but it can definitely expose places where your assumptions based on the factors above need adjusting.
How to run a shipping audit:
Determine a period that you’ll track details that will include a good sampling of your average shipments. This will vary on your order volume and frequency so for some this might be a day or two… others might want to track for a whole week or more.
Keep track of each shipment’s details such as size, weight, destination, etc plus what you charged each customer for the shipment.
At the end of your tracking period, go back to your shipping extension (or your carrier statement) and note what each shipment cost you.
In doing this, you can see if there are destinations or order types that routinely cost more or less than you’re currently charging.
Important tip: don’t worry about one-off outliers! There are always going to be weird shipments that go to crazy destinations that unexpectedly cost a small fortune. Or oddball orders that need to ship in much smaller or much larger boxes than normal. Whatever it is. Don’t worry about them. Shipping is a “sometimes you win" and “sometimes you lose” kind of thing. We’re just looking for if you win more than you lose, you know?
Shipping Strategies to Consider
Now that you have a handle on what it actually costs you to ship your products, it’s time to decide how you’ll cover those costs. Here are the most common options:
Make customers pay for the full price of shipping on top of product prices. This can either be a flat rate average of your costs OR variable, carrier-calculate rates. (Note that I am not a fan of variable rates and customers aren’t either. Check out this post for more on that!) Since this option can be a huge turn-off, I would really only recommend it if you have a very well-established business that sells lightweight items such as jewelry.
Make customers pay part of the shipping cost by increasing product prices & charging a small flat-rate shipping fee. This option works well because it allows you to recoup all of your costs in a more palpable way than the first option. Customers like flat rate shipping fees because they are easy to understand and you’ll like that you’ll see way fewer abandoned carts! If you’re worried about raising your product prices, don’t be! Unless you are selling a highly commoditized product, customers would much rather pay more for something as long as they’re getting a “deal” on shipping than feel nickel-and-dimed at checkout.
Make customers pay for all or part of shipping by increasing product prices accordingly & offering free shipping. Make no mistakes - this is my favorite shipping option by a landslide and the reason why is because customers love it! It’s easy. It feels generous. There are no hurdles or obstacles to overcome once someone is on the checkout page. Whether you account for all or just part of the shipping cost in your product prices is up to you and also depends on how complex you’d like your free shipping offer to be. More on that below but this is the option I would recommend for almost all businesses & startups. Okay, now on to the free shipping fine print!
Free Shipping Fine Print
Because you know that nothing is truly ever “free” here are the ways to make a free shipping strategy work for you:
Free Shipping on all orders - works best if you sell mostly small, lightweight items with high-profit margins or luxury goods.
Free Shipping on only orders over a certain amount - works best if you’re trying to increase your average order value (more on that below). For all orders below the minimum threshold, set up a nominal flat-rate fee.
Free Shipping on only orders for specific products or services - works best if you’re trying to promote new products or clear out seasonal inventory. (For more on how to set up automatic free shipping discounts, check out: Squarespace Discount Rules.)
Free Shipping on only orders to certain locations - works best if a lot of your customers are local/regional and you want to cater to them while not paying too much on the other shipments headed farther away.
Free Shipping on only orders by loyal customers - works best as an incentive to boost repeat purchases and build brand loyalty.
How to Calculate Average Order Value & Determine Your Free Shipping Threshold
Since offering free shipping on only orders over a set amount is my favorite option from the list above, I thought I’d make sure you know how to calculate average order value (sometimes referred to as “average cart value.”) That’s because this option is a tried-and-true method for boosting that amount! The important thing to keep in mind when setting a free shipping threshold is that you want it to be:
Low enough that shoppers feel they can reasonably add an additional product or two without spending a significant amount more than they planned.
High enough that you can cover the additional cost of shipping while still retaining profits.
To calculate your average order value, simply divide your revenue by the # of purchases. Using that number as your base, you’ll then identify a point just above it that you can set as the free shipping cutoff. For example, if your average order value is currently $57 and your average product sells for $18, I would set your free shipping threshold of $75. This would encourage the average shopper to add just one more product to their cart (a reasonable ask) while providing you additional revue to offset any additional shipping costs. Win-win!
Bonus Shipping Strategies Worth Exploring
Local Pickup - I firmly believe that every online shop that has the capacity to do so should be offering some sort of free local pickup. There are just so many good things about this:
Allows you to compete with large retailers & big box sellers
Provides an alternative for your local customers to avoid shipping costs
Offers the opportunity for in-person upsells & engagement
Better for the planet!
Click here for more on how to set up an in-store or local pickup option on Squarespace.
Go Wild & Combine Multiple Options! Okay, okay, okay - I swear to you that I’ll stop saying that options are my favorite but I swear: this one is my actual favorite 💕 Some of the most successful online sellers don’t implement just one of the strategies outlined above, they combine several of them! An example of what this might look like:
Offering low, flat-rate shipping rates for domestic & international shipments. Again, this makes it easy for customers to understand what to expect at checkout and you’ll have accounted for some of the shipping costs by pricing your products appropriately.
Offering free, flat-rate shipping on orders over a certain amount in order to boost average order value. The bonus here is that even though shipping is “free” for your customer that you’ll have already accounted for some of your shipping expenses by pricing your products appropriately.
Offering free in-store pickup for local customers. This will allow them to get orders faster and cheaper and you’ll come out ahead because (you guessed it) you’ll have accounted for some shipping cost in the cost of your products. Bam - straight to the bottom line.
Using the occasional free shipping offer for specific product categories or customer segments as a marketing tool. This allows you to move slow inventory, reward your best customers, build your email list, or promote a new product line without sacrificing the integrity of your main shipping strategy.
Bottom Line
A successful shipping strategy can be as simple or as complex as you’d like it to be but the most important thing is that you start by understanding what it actually costs you and going from there. It’s so important to keep track of this type of info about your business and check back in regularly to make sure things are on track. Shipping doesn’t have to be a headache at all — especially once you realize that it’s one of the most powerful (and easiest) tools available to be able to increase average order values, reduce abandoned cart rates and make customers happy!

3 Mistakes New Online Sellers Make
Tips and strategies to help those new to e-commerce launch quickly and get the most out of a web design project.
If you’re new to the world of e-commerce, it can be... overwhelming. And that’s probably putting it mildly. There are so many things that people will say you need to know and do — and most of it is all written in some sort of techie language that you don’t speak. Honestly, I think it’s probably why there are still so many small businesses that don’t have a website. (Depending on who you ask, estimates are that between 37% to 46% of small businesses in the US still don’t have a website!)
As consumer demand for online shopping options continues to rise, businesses that have even a small web presence will beat out those without one. As I’ve worked with hundreds of clients over the years (and also just browsed a lot of websites), I’ve identified three major mistakes I see a lot of e-commerce newbies make. So, if you’ve been struggling with making the leap from brick-and-mortar or word-of-mouth selling to fledgling e-commerce business, read up. The best part? The solutions aren’t the least bit technical :)
Mistake #1
They make the project bigger than it needs to be.
All too often, I see business owners struggle with e-commerce projects (or put them off altogether) because they are just trying to do too much with their new website at once. They put too much pressure on trying to get everything online and making it all “perfect” when they should be focusing on making smaller, more incremental improvements over time. Some people blame this on being a “perfectionist” but I say it’s a diversion tactic and, unfortunately, it’s costing business.
Possible Solutions:
“The incremental sales boost you’ll get from having just 25% of your top sellers online is still going to be better than no sales at all if you waited to get everything ready to go first.”
If you have a large inventory, don’t worry about getting it all online at once. Pick a handful of your best sellers and start there. The incremental sales boost you’ll get from having just 25% of your top sellers online is still going to be better than no sales at all if you waited to get everything ready to go first. Remember, time = money.
Break the project up into phases. Start by moving just one product or service type online or only providing limited options or variations at first. This will allow you to test things out to see how they go while keeping costs down. Customers would rather have limited options than no options.
Start simple and add fancy features later. Your website doesn’t have to have all the bells and whistles on the day you launch. You can always work on adding cool new things down the road. Keeping your site simple to start will allow you to get launched faster and you can use the analytics (and sales!) from those initial online customers to help you add to your site as you grow. The added benefit here is that it will give people a reason to keep coming back to see what’s new!
Mistake #2
They say too much.
There are typically two reasons why we tend to say too much on our websites: 1) we think it's all about us or 2) we think if we could just tell people more that will encourage them to buy. This results in websites with giant, boring blocks of text or super complicated menus - both of which are a big turn-off when it comes to sales.
Again, the best sites are simple, straightforward, and highly skimmable. Most e-commerce sites need only a few static pages (such as an about page and an FAQ page) but I often see newbies give more real estate to the history of their company than they do to what they’re actually selling. This is a huge mistake and has the unintended side effect of reducing sales, which makes people think e-commerce isn’t worth it. The truth is, we’re often getting in our own way when it comes to sales.
Copywriting Tips:
Keep the focus on your products or services and the benefits they provide to your customer or client. People don’t care about you, they care about what you can do for them. Good news: this means the pressure’s off your need to write the perfect bio or company mission statement. (No one was reading it anyway.)
Avoid technical jargon or long explanations, even if you think they are important to what you’re selling.
Whenever possible, write in bullet points or be open to layouts that push the extraneous details down the page or out of view for most customers. For example, moving super detailed info to a FAQ page or hiding it in a drop-down versus putting it all out there upfront. This way, it's there for the small percentage of people who want to see it but it's not in the way for everyone else.
A good rule of thumb for web copy is to write out what you think you need to say, then cut it in half... and then cut it in half again. Upside: less to write and faster to launch!
Mistake #3
They spend too much time on design.
“E-commerce isn’t a 6 trillion dollar market segment by mistake. There’s a ton of science and strategy to the designs you see online and rookies spend time tinkering with things that don’t need tinkering.”
There’s a reason most websites share a lot of the same layouts and features: it’s because they work. E-commerce isn’t a 6 trillion dollar market segment by mistake. There’s a ton of science and strategy to the designs you see online. And as much as it pains those of us who enjoy aesthetically pleasing websites to admit, function really does matter more than form.
This is another case where rookies have a tell and that’s that they tinker with things that don’t need tinkering. There’s a reason why the button is always where the button always is. Or why menu elements always behave a certain way. It’s because it’s an important part of helping users know how to interact with them.
The upside here is that not worrying about moving things a pixel to the left or right is that you can get to launch day way faster. Also, this isn't to say that design isn't super important to how a website performs, just that for most small businesses, the return on investment just isn't there. It's not worth it to spend months and months stuck in design and development, essentially reinventing the wheel.
Tips to get the most out of the web design process:
Find a web designer you like and whose design style you vibe with and then trust them to do their thing. This doesn’t mean that your input isn’t an important part of the process; just that you hired them for a reason. Your success and happiness are important and they aren't going to steer you wrong.
Don’t be afraid to ask questions if you'd like to know more about the reasons why a design or layout choice was made. In most cases, user experience best practices have guided the decision to put a button here or a link there and we may not recommend moving or changing it if you'd like to maximize sales/conversions but we're always happy to explain why.
In 99.9% of cases, it's best to just pick a theme or template as a great starting point and spend time building out a great user and customer experience around that versus going for a completely custom build. Again, this comes down to ROI and doing everything possible to get you to launch day faster!
If you’re struggling with getting started here’s a post you might find helpful: A Step-by-Step Guide to Starting an eCommerce Business in 2024.

5 eCommerce Trends You Can't Afford to Miss Out On
These trends are easy to implement but will have a major impact on your shop experience AND your bottom line! You’ll be pleased to know that this list doesn’t feature any zany design ideas that will look outdated next week but instead will show you how to better connect with today’s online (and in person!) shoppers.
There’s no doubt at all that the world of eCommerce has seen some major booms and changes over the last few years. With more people than ever shopping online - and more small businesses than ever starting to sell online to meet those demands - there are some clear trends that don’t seem to be going away anytime soon.
There are a couple of underlying themes to these trends worth noting. The first is that customers want to feel secure and confident in shopping online above all else. They aren’t necessarily looking for edgy website designs or really outlandish features. The things that motivate people to buy are simple, easy-to-implement ways that just provide reassurance that you’ll be there for them if they need you.
The second theme is that people are looking for mixed online and offline shopping experiences. So if you have a brick-and-mortar store, retail shop, or popup location - use that to your advantage on your website! Your IRL customers see your website as a continuation of the in-store experience, not necessarily a replacement for it and vice versa. You can lean into this overall theme by implementing the ideas below that allow for online customers and real-life shoppers to become one and the same.
Trend 1
Have a generous return & exchange policy.
Having a generous return policy is one of the absolute best things you can do to boost online sales in 2022. Study after study shows us that online stores that offer returns (or better yet, FREE returns) and exchanges perform better than those that don’t. For people who are hesitant to shop online or even just those who are new to your brand, touting your return policy in multiple places on your site is an excellent conversion booster.
How to do it: How to Manage eCommerce Returns on Your Small Business Website
Trend 2
Offer a Buy Now, Pay Later payment option.
I’ll be honest, I thought the whole “buy now, pay later” thing was going to be a short-lived thing that died out by now. But, boy, was I wrong. Shoppers love this option, especially younger shoppers who are leary of amassing credit card debt. It’s also easy enough to add an option like Afterpay to Squarespace that I say just toggle it on so that it’s there for those who want it. A lot of people will still opt to pay traditionally but you may see a small uptick in sales by appealing to those who may have been hesitant to shop without this option.
How to do it: How to Enable AfterPay on Squarespace
Trend 3
Create a Local Pickup option on your website.
This is one of my personal favorite options when I’m shopping online as it helps both me and the place I’m buying from save a little on shipping - and it can be a little greener, too! Local pickup options combine the best of both worlds; people can browse and shop online but then still drop by to pick up their order. Studies also show that this can lead to an uptick in in-person purchases too - win, win! Think of it just like all the candy and goodies in the checkout lane at the grocery store; you’ve technically already finished your shopping but it’s just so tempting to add a little extra something at the last minute!
How to do it: How to Set Up Local Pickup or Curbside Delivery on Squarespace
Trend 4
Display helpful alternatives to any out-of-stock options.
Oh man, it’s frustrating when you think you’ve finally discovered the perfect product for you only to find that it’s out of stock! Shoppers understand that supply chain issues and shortages may mean that you’re running inventory pretty lean and mean but don’t miss out on an opportunity to sell them something else they may love just because their first choice is not available.
I recommend using some of the built-in merchandising features in Squarespace like related products or product waitlists to prevent online customers from reaching a dead end. If you want to get even fancier, you could also add URL redirects for out-of-stock products so that people land directly on your preferred alternative (just make sure to mention that in the copy otherwise people will be confused).
Related: Built-In Features to Help You Sell on Squarespace
Trend 5
Add a chat option to your site.
I swear to you I’m not writing this post with just all of my favorite things as an online shopper myself but I love this one as well! And this is also another one where the stats confirm it works: the majority of people surveyed say they not only expect a live chat option but use it as an indicator of how good a shop’s customer service is overall.
In this post, I dig into what I call the idea of “Conversational Commerce” but the whole point is that you can (and should) be using live chat as a competitive advantage over your competitors. Nowhere else online are you able to have direct 1:1 conversations with your customers and help guide them to exactly what they’re looking for. You can’t have those conversations via social media or even email. Live chat is a way to bring what makes you special in-person to your online space.
How to do it: Best Live Chat Widgets for Squarespace
Bottom Line
These are some trends I can get behind! I love that when it comes to eCommerce people have shown that what they’re looking for are clarity and connection. They want to be reassured and to feel confident in their buying decisions. They want to know that there are real people behind the brand and they want to communicate with YOU! If you’re looking for ways to increase sales or build your audience, I suggest starting with the 5 things on this list. I can guarantee your audience will love them!
Looking for more? Check out: 7 Ways to Build Trust (and Boost Sales) on Your eCommerce Website

3 Ways to Crush This Holiday Selling Season with Your Squarespace eCommerce Website
Don’t let holiday selling stress you out! Here are 3 simple solutions to make sure you’re not left worried about inventory or shipping - the biggest problems online sellers are facing this season!
eCommerce merchants are facing a double whammy of things to be nervous about this holiday selling season. Chances are you’re worried about 1) ongoing supply chain issues AND 2) the threat of longer than normal shipping times this holiday season (again).
This is resulting in:
Being uneasy about promoting too much too early because you’re not sure you’re even going to have inventory to sell, and…
Sleepless nights spent worrying about an even shorter-than-normal selling season, not sure you’ll be able to fulfill and ship in the teeny tiny window of time you have.
Eek!
Don’t worry - I have three solutions you can try to help ease the nerves so you can sell with confidence this holiday season.
1. Add a Local Pickup Option
Adding a local pickup option will allow for sales right up to the very last minute -- no need to cut things off early to allow for extra shipping and fulfillment time!
Bonus: you can use local pickup as a competitive advantage over non-local online competitors - winning over shoppers who don't want to risk not having gifts arrive in time.
Not sure if this is for you? Let’s explore the idea:
The best of both worlds - offering in-store pickup or curbside delivery are great ways to combine the ease of eCommerce with the familiarity of buying from a favorite local business.
Win back customers who are accustomed to “free” 2-day shipping - It’s about more than just convenience; providing a local pickup option can help you compete with the big guys! Customers are used to shopping online with Amazon or Walmart and getting whatever they want delivered fast. Local pickup is a way to beat them to it!
I think that if more businesses knew how easy it was to set these options up that they would definitely do it - and possibly attract a whole new batch of customers as a result!
I mean, how nice would it be if you could pick up all your holiday shopping curbside on your way home from work?!
Marketing curbside or in-store pickup as a service can really give you a competitive edge! Plus, you can throw in upsells like free gifts with purchase or free gift wrapping to really sweeten the deal.

Tips for Offering a Successful Local Pickup Program
Like I said, setting this up is pretty easy to do from a technical perspective but here are a few quick tips to make sure you’re set up for success before you so:
Document your fulfillment process. This includes making sure that everyone on your team is educated on the in-store pickup or curbside delivery procedures. Write down every step that happens between the time someone submits an order until that order is picked up. Who monitors your inbox for new orders? Who marks them as fulfilled and when? How and when are customers notified? Be specific. Your plan doesn’t have to be complex but it should be organized.
Add info about local pickup to your FAQ page. It’s important to set expectations early about how long it will take to fulfill an order, what needs to be done when the customer arrives at your location, etc. Add information about pick-up hours, where to park, what they need to bring to pick up their order, and your contact information -- especially a phone number! (When in doubt, my rule of thumb is to treat every visitor like a lost tourist 😂)
Provide directions and ALL the information again in your email confirmation. You may have put all the info on your website and FAQ page but just count on the fact that people are busy and assume they didn’t see it. Don’t worry about repeating yourself and provide the directions about what to do again in your email confirmation email. Be explicit. For example, are they to proceed directly to your location right away or will you be emailing again when their order is ready for pickup? Is there a phone number they need to keep handy? Can they stay in their car? Is there a special line to stand in for online orders?
Put up easy-to-read signage at your location regarding curbside pickup procedures. At the risk of repeating myself, I’m telling you to go ahead and repeat yourself :) If you need people to park in a certain spot or area, call or text a certain number or follow some other procedures, let them know. Make it simple and clear. The goal is to reduce frustration and confusion. Great on-site signage also has the benefit of advertising to anyone passing by that you offer local pickup so be sure to mention your website on any and all printed materials!
Two Options for Local Pickup on Squarespace
Use the built-in Local Pickup option. This will create an option at checkout toggle between shipping & pickup and will be available to all customers. (Get there: HOME > COMMERCE > PICKUP)
Set up a free flat-rate option. This will allow you to restrict local pickup options to people in certain areas using zip or postal codes. While it isn’t technically necessary to limit this as an option at checkout, it’s nice to only show it to people who could reasonably choose it. The trick on this is to make sure you give the pickup option a very clear name like “Curbside Pickup - YOUR AREA ONLY” so that it differentiates the local pickup option from any other (potentially free) shipping options you offer. (Get there: HOME > COMMERCE > SHIPPING > ADD SHIPPING OPTION > FLAT RATE)
Tip: for more complete, step-by-step instructions on both of the ways outlined above to set up a local pickup option on Squarespace, check out the bottom of this post where I break down all the details!
2. Simplify Your Shipping Strategy + Add a Shipping Extension
For traditional eCommerce orders, adding a shipping extension can help you fulfill orders FAST and save you some money in the process. Using a shipping extension can help you control costs so that you can offer the #1 thing that online shoppers are looking for: FREE SHIPPING!!!
Plus, I’m pretty sure waiting in line at the post office with other frazzled shippers isn’t exactly you’re idea of a good time! Let’s get you out of there!
Start By Making a Smart Shipping Game Plan:
The best shipping strategies are SIMPLE. Like, stupid simple. And most online sellers make it unnecessarily complicated. Here’s what I recommend for the easiest (and highest converting) shipping strategy you could possibly have:
Set a per order flat rate shipping option. Make the cost cover some nominal amount of whatever it costs you to ship your average order. Don’t worry about making it cover everything, just make it something easy. Like $5. Or $7. Or something relatively easy for online shoppers to stomach and understand.
Set up an automatic free shipping discount for orders above a certain amount. The threshold for free shipping should ideally be somewhere just north of your current average order value. You’ll be surprised at how many people choose to add just a little something to their cart in exchange for free shipping! The key here is that you’re not offering free shipping to just anyone so be sure to set this up in the discount section, not the shipping section!
Why this combo works:
Simply, people hate feeling nickel-and-dimed and love feeling like they got a deal. That’s it.
Offering a flat rate shipping option that will apply to orders under your free shipping threshold feels honest and transparent and ensures that shoppers won’t face any nasty surprises in their cart.
Setting up an automatic free shipping discount encourages people to spend just a little bit more while still making it easy - no coupon code required!
This combo is also super easy to promote!
Imagine how simple it will be to boil your shipping program down to something as easy as: “$5 flat rate shipping. All orders over $45 ship free, no code required!” Swoon. I love it.

On the fence about offering free shipping? Let me convince you it’s worth it!
I go into all the pros and cons of free shipping in this post: eCommerce Strategy 101: Should You Offer Free Shipping? but here are some of the benefits of this for anyone with lingering doubts about how well it works as a strategy.
Free shipping:
Reduces cart abandonment rates
Increases conversion rates
Boosts revenue
Increases order volume
Increases average order value
Helps attract new customers
Encourages repeat visitors
Boosts loyalty, and more!
Combined with a minimum order amount requirement and a low flat rate for any orders below that amount, you’ve got a winning shipping strategy!
Sanity Saver: Shipping Extensions!
Ok, now that you have a winning customer-facing shipping strategy it’s time to focus on what happens behind the scenes when orders come in.
For small- to medium-sized businesses, managing shipping is typically one of the biggest headaches and often eats up tons of resources - time, money, and sanity!
Luckily, Squarespace pairs well with several popular shipping extensions that can help take a load off.
How shipping extensions work:
Shipping extensions are basically apps that use the Commerce API to pull in order data to a third-party platform that takes care of all things shipping for you. Some popular Squarespace shipping extensions are:
ShipStation
GoShippo
ShipBob
Easyship
(Pssst - I give you all details on my fave option below!!)
All of the shipping extensions with native Squarespace shipping integrations work pretty much the same way:
Sign up for an account directly with the app you’d like to use then connect it to your Squarespace site
When orders are placed on your website, the order information will get automatically pulled into your extension of choice and a shipping label will be created for you to print when you are ready to ship.
Once shipped, the tracking information will get sent back to Squarespace and automatically included in a shipping confirmation email to your customer.
Sidenote: A common misconception about shipping extensions is that connecting one to your site somehow “takes over” the shipping options that are displayed to your customers at check out. What you need to remember about shipping extensions is that they only take care of what happens behind the scenes for you, the merchant. You’ll benefit from discounted rates plus a ton of saved time and headaches managing fulfillment manually on your own. The time and cost savings shipping extensions offer still need to be balanced out with a winning customer-facing strategy like above!
My Favorite Shipping Extension: Easyship!
Knowing that all shipping extensions work in essentially the same way, how do you go about choosing one over the other? Well, let me save you the agony of starting a bunch of free trials and testing them for yourself :) My fave is Easyship. Here’s why:
As its name implies… it’s easy. Easyship has a nice, clean interface and offers just enough options to allow you to customize the experience without feeling bloated. Some of the other extensions have complicated user interfaces and offer a bunch of unnecessary options that just bog things down.
The discounts are great! As an online seller, you should never, ever, ever pay retail for shipping. You are not a retail customer. Easyship has great discounted rates that are passed along to you for over 250+ carriers worldwide.
3. Add Fresh (No Cost) Inventory with Print on Demand & Printful
You are not alone if you’re nervous about buying a bunch of inventory that you won't be able to sell - or if you’re one of the zillions of sellers who has a critical shipment you’ve been waiting on stuck in port somewhere. Inventory also costs (wait for it)... money.
Solution:

If you’re running short on both time and resources - you should definitely give a print-on-demand solution like Printful a try!
I think this is an especially good idea if you already have some of your own products in stock but just want to round out your product lineup in a low-risk, high-reward way.
With Printful you can quickly add new products to their shop to make it look like you have tons to offer but you don’t need to worry about:
Buying inventory that will never sell
Production
Warehousing
Fulfillment
Shipping
Returns
… or any of the other headaches that go along with making and selling your own goods!
What is print on demand and how does it work?
Somewhere between manufacturing your own products and dropshipping someone else’s goods from overseas lies the print-on-demand industry. To me, it’s the perfect medium and, in many ways, the best of both worlds.
With print on demand you can offer your own customized products in your own online store... without needing to worry about production, warehousing, shipping, or any of the other headaches that come along with traditional eCommerce.
It’s a win-win!
The Best Print on Demand Solution for Squarespace: Printful!
The secret to making POD work without too much actual work is choosing the right company to partner with and I think you can’t beat the combo of Squarespace + Printful! With your Squarespace site all set up to sell, adding Printful into the mix is easy. And the beauty of it is that it works whether:
Your entire inventory is print-on-demand products or...
You’ll just be adding a few SKUs to your mix to round things out.
It can really be as much or as little a part of your product lineup as you need it to be.
About Printful
If you’re new to POD or Printful, let me share with you how things work and some of the benefits of adding it as an extension of your Squarespace eCommerce business.
Printful itself is FREE! There are NO monthly subscription fees, ZERO set up costs, and NO order minimums. You only pay the wholesale price + shipping for each item that is produced.
Everything is made on demand. Because items are never made in bulk and only go to print when they are actually ordered you can feel free to test drive designs & products without any upfront investment costs, no inventory to store and no worries that you’ll be left holding the bag if something happens to be a flop. (Hey, it happens!)
It’s a completely white-labeled experience. From start to finish, your customers will only know that they saw something they loved on your site and that it arrived in perfect condition to them. Everything from the emails they receive about their order to even the packing slip in the package can be personalized to match your brand. If you want, you can even ship pack-ins like stickers or custom packaging to Printful to use on all your orders!
How Printful Works:
You markup products as much or as little as you want. You’re free to markup the products that Printful will be making as much or as little as you want - you’re in complete control! Remember, it’s not just the product cost itself that matters - it’s your design and style that people are willing to pay for!
Customers pay you directly. When a customer places an order on your site, they’ll pay you directly and in full.
Squarespace sends new order info to Printful for you. The integration between Squarespace and Printful will automatically push the order info from your customer into Printful which means that from here you’re pretty much hands-off completely!
Printful takes care of the rest! Printful will charge you the wholesale cost of the product your customer ordered (plus shipping and taxes) and take care of production, fulfillment, and shipping. They’ll even automatically send the tracking information back to Squarespace so that your customers get a shipping confirmation email from you!
Ready to give print on demand a try? Get started with Printful here!
Have a Stress Free Holiday Selling Season!
One of the reasons I love working with small- to medium-sized businesses like yours is that entrepreneurs are a scrappy bunch! You’re quick to adapt to changing market conditions and don’t let things like inventory delays or tight shipping windows get you down.
Running an eCommerce business can be stress-free, even during the holidays!
By using built-in tools like Local Pickup or a shipping extension like Easyship you can streamline your operations. Incorporating a print-on-demand solution like Printful can get you the inventory you need in a low-risk way.
If you’ve been stressed about how you’re going to make things work, I hope you give these things a try!

5 Simple Discount Tips
When it comes to discounts, I like to keep things simple! Check out my 5 tips for creating your own simple discount strategy that’s easy to market and manage.
Deciding when and how to discount your products is going to depend as much on your brand as what you’re selling. (In this post all about coupons, offers, discounts & promos, I go more into depth about whether discounting is “on brand” for you or not.)
However, I do think that eCommerce customers, in general, are not only accustomed to seeing offers in their inboxes or discounts promoted on social media but that they expect and enjoy the opportunity to score a deal at checkout. What this means is that even luxury and mid-market brands that never used to offer coupons are starting to incorporate discounts into their marketing strategies to meet the expectations of today’s online shoppers.
The one thing to keep in mind is that while you clearly have a lot of discount options and capabilities at your disposal that just because you can run very specific, highly complex promotions doesn’t mean you should. Keeping your discount strategy simple not only helps you make sure that you’re not setting yourself up to over-discount but is also way easier to market!
With those things in mind, here’s a recommended general discount strategy + some of my best tips for running promotions on your eCommerce site:
Offer Free Shipping - I think every shop needs to have a free shipping option. Restrict it to your cheapest method of shipping and only offer it to orders over a certain amount. Studies have shown that people will pay up for expedited shipping but really hate not having a base option offered for free.
But Throw Some Restrictions On It - Even better, I say restrict that free shipping option so that it only applies to orders over a certain amount. Be strategic here and set the threshold just above your current average order total (before taxes and shipping). People are almost always willing to pay more for products in order to score “free” shipping 🙃
Have One Welcome Discount Code - I tend to not like coupon codes in general but they do work well for “thank you” offers for things like signing up for your email list or placing their first order. If you use Squarespace Campaigns for your email marketing, it’s super easy to set up an automatic email that delivers a coupon code to entice first-time customers to give you a try.
Make Everything Else an Automatic Discount - For other sales or promos you have throughout the year, make it easy and go automated! For example, category discounts or specific product discounts are best when you can just say: “10% off all summer products - no code needed!”
Keep It Simple - Keep your active discounts or offers super targeted and limited. Unless you’re running paid Google ads or something, there’s really no need to ever have a thousand promo codes out there. I'm of the mindset that focusing on value and quality over discounting tends to be the better long-run business strategy.

Order Fulfillment 101
Creating a great process to manage and fulfill your orders on the back end is just as important to your eCommerce experience as what your site looks like online. Luckily, Squarespace makes it super streamlined and simple to fulfill orders and manage customers. Once you receive an order and have it ready to ship, here’s how the order fulfillment process works.
Creating a great process to manage and fulfill your orders on the back end is just as important to your eCommerce experience as what your site looks like online. Luckily, Squarespace makes it super streamlined and simple to fulfill orders and manage customers. Once you receive an order and have it ready to ship, here’s how the order fulfillment process works.
The Workflow
Get Notified - All store managers or site admins will receive an email notification every time you receive an order. If you use the Squarespace app you can also get push notifications about new orders. If you want to send the emails to other people on your team that aren’t users on your site you can either set up a rule in your Gmail to forward copies of the emails or use a tool like Zapier to set up more advanced options.
View Order Details - From the back end of Squarespace or the Commerce app, you can view an order summary, including info submitted via any custom product forms or custom checkout forms you’re using. You can also view the order status, activity, notes, and email notifications associated with the order.
Fulfill The Order - The options available to you will depend on what you’re selling. Orders for digital products or gift cards are automatically marked as fulfilled because they are delivered immediately to your customer and no further action is needed. For physical or service products, orders are held as pending and you can mark them as fulfilled as they ship or as you complete them.
Add Tracking Info - Only orders for physical products will prompt you to enter tracking information when you fulfill the order. Squarespace recognizes tracking numbers from the following carriers and will update the carrier name automatically: Australia Post, Canada Post, DHL eCommerce, DHL Express, FedEx, UPS, USPS & Royal Mail. For any other carriers, you can just enter the name under “Other.”
Send Confirmation - After you enter tracking information you’ll see a checkbox that is automatically checked to send an “order fulfilled” email confirmation to your customer. (You can uncheck this if you want to not send the email for some reason.) To edit how this email looks or customize it with any other info check out this post about how to customize your store’s email notifications. That’s it - you’re done!
Other Options
Bulk Fulfillment - If you have more than one order that you’d like to fulfill all at once you can do that by going to Home > Commerce > Orders > and filter by pending orders. You can select any/all pending orders you’d like to fulfill. You’ll then be prompted to enter tracking info if you have it.
Cancellations & Full Refunds - The most important thing to note is that you should always process refunds and cancellations directly via Squarespace and not through the payment provider. This makes sure that your stock levels remain accurate and that order info is synced correctly. You can also only cancel pending orders so if you’ve already marked the order as fulfilled you’ll need to move it back to pending before refunding or canceling. Canceling automatically refunds the purchase and sends the customer an email about the cancellation. Marking an order as canceled also gives you the option to restock your inventory with items from the order. Customers will receive the Order Cancelled email.
Partial Refunds - The most common scenario for this is if you offer your customer a refund for their purchase less the shipping costs but you can issue a refund for any amount you enter. From the order details screen just click “Issue Refund” and enter the amount. Once you confirm the refund your customer will automatically receive an email confirming so. Note that issuing a partial refund doesn’t automatically restock any inventory so if you received a return and have that product available to sell again you’ll need to add it manually to the inventory count.
Exporting Orders - If you need to pull your order info into another program or spreadsheet for reporting or other activities, you can export orders using a range of filters by going to Home > Commerce > Orders > Export.
For more on what you can do to manage your customers and orders on the back end, check out Using Squarespace as Your CRM Part 1 and Part 2.
How a Shipping Extension Changes the Fulfillment Process
Easyship Dashboard
Connecting a shipping extension is helpful for a number of reasons. A shipping extension makes it easy to print shipping labels for your orders with all the order info filled in for you - no typing addresses! :) Besides just being convenient by saving you from waiting in line for hours at the post office, most of the extensions offer discounted rates which you can take advantage of to stay competitive on shipping costs.
There’s another big benefit to using a shipping extension that really makes it a no-brainer for anyone shipping even a few products. When an order is placed on your Squarespace site, the info is automatically pushed out to your shipping extension of choice. And then, once you print & ship that order, the tracking information is automatically pushed back to Squarespace. This means that items 3-5 in the workflow above are all taken care of for you by the extension in addition to generating the shipping label and giving you a shipping discount.
For more on how shipping extensions work and how to set up a profitable shipping strategy on Squarespace check out this post.
For a full review of all the shipping extensions available on Squarespace, including my fave Easyship check out this review post.

6 Steps to Creating an Effective Online Store
A successful website isn’t just about good design; it’s about how well it works, how well it sells, and how effective it is as a business tool. Whether you’re just getting ready to launch or are interested in improving your website and customer experience, these 6 simple steps will help you get things going in the right direction on your eCommerce Squarespace website.
A successful website isn’t just about good design; it’s about how well it works, how well it sells, and how effective it is as a business tool. Whether you’re just getting ready to launch or are interested in improving your website and customer experience, these 6 simple steps will help you get things going in the right direction and help you take your site from basic & blah to eCommerce mega-machine.
1. Manage Inventory in Squarespace
If you ask me, one of the first red flags I look for on a mismanaged eCommerce site is people selling physical products but marking the inventory as “unlimited.” Eek. I mean, what kind of crazy roller coaster chaotic world this must be! If you sell… pretty much anything… you have to know how much you have to sell. Heck, even events or some digital goods need “inventory” counts; you know how many seats you have to sell or how many downloads you need to break even.
For a lot of shops, managing inventory could be as simple as syncing a Google sheet up to Squarespace with a tool like Zapier.
If you want to go a step further, you could also check out one of Squarespace’s inventory extensions. (I review them all here.)
Be sure to also check out the Squarespace Commerce app which allows you to make inventory updates from your phone or tablet.
2. Add Product Categories & Tags
Product categories & tags are the backbones of a well-organized eCommerce site. Not only can you use these to help guide visitors to exactly what they’re looking for quickly, but they can also help you do cool things with your navigation - and a few other tricks (more on those below)!
For a deep dive into all the ins and outs of categories & tags check out this post: How to Use Product Categories & Tags in Squarespace
For more tips on how to keep things from getting out of control, check out the tips in this post.
3. Use Summary Blocks
Alright, I told you that categories & tags would help you do cool things and this is one of them! I think a lot of people see Squarespace Summary Blocks as great tools for pulling in an overview of posts from blogs or events but they’re also indispensable for displaying product groups on your home page - or even in blog posts, like below! You can use a summary block’s filter settings to display products from any category or with any tag. You can also use them to display only featured products. This is a great way to showcase things like bestsellers, new items, or sale items.


As an extension of this, you can also use product categories or tags to power some of my favorite Squarespace plugins like the Featured Product Tag and Product Shop Labels ones from this post.
4. Connect People to Your Email List
Beyond just sales, one of your goals really should be to always be growing your email list. It’s just such a valuable business asset! (And not just because you shouldn’t bank on social media.) I would definitely recommend asking people to sign up for your list at checkout in addition to offering a signup form in the footer of your site. Not sold on email yet? Let me convince you:
Email marketing offers a higher ROI than SEO, display, advertising, and other forms of digital marketing. It’s estimated that for every $1 you spend on email marketing, you can expect an average return of $42. More in this post.
According to another study, email marketing reigns supreme with an ROI of 4400%. No, that’s not a typo. More here: 4 Post-Sale Emails Every eCommerce Site Needs
Feeling stuck? Here are 11 Lead Magnet, Offer & Freebie Ideas to Grow Your Email List
5. Use Product Blocks
A Squarespace Product Block is like a summary block on steroids. But instead of giving you an overview of a bunch of different products in a certain category and inviting you to click through for details, a product block puts everything you need right there front and center. Product blocks turn any page you want into a shop page. Use them in blog posts, on event pages, on your home page, on landing pages - wherever they make sense for your business. Product blocks allow people to “add to cart” from right where they are, no need to navigate anywhere else.
If you’re creating targeted landing pages for paid ads or social media posts, use product blocks to add just the product you’re advertising right on the page. No distractions or other shop items to get confused by! For more on creating a great sales page, check out this post.
You could also use a product block as a way to create an interesting upsell or cross-sell layout by adding it to the additional info section of a core product. This would be a way to display super-targeted products as opposed to using the Related Products feature which is going to constantly auto-update.
6. Add Automatic Discounts
Look, I love a coupon code as much as the next person but you know what I love more than that? NOT having to remember a coupon code in order to score a deal. 🥳 Automatic discounts on Squarespace allow you to set the conditions that need to be met in order to get the discount. Once the criteria you define is met ( - boom - auto discount. This is a great way to improve the experience of shopping on your site for your customers. You can create automatic discounts that apply to any order, orders over a certain amount, single products or whole product categories!
For more on this check out this post: eCommerce Crash Course: Coupons, Offers, Discounts & Promos
If you need some ideas on some sales and offers to try out using automatic discounts check out this post.
Automatic discounts like this are separate from and in addition to any automatic free shipping offers you create. I would just keep this in mind so that you don’t create too many offers that people can stack together (just pick one or the other). Check out this post for more on free shipping and setting up a profitable shipping strategy.
Bottom Line
When it comes to creating an effective eCommerce site, you’ve got to focus on some of the little things that have a big impact on customer experience and your business. Whether it’s managing inventory effectively, properly merchandising your products, or ensuring every interaction your customer has is smooth and easy - you can do it all using the built-in tools on Squarespace.

A Step-by-Step Guide on How to Set Up Your First Online Shop
From what brand elements you really need to have to the best place to grab your domain name, what pages your site needs, and how to get paid - this post covers everything you need to know if you’re ready to start doing business online ASAP.
Updated June 2021
If you’ve been stewing on an eCommerce business idea or are finally ready to launch that startup, when better than right now? Today. Why not?! Sure, it’s going to take time to work on all the little details but I’m a huge proponent of the “progress over perfection” mantra. It’s probably easier than you think to move the needle and make a lot of headway in a manner of days or weeks, not months or years. So while your competitors are busy having another meeting to talk about a website, you’ll already be doing business online. Look how savvy you are.
Step 1: Name & Branding
The biggest mistake I see people make in this department may actually come as a surprise. I think most people overthink - and overspend - in this phase. This comes as absolutely no offense to all the brand designers out there (hey, I used to be one so I feel I can say this!) but I see so many clients stall out in this early phase and never move forward. Too much time is spent on perfecting a logo for a concept that hasn’t been proven or products that haven’t been tested and the thing that I can 100% tell you about branding is that it really has nothing to do with design.
I just love this quote and I think it sums things up perfectly:
“A brand is not a product or a promise or a feeling. It’s the sum of all the experiences you have with a company.”
So, step 1 is to just make some decisions and move forward. You don’t have to live with them forever. Don’t overthink things because you can always change them down the road. Names, logos, fonts, colors - all totally changeable.
I would actually rather see a company bootstrap a little on this front as a startup and once their concept, product, or service has been vetted and all the kinks worked out, hire a brand designer to come in and give things a glow up. If you invest heavily in branding as a Phase 2 initiative instead of in Phase 1, you’ll be able to provide data, metrics, real feedback, and real experiences to your brand designer to work from. Early on, it’s all totally hypothetical. The goal right now is just to have something to launch with.
From a web design perspective, here’s what I think you need as a bare minimum:
A simple, text-based logo in just one or two colors. (I love this post from GoLiveHQ on 6 Easy Steps to Create a Text-Based Logo For Your Brand.)
A simple color palette that consists of no more than 3 colors:
One dark color
One light color
One accent color
Favorite brand fonts - two at most, one for headlines/buttons and another for body copy.
For more on building a minimalist brand check out this post!


Step 2: Decide whether you’ll start from a free or paid template
One of the reasons Squarespace is so awesome is that even the free template designs are all pretty great but they’re not your only option. You should think of templates as jumping-off points that will help you get to launch day fast. So when looking for a template, whether free or paid, here’s what you should be paying attention to:
Home page layout - Does it have room to feature the types of things you sell and the content you want to share?
General style - Does it make you feel the same way you want your customers to feel?
General navigation areas - Does it have a layout similar to what you’re looking to replicate?
Free or Paid?
The good news is that no matter what template you choose, you’ll have all the same features and functionalities available to you. This is an improvement over both Shopify and older versions of Squarespace. On both of those, choosing a template also meant you needed to pay attention to what each template allowed you to do - and some came with major limitations that you were stuck with! No worries on that front anymore! 👏
With this in mind, I think it’s more important to use the criteria above in selecting a template versus whether it is free or paid. Another thing to keep in mind is that even paid templates are super affordable compared to the cost of a fully custom web design.
Here are some posts to help:
For help learning how to pick the right template for you, check out this post.
You can browse all the free Squarespace templates here.
If you’re still looking for more options, check out:
The Best eCommerce Templates for Squarespace - the original template post!
More Great Squarespace eCommerce Templates - the encore!
Step 3: Sign Up for Your Website Account
Once you’ve selected your template, it’s time to sign up for a website account! Squarespace offers a free 14-day trial to give you a little time to build your first site before subscribing.
Tip: If you plan on working with a pro like me, ask if you can skip this step. Most web designers can offer you some discounts or perks if they create your account for you and just transfer ownership over to you.
How to sign up for Squarespace:
If you’re starting from a free built-in template:
Go to squarespace.com and click on the “Get Started” button in the top right corner
Click through the initial little questionnaire about who you are and what you do.
Select the template you’d like and follow the prompts to complete your account setup.
If you’re starting with a paid template and don’t already have a Squarespace account:
Go here to create a Squarespace login. This is all you’ll need to do for now.
You’ll be asked to share the username (email address) your account is under when you purchase your template so that it can be transferred into your account for you.
The company you purchase your template from will follow up on how to access your template and get started!
Now you have a website account! Squarespace has an extensive video library and help section but you may want to just start clicking around to explore a bit. Don’t worry if things seem overwhelming at first! Once you get the hang of things, you’ll soon discover that getting around is pretty intuitive and even fun!


Step 4: Domain Name
Your domain name almost matters more than your business name! That’s assuming they aren’t the same thing, of course, which ideally they should be. But great domains can be slim pickings these days so there’s always the chance that you thought you had a great business name but the matching domain name is already taken.
Helpful tidbits re: domain names:
Yes, you should really go for the .com version. Vanity domains like .shop or .whatever are becoming more acceptable these days but 99% of people are going to screw that up and type .com so don’t settle for a vanity domain just because the .com isn’t available. Find a .com that works even if it means changing your business name to match. It’s way easier to do this than the other way around. Trust me on this.
Buy up any alternative domains or common misspellings of your domain that are available. Domains are cheap (many start at just ~$10/year) and this is a small price to pay to own and re-route people to your main site. This isn’t totally necessary but you’re there buying domains, why not also at least own the variations to protect your future biz, right?
You can save yourself a login by buying your domain(s) directly from the same place you plan on hosting your website. For example, you can buy domains directly from Squarespace which makes it easy to manage all aspects of your online business from one place. (Bonus Tip - Squarespace offers a free domain for the first year once you sign up for an annual subscription so if you know that you’re going that route hold off on this for now and you can get this for free after you subscribe!)
If you’d like to host your domain independent of your website subscription, I recommend Google Domains. It’s super easy to use, affordable and has a native Squarespace integration that makes it simple to connect to your site.
Step 5: Add Your Pages & Content

The exact pages that your site will have are obviously going to be unique to you and your business but here is a list of pages that pretty much every site out there needs to have at a minimum:
Home
Shop (This may have a different name depending on what you do but the gist is the same, more on this in the next step)
About
Contact
Other page types that you’ll need to think about but that aren’t necessarily super sexy as far as content or layout are concerned are your privacy policy and your terms of service. For my recommendations on those, check out this post: How to Set Up a Privacy Policy & Terms of Service On Your Website.
Remember this is your jumping-off point. If your site has just these pages to start you’re in great shape!
Step 6: Add Your Products or Services
This is the stuff! This is why you’re here! What is it that you sell?
Physical products
Services (Either as packages or consultations)
Digital goods like downloadable or printables
Subscription-based products or services
Memberships or Courses
Bookings or Reservations
Whatever it is, the point of all of this is to be able to do it online. For each item that you sell/offer, you’ll want to be able to present it confidently to the world! To do that, compile these details for each product/service:
Name
High-quality photo(s)
Detailed description (Describe what people are getting in detail, including key features, how it benefits them, etc.)
Price
Variations, if applicable (i.e. different sizes, colors, options, etc.)
Inventory (either the actual physical count or, for things like events, this is the number of spaces available)
Exact product specs (weight and dimensions) for shipping, if applicable
Add each item to your shop page in Squarespace just filling in all the info as you go. If you have lots of items, you may also want to think about:
How you’re going to use tags/categories to organize your shop
Using a spreadsheet to bulk upload your inventory details
How you plan to connect your website with other things like your accounting software, fulfillment center, or other third-party apps/software
Step 7: The Settings
Ok, I lied to you in Step 1. The part where I told you that that was where most people stalled out. I was wrong. This is it. This is where most people give up and call in reinforcements. Why? Because it’s a lot and you can totally feel like you’re missing a tiny checkbox somewhere that is going to have lifelong impacts on the stability of your business. Don’t worry. Worst case scenario, something goes sideways, your customers/clients realize you’re a real person out there just trying to do your thing and everyone has a good laugh. (Unless it is about taxes, in which case, yeah - the government tends to not laugh off you not paying them their cut. When in doubt, it’s worth it to talk to an accountant who is local to you and familiar with your personal financial situation.)
When I first got started doing websites exactly 1,392 years ago, I basically just clicked on every single settings menu available at least 3 times each to make sure I didn’t miss anything. All that clicking boils down to these basics:
Payments (see: How to Choose an eCommerce Merchant Processor)
Taxes (see: How to Set Up Automatic Tax Calculations on Squarespace with TaxJar)
Shipping (see: How to Set Up a Profitable Shipping Strategy on Squarespace)
On Squarespace, most settings that you’ll need to take care of are in the Commerce panel (just click on Commerce from the left-hand dashboard menu) but there are also some additional settings available under Settings. Remember, the goal is just to launch. Taking care of payments, taxes and shipping will get you in business. You can always keep refining settings and options later on as you grow.
Step 8: Subscribe & Launch
When you have everything added and the basics set up, it’s just a matter of subscribing to a plan to make your site live! If you’re not sure which plan to go with check out this post but the TL;DR is that most sellers should choose the Basic Commerce at a minimum.
To subscribe go to: Settings > Billing & Account > Billing > Upgrade > Select a Plan
Congrats! You’re in business!
At its simplest, these are the steps to launching a new online shop for the first time. This will get you to a place where you can do business online on your very own website! There are lots of ways to continue to improve and expand from here whether it’s working on email marketing, SEO, automations, order management, shipping/fulfillment, promotions and offers… the list can really go on and on.
But the goal is just to start, to have something you can grow and build on. The best brands and businesses are iterative, adaptive, and always learning. Your first site is not going to be your best one and things are likely to change (a lot!) over time. To be honest? I would be more worried if they didn’t. ;)

Squarespace eCommerce Launch Checklist
Check out my quick list of commonly missed or easily overlooked items that you should make sure you’ve taken care of before you hit publish on your new eCommerce website.
I have several posts out there about how to set up your first online shop, what to include on your eCommerce setup checklist, or even how to launch an eCommerce site even if you don’t have anything to sell yet. But what about launch day? There are lots of moving parts to launching an eCommerce site and when you’re staring down launch day it can be easy to overlook something simple out of sheer fatigue! You feel like you’ve taken care of everything but how can you really know?!
I’m all about checklists as a way to take some of the guesswork out of things. I use the same checklist for nearly every project I work on for a reason - there’s no point in reinventing the wheel each time! (For the record, my checklist tool of choice is ClickUp which I highly recommend!)
If you’re getting ready to launch your eCommerce website (or even if you launched already and want to make sure you didn’t miss anything!) here’s my quick list of what you should make sure you have taken care of before you hit that “publish” button!
Make sure you’ve added a site title
Check all links & buttons
Make sure your domain is connected & secure
Test payments through your chosen merchant processor
Make sure taxes are set up appropriately
Make sure you have at least one shipping option set up
Place a test order
Set up any third-party sales channels (such as FB or Instagram)
Make sure your custom email address is working
Test all contact forms & signup forms
Work through Squarespace’s SEO checklist
Disable test mode to prepare for accepting orders
Customize & review your site’s email notifications
Make sure your checkout page is customized
Check out how your site looks on mobile
Verify your site with Google Search Console
Add your Google Analytics account info
As you can see, most of the things on this list are things that you’ll probably have taken care of during site set up but these are also commonly missed or overlooked items so make sure you’ve got them all checked off. Once you do, remove your site password and hit publish! You’re ready to launch!

How to Optimize Your Squarespace Product Pages
Say goodbye to boring product pages that don’t convert with some simple strategies and tips that will help you sell without being salesy and easily convert interested visitors into paying customers.
One of the key things that set eCommerce web design apart from just any old-business web design is product pages! Product pages are so important to get right because there are going to be lots of times when that page is the only one your customer ever sees; they may get to it by clicking an ad or social media link, like what they see, and then go directly to checkout!
This is why it’s so important to make sure that you focus on optimizing your product pages almost more than any other page on your website. I see lots of people who spend a ton of time worrying about perfecting their home page layout or writing the perfect about page copy - those things are good but they’re not what’s keeping your lights on and with the exception of maybe your homepage they aren’t going to get viewed nearly as much as actual product pages. If you’re looking to launch quickly, I say pair this with my Step-by-Step Guide on How to Set Up Your First Online Shop and you’ll be in business!
So, being strategic and intentional in your product page design and being mindful of your customer’s experience with those pages is clutch! My tips below keep that user experience in mind. They may never be able to pinpoint exactly why they loved interacting with your business but all of these elements help make sure it’s a great experience that will keep them coming back time and again!
Layout
Luckily, Squarespace makes it super easy to nail the basic structure of your product pages right out of the box - all the key elements are there for you! But you still need to make sure you’re paying attention to how you’re utilizing the different sections if you’re looking to maximize sales. The basic tip: think like a newspaper editor!
What You Can Do To Optimize
Put Important Info Above the Fold - A common eCommerce mistake that I see is too-long product descriptions “above the fold”. In this case, the “fold” isn’t really a page scroll, it’s the “add to cart” button! So, think about what info people need to know and when they need to know it. Only the most important things need to be said before the “add to cart” button. You’ve got to find the “headline” -- whatever the biggest selling point is for your product(s). I love a one-sentence (or even one simple phrase or even a few words!) main description. Something that’s easy to digest, highly skimmable, and on-brand.
Put All Additional Info Below or in Drop Down Tabs - People are going to want to know more but that doesn’t mean you need to word vomit on them all upfront. Once you’ve added just the most important info “above the fold” move everything else into the “additional info” section. It will be there for people who want/need it but it won’t be a roadblock for those that don’t.
Remove the Clutter - If you have a ton to say or offer a really technical product, consider adding drop-down FAQ-style tabs to house all that additional info like sizing info, care instructions, manufacturing/sourcing info, tech specs, or other attributes like dimensions or suggestions.
Be Consistent - Once you know what to prioritize (and also de-prioritize!), stick with that layout for each and every product to create consistency.
Don’t Reinvent The Wheel - Lastly, there’s a reason why most eCommerce pages look kiiiinda the same - because they are effective and that familiarity actually helps people feel comfortable in shopping online. This is not the place to become super creative with funky buttons or odd layouts, it may win you design awards but it will cost you in sales.
Photos
Almost more important than what you say about your product are your product photos! A picture speaks a thousand words so it’s worth spending money here, whether that’s with a pro photographer or even with a photo editor who can help polish up your own photos. Here are my best product photo optimization tips!
What You Can Do To Optimize
Be Consistent in Photo Style (& Make Sure They’re “On Brand”) - If your brand is clean and minimal, simple product photos on white backgrounds make sense. If your brand is vibrant and fun, the same photos would look drab and boring. Once you’ve nailed the photo style for your products, be consistent! This will make even the smallest shops look super professional!
Add Multiple Photos of Each Product - Show the front, back, and sides of products if that makes sense. Show a lifestyle photo AND a minimal “flat lay” style layout. Give your customers an idea of what it’s like to use and enjoy what you’re selling. I would say 3-5 images per product is a great rule of thumb.
Add Photos for Each Variant - Look, most people are super bad at imagining on their own how things are going to look. So you’ve got to show them! If you sell t-shirts, make sure you have a thumbnail image of your design in each color available. Squarespace makes it super easy to sync up images to product variations which can really help take the mystery out of things and help boost conversion rates!
Add Video! - I wouldn’t say this is imperative because it doesn’t make sense for everyone and videos are considerably more expensive and time-consuming to produce than great photos BUT if you’ve got great (high-quality, professionally-produced) videos, they have proven to be really effective! I would suggest adding it as the last thumbnail in your photo lineup.
Content / Copy
It may surprise you that most people get product copywriting completely wrong by thinking that they just need to focus on describing their products to death. The thing is that if people aren’t buying, it’s probably not because you just didn’t tell them enough about you. It’s because you didn’t tell them enough about how your product is going to benefit them. Consumers are ultimately pretty self-absorbed, and rightfully so - you’re asking them to give you some of their hard-earned money in exchange for whatever it is you’re selling. So, cater to those self-interests and keep copy customer-focused.
What You Can Do To Optimize
Use Your Brand Voice - Most people don’t buy products based on bullet points of attributes. They buy products from brands that they feel inspired by and connected to. Your products are a way for them to bring some of that brand home with them so be sure to inject product descriptions with your personality. Describing how your products benefit your customers or how using your product will make them feel also makes it much easier to differentiate from your competitors.
Use Relevant Keywords in Title & Descriptions - Using descriptive, natural language can make your products easier to find by humans and search engines alike- win, win!
Remember That Most People Don’t Read, They Skim - Because of this, you want to really think again about how to prioritize what people need to know when they need to know it. Hierarchy matters when it comes to website copy so put the most important things first and remember that you can always link out to things like product guides or FAQs for anyone who wants to do some in-depth research or reading before buying.
Product Merchandising
Think of product merchandising for your online store like all the little “extras” that make your shop look exciting and that encourage people to buy. These are things that help guide, encourage and entice customers to explore all you have to offer and can boost things like average cart values and also satisfaction rates.
What You Can Do To Optimize
Display Reviews or Social Proof - Most online shoppers will at least glance at a reviews section before buying to get an idea of what others are saying. If you’re new and don’t have many reviews (or you don’t want to open it up to a review free-for-all), you can always just add some selective quotes to a product description so that you at least have a little street cred.
Recommend, Upsell, and Cross-Sell Relevant Products - Using these selling tools can help people discover new products that they may not even know that you had or encourage them to add additional items to their cart that they just couldn’t resist! (More on upsells & cross-sells this here.)
Add Product Tags & Categories - This can help your customers find discover new things or find what they are looking for quickly. (More on how to use product tags & categories on Squarespace here.)
Display Stock Levels or Let People Know About Limited Availability - These built-in Squarespace tools do two things: 1) helps reduce the disappointment of adding something to your cart that is no longer available by the time you check out and 2) create a sense of urgency about products that are going fast to encourage checkouts!
Lastly: Go For The Ask!
This last item seems obvious but it’s the most important thing on the page: the “Add to Cart” button! In web speak, buttons like this are called CTAs (calls-to-action), and making sure yours is crystal clear is key. If you’ve paid attention to the optimizations I’ve noted above, your Add to Cart button should be sitting right above the fold, below a simple, attention-grabbing, skimmable headline. There are great photos, some strategic merchandising tools in use, and additional info below if needed. Most importantly? There’s nothing to distract from the reason why the page exists in the first place - to sell!

How to Create a Seamless Checkout Experience
Creating a seamless checkout experience is pretty easy on Squarespace because it’s simple, streamlined and pretty well-designed as a default. You don’t have to do a ton of work to improve on things but there are a few simple tweaks to make sure that checking out on your site is as fast, easy and painless as possible.
I’m not the best at sports analogies but I would say that the checkout experience is not a whole lot different than rounding home base and making the final sprint towards home plate. You’ve already hit the ball out of the park and now you just need to bring it home. As an online seller, you’ve already done the hard work of putting what you’re selling out there, marketed and merchandised it effectively, and convinced someone to hit the Add to Cart button. Now, it’s just time to close the deal.
Creating a seamless checkout experience makes sure that checking out on your site is as fast, easy, and painless as possible. It makes for happy customers and home runs for you! (Home runs = sales.) With this in mind, here are my top 3 tips for creating a checkout experience customers will love!
Enable Express Checkout
Express Checkout is a super cool Squarespace feature that you can enable that automatically directs customers right to checkout, bypassing the shopping cart altogether. Without Express Checkout enabled, items are added to a customer’s cart for them to go to check out whenever they are ready. However, if you sell something that people typically just buy one of enabling Express Checkout saves users a click and can reduce both frustration and cart abandonment rates!
So, if you have just a single-product store or most people just buy one thing at a time on your site, I would suggest enabling Express Checkout by going to COMMERCE > CHECKOUT > EXPRESS CHECKOUT. Doing this will change the name of the button on your product page(s) from “Add to Cart” to “Purchase.” This feature not only saves people from having to hunt down the shopping cart icon in order to buy, it also gets them right to the checkout page when they are most likely to complete a transaction.
🚨 Note that if people typically buy multiple items from you that this is not the way to go for you. In that case, I would just make sure that you have your shopping cart icon clearly displayed in your site’s header. (Check out this Squarespace support article for instructions on how to display and style your shopping icon in your site’s header.)
Keep Required Info to a Minimum
File this one under: “just because you CAN doesn’t mean you SHOULD”. For example, can you ask your customers a bunch of questions at checkout? Yes. Should you? No.
This is because people really, really dislike having to divulge more information than is absolutely necessary, and with every additional question you ask the chances of customers bailing out increase exponentially.
There are several ways to reduce the amount of required information at checkout. You can edit most of these by going to COMMERCE > CHECKOUT.
Custom Checkout Forms - Use custom checkout forms only for absolutely imperative information that pertains to the order being placed ONLY. For example, as a way to include a gift message or to add helpful delivery information. I’ve seen some carts where I feel like I’m taking a survey because there are so many questions. Where did I hear about you? Would I recommend you to a friend? What’s my birthday? What is my favorite color? TOO MUCH.
Additional Fields - Do you really need to know a customer’s billing AND shipping phone number. Do you even really need their phone number at all? My bet is nope. Turn off the phone number field as required under the Additional Fields section.
Billing & Shipping Info - Can you default to assuming customer’s billing addresses are the same as their shipping addresses so that they don’t have to enter that info twice? My bet is yes and people can still opt to enter something different if they need to. Enable this as the default by checking the Use Shipping Address box.
There are so many easy ways that you can make things easier by reducing the workload for your customers at checkout. For more on this idea check out this post: 12 Ways to Build a More Empathetic Brand.
Be Strategic About Accepted Payment Methods
I’ve talked before about how reducing the number of options available can actually help people in making decisions and the same concept holds true when it comes to deciding what payment methods to accept at checkout. Some sellers want to try to appeal to everyone by offering a ton of different payment options thinking that then there will always be something for everyone.
I see this pretty often on Shopify sites because it’s a lot easier to do on Squarespace but IMHO the simplicity of acceptable payment methods on Squarespace is part of the genius. Sure some people would use Google Pay if you gave them that option at checkout but not offering it isn’t going to deter them at all from checking out; they’ll just go with whatever option you offer.
On Squarespace, you can get paid via Stripe, PayPal, Apple Pay, and AfterPay but this doesn’t mean you need to offer them all. That would just make your checkout clunky and slow people down. Instead, choose to enable just the options you think your target demographic uses and likes the most. I would say that 99% of shops only need to offer Stripe (for regular credit/debit card payments) + possibly Apple Pay. For more on getting paid, check out this post: How to Choose an eCommerce Merchant Processor.
Style Your Checkout Page
A few quick edits to the default settings on your site’s checkout page will make sure that it feels on-brand and cohesive with the rest of your site. This helps shoppers feel confident that their transactions will be safe and secure at checkout and keeps them from slowing down because they feel uneasy. At a minimum, I would recommend customizing the following elements by going to DESIGN > CHECKOUT PAGE:
Display Your Logo - Toggle the option ON to display your logo on the checkout page. This is the best way to help things visually appear seamless.
Background Color - Ideally make it the same color as the background on the rest of your site!
Button Color - Make it the same as your main buttons (aka the Add to Cart buttons) on your website.
There are some more checkout page style tweaks available but if you just do just the three things above they make the biggest impact in making things feel custom vs. generic.
Bottom Line
Creating a seamless checkout experience is pretty easy on Squarespace because it’s simple, streamlined, and pretty well-designed as a default. You don’t have to do a ton of work to improve on things but you can choose to use a little restraint when it comes to what info to ask or how many payment options to provide. You can also enable some of the additional features available to you to make things as fast, efficient, and on-brand as possible. Just a little TLC here to make sure your checkout is a home run!

A Minimalist’s Guide to Squarespace Inventory & Product Extensions
If you’re checking out some of the inventory management and product extensions on Squarespace, read this post first! I review all of the extensions available to help you manage everything from stock levels to print-on-demand services so that you can add just the right tools for your business.
Welcome to my latest installment of a Minimalist’s Guide to Squarespace extensions! In this post, we cover all things inventory and product management. Why the Minimalist’s Guide you ask? Well, because I just hate adding apps or plugins willy nilly and I like to keep things as simple as possible, only adding third-party programs when absolutely necessary. With that in mind, I think it’s important to really understand what each extension does so that you know what you’re going to get and at what price. Then, you can decide for yourself whether the additional functionality is worth investing in and how you are going to incorporate it into your business. Let’s go shopping!
Extensions To Help With Inventory
If you’re struggling to manage inventory and stock levels or if you sell on multiple different platforms, these extensions will all help you get things under control. I love a simple spreadsheet as much as the next girl but as you grow a spreadsheet just may not cut it.
inFlow Cloud
What it does: With inFlow Cloud, you can update Squarespace stock levels automatically and manage inventory and orders from your phone or tablet. You also have the option to purchase a scanner so that you can scan barcodes to receive stock or fulfill orders. inFlow Cloud is a complete inventory management system that can help you manage everything from purchasing to sales.


Who should try it: Companies with medium-large inventories and a small team that need more than a spreadsheet to stay on top of things. inFlow Cloud can help you save time counting inventory and also plan ahead so you don’t run short.
Pricing: The cheapest plan is $71/mo but only allows up to 100 orders and 2 team members which most people who need something like this will quickly exceed. The Standard plan is $179/mo and gets you 1,000 orders and 5 team members, plus some additional features like being able to control user access permissions. The other thing to factor in is whether scanning barcodes for tracking is something you want to do; the optional inFlow Smart Scanner will set you back $799.
Trunk
What it does: I have reviewed Trunk before in this post all about how to sync inventory between Squarespace and Shopify but really it does much more than that! You can also use it to loop in Quickbooks, Square, Amazon, Etsy, Faire, and other popular platforms. I especially love how simple and straightforward the user interface is. Another thing I like about Trunk is that it puts the focus on Squarespace as the center of what you sell, looping in everything else around it. It can save you time with real-time SKU-based stock level syncing and also allow you to seamlessly track quantities across packs and sets or have available stock automatically calculated based on materials.


Who should try it: Anyone who sells on multiple platforms and wants to make their life easier by not having to worry about overselling on one site and erroneously looking sold out on another. If you sell bundles or kits that involve multiple SKUs, Trunk will also make sure that you have availability across all items which can help you with ordering and planning. Trunk would be perfect for the smaller online shop that needs a little help getting inventory organized but doesn’t need all the features (or expense) of something more robust like inFlow Cloud, above.
Pricing: Plans start at $35 which gets you real-time stock level syncing and low stock alerts but only 100 orders/month. Trunk does have nice incremental pricing tiers that allow for additional orders/month even on the lowest plan which is nice if you have a moderate number of orders but don’t want or need the features of the pro plan. Speaking of which, the Pro plan allows for bundling & kitting and duplicate SKU syncing which are both pretty cool features if you need them especially considering the pro plan starts at just $39/mo.
My Pick:
If you’re just needing something basic, start with Trunk. It has all the most popular sales channels and inventory-tracking features without a lot of bloat at a very reasonable price point. inFlow Cloud has more advanced features but a price tag to match - although when you’re ready for those extended capabilities I would say the higher price could be worth it.
Extensions For Print On Demand Services
If you’re an illustrator, artist, or photographer you probably want to sell custom products that feature your work but don’t want to invest in products that you’re not sure you can sell or have to worry about production and shipping. These apps take care of all those headaches to free you up to focus on your work.
Printful
What it does: Printful allows you to sell print and embroidery products without needing to invest in inventory or manage production, fulfillment, or shipping. Just upload your designs, pick your products and you’ve got yourself a shop! Most people think of Printful for apparel like tees and sweatshirts but they also allow you to sell your own custom accessories (like hats, bags, and phone cases) and home goods (like mugs, pillows, and wall art). They also offer warehousing services if you have other items that you want to combine with your custom Printful items and you can also send them your own custom inserts like stickers or cards that they will include with all your shipments so that things look like they came right from you. Another feature I really love with Printful is their mockup generator which makes it easy to have high-quality, realistic-looking mockups that look awesome in your store!
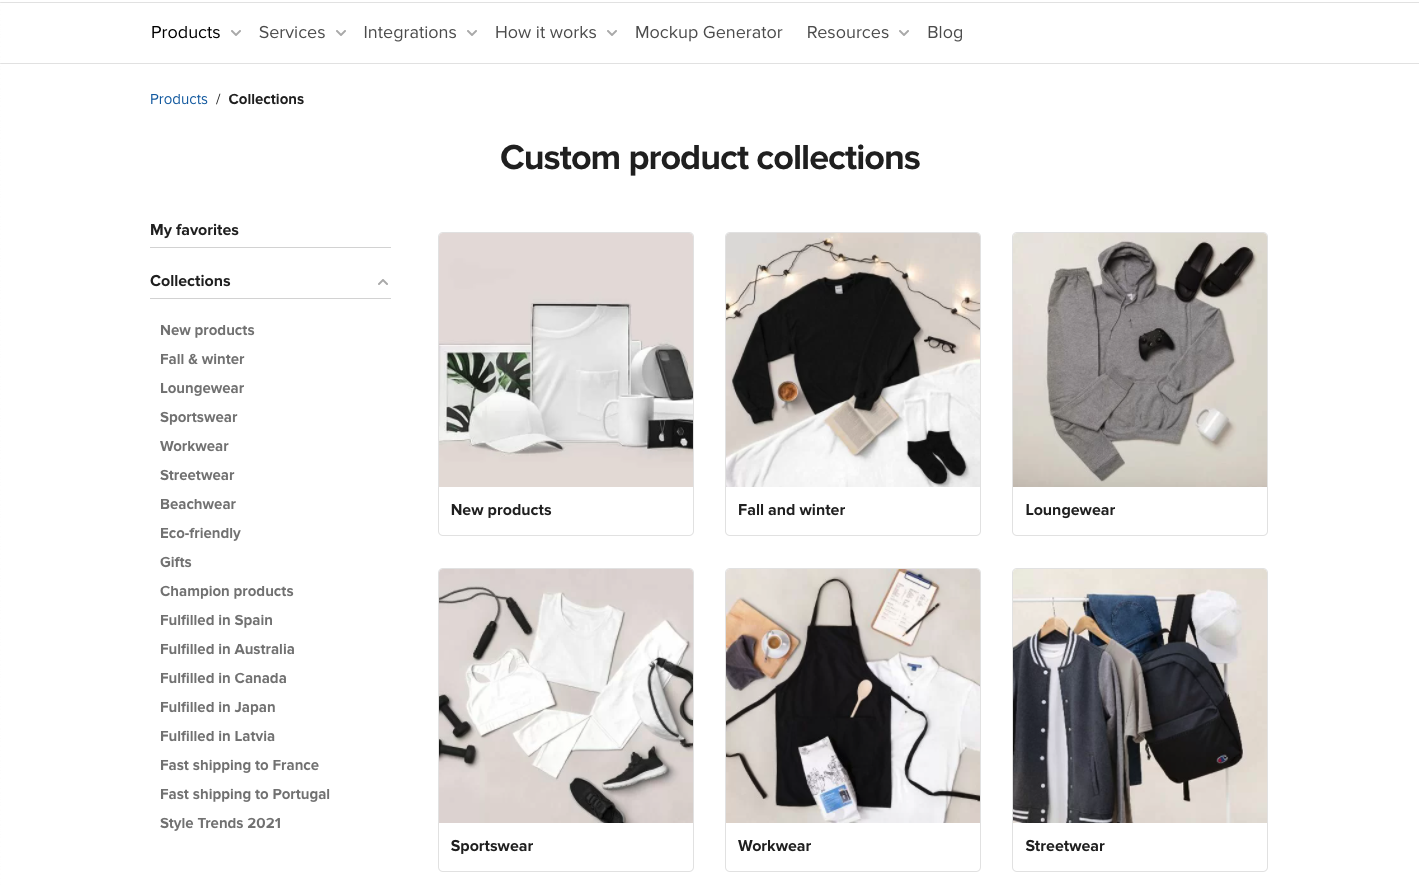
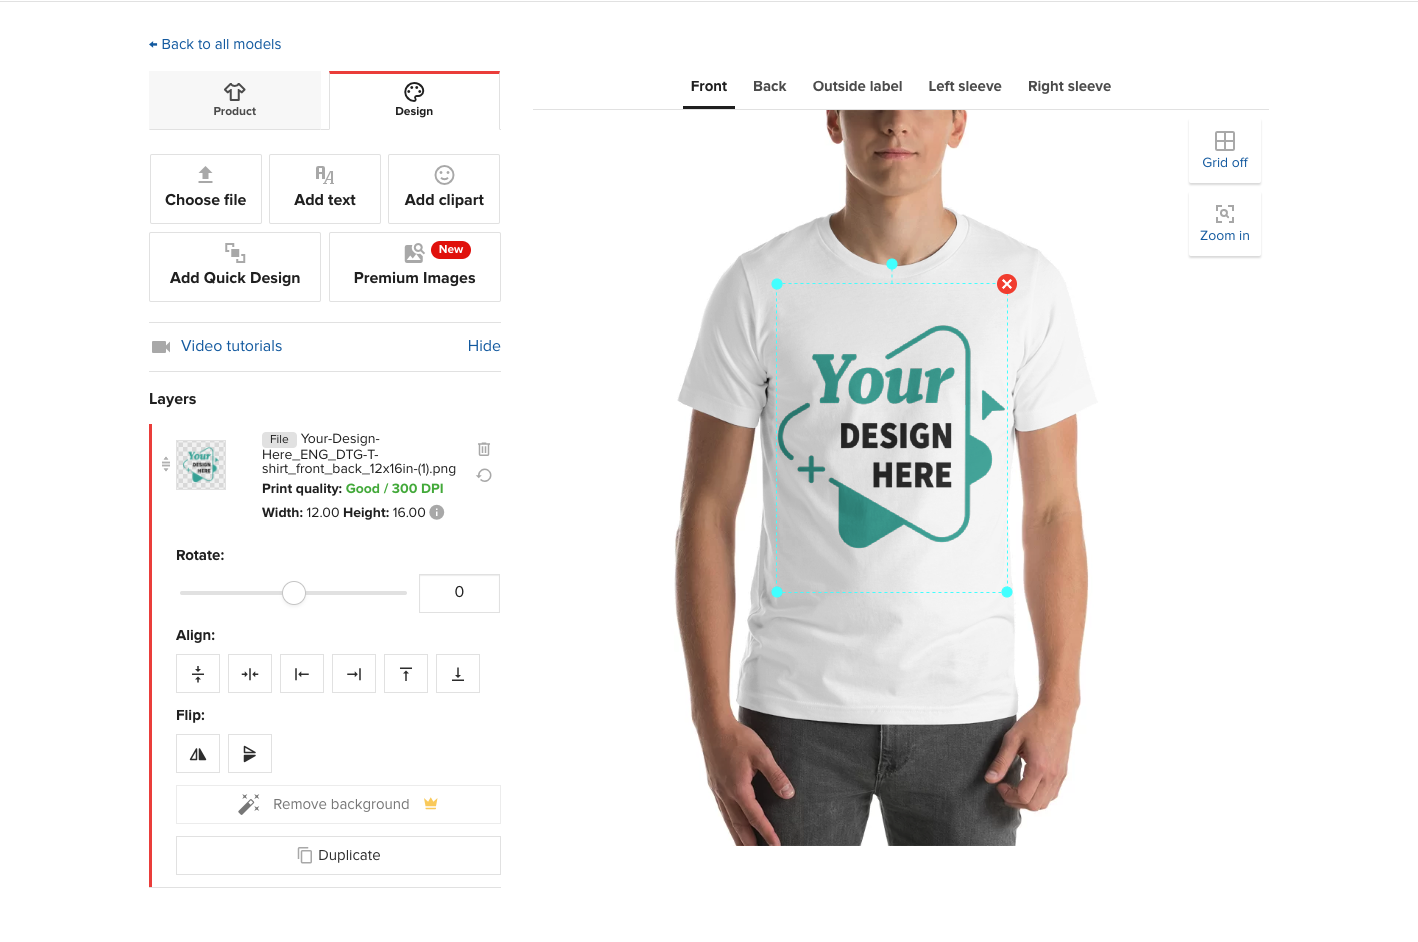


Who should try it: Any designer, illustrator, or artist who is looking to sell custom pieces without needing to keep inventory in stock and who doesn’t want to hassle with order fulfillment or shipping. With Printful, you can create as many items as you want and adjust the pricing markup to any amount that you like.
Pricing: There is no subscription fee to sign up for Printful, you just pay the wholesale price per order placed. For example, someone places an order for a poster on your website and you charge them $39. The wholesale cost on Printful might be $9 + shipping. You pay Printful for that order and pocket the difference. So basically, you only pay when you get paid.
Printique
What it does: The premise with Printique is the same as Printful, above. They allow you to sell premium photo products while they handle all the production and white-label shipping. Printique is more art-focused than Printful so the products are things like photo books and albums, framed and unframed prints, and wall decor plus some other miscellaneous items like calendars and other little gift items.


Who should try it: Printique is perfect for professional photographers and artists who are looking for some more advanced features like being able to control how things crop for different proportions and want to be able to sell on a wide range of materials like canvas, acrylic, and wood or who are interesting in offering framed prints or photo books.
Pricing: Just like with Printful, you don’t pay Printique until you have an order so you never have to worry about paying for unsold inventory or monthly subscription fees!
My Pick:
I think both Printful and Printique are great services that allow you to start an online shop without needing to invest in inventory or worry about the hassles of shipping and fulfillment. The reason to pick one over the other is really just based on what you’re selling; go for Printful for graphic designs printed on high-quality apparel and other fun things like posters and pillows. Check out Printique if you’re selling anything with a photo like framed prints.
Dropshipping Extension
Spocket
What it does: Look, I’m going to be honest here. Dropshipping is not my jam. But this extension is on the list and I wanted to be thorough and give it a quick review. If you’re a serious drop-shipper, I would say that you may want to check out Shopify over Squarespace but if you’re just wanting to supplement your other inventory on Squarespace with a few drop-shipped products, Sprocket is the way to go! They pre-vet suppliers from across the globe and you just select the items you want to sell and they push through to your shop for purchase! They have a wide range of products and you can see a review of each seller and where the items ship from.


Who should try it: I think Spocket would work well for a Squarespace shop owner that sells their own products and is just looking to supplement with a few other items. In theory, you could run an entire Squarespace shop just filled with all drop-shipped products if you wanted! You do you!
Pricing: The Starter plan is $24/mo and allows you to include up to 25 unique products. I think that most people would want to be on the next plan up though: the Pro plan which is $49/mo. This plan allows for 250 unique products and 25 “premium” products. I read Spocket’s help documentation to try to figure out the difference between “unique” and “premium” products and TL;DR you’re gonna wanna sell premium products 😉 as these are the highest quality items with the best discounts. On the Pro plan, you also get branded invoicing, which I think would be imperative for any drop shipper to help things feel cohesive.
Bottom Line
I think there are some real winners on this list, depending on what your exact needs are. From Trunk to save you time and headaches keeping inventory in sync across all the platforms you sell on, to Printful and Printique for allowing you to sell custom products completely hands-off - there are lots of good options that will allow you to connect your Squarespace website to the tools you need to grow your business. When it comes to extensions, my biggest piece of advice is to just understand what you’re going to get and at what cost. When incorporated strategically, they can really help you take things to the next level!
Looking for more hot takes on Squarespace extensions? Be sure to check out my other MInimalist’s Guides on sales & marketing extensions and shipping extensions!

How to Choose an eCommerce Merchant Processor
Taking a look at what factors to consider when choosing a payment processor, including what options are available on both Squarespace and Shopify. Not sure which way to go? Check out my recommendations for either platform!
I wish there was an internet version of putting the first dollar you earn in a little picture frame and hanging it behind the cash register. I actually Googled why people do this and it basically boils down to wanting to have a little reminder of everything they put in to build their business, or as a way to honor their first customer or to motivate them that there is a pot of gold at the end of the rainbow. (The pot of gold is getting paid.)
Online businesses don’t seem to have a similar ritual - maybe because we get paid in digital money versus paper bills? In any event, how you get paid is actually an important decision as it can determine how much you net or even your conversion rates. Choosing how you’re going to get paid may not be as glamorous as framing a dollar bill but it’s definitely just as significant.
Factors to Consider
Is it a native integration or a third-party merchant?
How easy is it to sign up and get started?
How fast is the checkout process?
Do you have to sign a contract?
What are the fees?
Where are you located and/or where are your customers located?
Options
On Squarespace
Stripe
PayPal
Apple Pay (via Stripe)
Afterpay - must be on one of the Commerce plans and also use Stripe
Square - for in-person payments through Squarespace POS
On Shopify
Shopify Payments (includes ShopPay, Apple Pay, and Google Pay)
PayPal
Accelerated Checkouts (i.e. Amazon Pay)
Third-Party Providers (varies by country, includes things like Stripe, Affirm, authorize.net, Klarna, and Quickbooks Payments)
Alternative Payments (i.e. cryptocurrencies like BitPay)
Manual Payments (such as COD, bank transfer, email money transfer, etc.)
My Recommendation(s)
Some merchants make the mistake of setting up too many payment options because they think that more options = a better experience. This is wrong. Sure, if given the choice I might choose to use Apple Pay but I’m not going to NOT check out if it’s not an option; I’ll just choose my next favorite thing.
If you’re trying to decide between Squarespace and Shopify…
I honestly wouldn’t let the fact that Shopify has more options overall be the tiebreaker in looking at it over Squarespace. There are many more important considerations that should drive you to one over the other. That being said, if you’re in a country that has limited access to PayPal or Stripe you may just have more choice on Shopify. For merchants in the US and Canada, I would say this is kind of a draw as both have the most popular options available.
If you’re already committed to a platform…
Getting Paid On Squarespace - I would recommend Stripe. It takes just a few minutes to set up, the rates are competitive and processing is fast and simple. Since you’re using Stripe, go ahead and enable Apple Pay too. IF you want to offer a “Buy Now, Pay Later” option, you can also enable AfterPay with Stripe but read this post first to decide if it’s really for you: Should You Offer “Buy Now, Pay Later” Options on Your eCommerce Website? I don’t really recommend PayPal unless your audience just really seems to prefer it because it’s a pain to have to manage to transfer in/out of PayPal to your bank in addition to adding processing time before you actually have access to your funds.
Getting Paid on Shopify - Just go with Shopify Payments, which is Shopify’s built-in merchant processor. It’s fast to set up and makes getting started super easy and painless. If you’re on the Basic Shopify plan, the rates are the same as Stripe (2.9% + 30¢ USD) and the rates go down the higher plan you are on. Because Shopify Payments already includes the most popular accelerated checkouts (ShopPay, Apple Pay, and Google Pay) I would only recommend adding in a Buy Now, Pay Later option as an alternative (see link above for more on this!). Other options are nice for international sellers but I wouldn’t recommend them for US or Canadian merchants.
There you go! My recommendations on how to choose an eCommerce merchant processor! If you’re just getting started, you may also want to check out this quick guide to getting started with your first eCommerce site.

3 Features of a High Functioning eCommerce Website
The key to a successful eCommerce business? Building on a platform that does more than just manage a storefront. Learn more about my favorite Squarespace features that turn your average website into an eCommerce powerhouse.
Oh, if only all it took was having a great website. It would definitely make my job easier. I could just make pretty things all day without a care in the world about how things worked, or integrated with the rest of your business, or just functioned in general. But we all know that pretty ≠ high functioning. Yes, it definitely takes more than a great website to run a successful business.
Here’s the problem that I have though: typically increasing a website’s functionality - basically how well it serves your business - usually requires adding more tools. Tools to help strategize and improve user experience, tools to help communicate and manage, tools to ship and schedule and socialize. My minimalist heart just breaks a little sometimes when it requires 1,001 apps and subscriptions to download and sign up for -- just to get simple things done.
As small business owners flock to eCommerce in record-breaking droves, I think it’s more important than ever to consider platforms that can offer simple solutions for all parts of a business. A website, like the cheese, does not stand alone.
Best Solution: Squarespace
Listen, Squarespace is like the all-inclusive resort of website platforms. And trust me on this because over the last 20 years I’ve tried and used them allllll. There are some naysayers out there that say Squarespace isn’t where to be for eCommerce but I call BS. When it comes to a platform that just works, and that has all the tools and capabilities built-in, Squarespace beats out all of the others hands down. (Related: Squarespace or Shopify: Which eCommerce platform is best?)
The biggest reason I cast my vote for Squarespace in this category is that it’s so important that your eCommerce website doesn’t just have eCommerce capabilities. You need to be able to tend to things like design, marketing, analytics, and accounting. You need to be able to manage the parts of your business that extend beyond your website and you need to be able to do them as seamlessly and efficiently as possible.
Not convinced that you can consolidate your business software and make life simpler by choosing Squarespace? Here are three of my favorite Squarespace functions and the other apps they can replace:
Campaigns
Replaces: Third-party email marketing platforms like MailChimp, Flodesk, ConvertKit, or MailerLite.
What It Does: Campaigns allows you to build and manage mailing lists and create visually stunning emails and newsletters that match the style of your site. And because they’re connected inside Squarespace, Campaigns makes it crazy simple to put together emails that feature items from your shop and/or blog! You can even create automated emails to follow up after purchase and welcome new subscribers with a coupon code or send targeted emails to customers based on their interactions with your site.
Learn More: You can add a Campaign subscription to your existing Squarespace site by just going to MARKETING > EMAIL CAMPAIGNS. That’s it. If you’re not ready to subscribe to a plan, there’s no charge to just build your list and you can send your first three email campaigns for free.
Member Areas
Replaces: Apps and software like MemberSpace or Memberful, some learning tools like Teachable or Thinkific, or other “all-in-one” platforms like Podia.
What It Does: This feature from Squarespace is a literal game-changer. It allows you to create members-only content that is either free or paid. Sharing your expertise through gated content like a “members only” area or with an e-course is one of the most rapidly growing segments of eCommerce and people love learning new things online directly from experts! Member Areas can handle recurring billing for things that are ongoing memberships and even allows your users to manage their own accounts and subscriptions so that you can focus on creating content instead of being an admin.
Learn More: I did a quick review of the Squarespace membership feature here. If you’re looking to give this a try, you can enable it on your existing site just by going to SETTINGS > MEMBER AREAS and toggling it on. You’ll need to take care of a few eCommerce settings before you can sell access to any content but it’s a pretty easy process and it’s built right in alongside the pages and tools you’re already used to using in Squarespace.
Scheduling
Replaces: Online scheduling apps like Calendly, Square Appointments, Acuity, or those offered by other platforms like Dubsado or Honeybook.
What It Does: Squarespace Scheduling allows customers to make appointments with you but, honestly, that just scratches the surface! You can also allow people to book group classes, sell packages and gift cards, set up subscriptions, and automatically set up Zoom meetings. You can also send custom reminder emails or follow-up text messages and even gather information via intake forms. I’ve found that this tool is almost infinitely customizable to fit any type of business especially because they allow you to change the language of the buttons and booking pages so that everything is perfectly personalized for your business! There are some clients I’ve had that use Scheduling exclusively as an “eCommerce” solution for their service-based businesses which I think is so smart!
Learn More: To get started with Squarespace Scheduling, just click on the “Scheduling” link from the home screen. If for some reason it’s not in the list of available items, you can turn to add it so that it’s easy to access by going to SETTINGS > ADVANCED > MENU SHORTCUTS and toggling the Scheduling one on. There are lots of features to this powerful tool but if you’re setting Scheduling up for the first time, Squarespace has super helpful tips and a checklist to help you get started.
Remember: Less is More
When it comes to the best eCommerce website platforms, you have to look at your needs beyond just having a storefront. There are so many other aspects to running a successful online business that are just as, if not more, important. How your website looks and functions, including how easy it is for you to access the tools and features you need every day, can make or break your experience. Set yourself up for success by building on a platform that has everything you need built right in from the start and be leery of platforms that may seem to do eCommerce better but make it difficult to do anything else.

How Small Businesses Can Compete With Amazon on Shipping
Using all the tools, technology, and resources available, you can offer a premium shipping experience without seeing red. Combined with some simple pricing strategies, your small business can ship as smart as the big guys and create happy, loyal customers in the process.
As a small business, there are lots of things you can do better than the big guys. You can offer more personalized service. You can pivot quickly to respond to trends. You really understand your specific niche or demographic. One thing that’s not the easiest? Competing with big-box retailers or online giants like Amazon when it comes to shipping. Amazon Prime has trained all of us to expect deliveries fast and (almost) free... and it means that smaller retailers need to find ways to offer similar options. Or at least the illusion of them :) Here are 5 tips and ideas on how to optimize your shipping processes, lower costs, and improve your bottom line.
1. Use the free tools available to you!
Almost every carrier (UPS, FedEx, and USPS) offer some free boxes. Not only does this eliminate the need to buy your own packaging but can save you money on shipping, too! Shipping providers are optimized to use the standard size boxes they offer and often charge more for other shapes or sizes. So, as cute as a custom printed box is, it could be worth it to focus on what’s inside instead (branded tissue paper or inserts, for example) and just use the standard or flat rate boxes offered by your carrier of choice.
2. Set shipping tiers strategically.
Consumers are hesitant to pay for shipping but will often gladly spend the same amount to get their cart above a minimum requirement in order to get it for free. Paradoxically, people are often willing to pay extra for express shipping methods to guarantee a faster delivery. So how do you use this little bit of odd buyer psychology to your advantage? Set your shipping tiers strategically. For example, offer free ground shipping - but only on orders over $X. Then, offer an upgrade option to express delivery for $Y. The result will be higher average cart values (people spending more in order to get “free” shipping), or people spending more AND paying a premium for faster delivery.
3. Bake the cost of shipping into your products.
This one always seems to rub merchants the wrong way but I’m telling you this works! Abandoned cart data everywhere shows us that people bail out the second they see your sky-high shipping rates. The solution? Just bake those costs right into the cost of your products. Instead of selling something for $24 plus $12 shipping, make it $36 + free shipping. Or $30 + $5 flat rate shipping. The psychology here is that paying for a product has value (you get something in exchange for your money) but paying for shipping feels like a loss (you’re just paying to get the good you already paid for). I think the biggest mistake I see smaller merchants make is feeling like they need to pass on all of their business expenses to customers outright. That’s like going out to dinner and getting charged to use a fork and knife ☠ No one wants to see how the sausage is made.
4. Use a shipping extension like Easyship!
The reason the big guys can offer free or low-cost shipping is because of the sheer volume of shipments they send out. They’ve negotiated with carriers to get their rates way down and also have high-tech fulfillment centers to make sure every step of the shipping process is as optimized as possible. But even if your fulfillment center looks more like your laptop + a roll of packing tape, using a shipping extension like Easyship can be your secret weapon. It’s the #1 way to make sure you’re in the best position to compete with the Amazons and Walmarts of the world.
How does Easyship work?
Short version: they negotiate with 100s of couriers all over the world on your behalf giving you enough purchasing power to take advantage of discounts of up to 70% off retail. The cloud-based software then automates everything: you can compare shipping quotes, create rules or filters for different products or countries, generate and print shipping labels, schedule pickups, and monitor everything from one simple dashboard. You can also offer a branded shipment tracking page for your clients which can help boost buyer confidence and reduce time spent responding to customer service inquiries.
Even if you ship just a few shipments each month, a shipping extension like Easyship is a no-brainer just for the time savings alone! It’s also the winner for me when it comes to easy automations with Zapier. I love it when I get an email the second a package is delivered!
Bottom Line
Using all the tools, technology, and resources available, you can offer a premium shipping experience without seeing red. Combined with some simple pricing strategies, your small business can ship as smart as the big guys and create happy, loyal customers in the process.

eCommerce Crash Course: Coupons, Offers, Discounts & Promos
Before you go creating coupon codes all over the place, check out this crash course in eCommerce discount strategies. Assess whether they are right for you, and find out how to implement a discount strategy successfully. If you’re also feeling a little stuck in a discount rut, I also provide some new ideas you can try to mix things up!
I’ve talked before about pricing strategy here and whether you should offer free shipping here. These are both key components of your overall eCommerce strategy that you can - and should - tweak from time to time to make sure you have things juuuust right. But there’s another leg of the stool that needs to also be considered: coupons, offers, discounts, and promotions. All of these things are part pricing strategy and part marketing strategy, and they can have a big impact on online sales.
There are a few schools of thought when it comes to online coupons and such. For me, it’s easiest to think of them this way:
Luxury - Never has sales, ever. Period. Think: Gucci
Mid-Market - Has well-publicized annual and semi-annual sales only. Outside of those times, no sales. No coupons. Think: Nordstrom
Budget - Everything is always on sale. Coupons or other marketing promotions are easy to come by. Somehow never pay full “retail” price. Think: Kohl’s
Questions to Ask Before Getting Started
There are merits to each of these so if you’re still trying to decide which bucket you fall into, ask yourself these questions:
Is it on brand? Shoppers are actually super adept at picking up any discrepancies between what you are saying about your brand and what your pricing strategy is saying about your brand, including whether and how you discount. If your branding says “luxury” but your discount strategy says “budget”, that’s a mismatch.
Are you training people to only buy from you when there’s a discount? This is an important thing to point out in a post all about coupons, offers, discounts & promotions. Before you read any further and decide how to implement any of these, ask yourself if these things need to be part of your strategy. This is a prime example of just because you can do something doesn’t mean you should. One of the biggest eCommerce mistakes I see merchants make is training their customers to only shop when there’s a discount. This devalues what you’re selling and is often only a successful strategy for the highest volume sellers.
Is the timing right? If you’ve decided that offering discounts or promos is on brand and right for your business, there should still be a method to your madness. Discounting willy nilly makes no sense. The best offers are strategized well in advance and are supported by external marketing activities like newsletters, social media posts, etc. Consider the season, popular trends, or other promotions you can leverage off of.
Do you have enough margin to discount? I mean, this should go without saying but if your regular prices don’t leave enough room for you to discount when needed and have you not lose your shirt, you should start by adjusting your retail prices across the board before venturing into the wide world of coupon codes. (More on this below!)
How To Do It Right
Now that you know where you fall on the Gucci-Nordstrom-Kohl’s spectrum™ and you’ve considered all the factors above, let’s explore some of the reasons why you may want to adopt a discount/coupon strategy:
It can quickly drive sales. Everyone loves a bargain so putting something on sale should definitely boost conversions. What this means is that what you lose on tighter margins, you can make up with volume.
It's a good way to move excess or outdated inventory. Think of this in the same way you can buy super cheap Halloween candy on November 1. Most products (and not just the edible kind) have a “shelf life” - even if that means the time period when they’ll be most attractive and potentially sell for the highest price. You may also be at a place where you’re willing to sell products for a near loss just to get them off the books and make room for new goods.
It can attract new customers. We’ve all seen the popups offering X% off our first purchase if we sign up with our email. I would argue that this is getting to be a bit overused and I tend to dislike it because it encourages only buying with a discount but it can be a way to sweeten the deal if you have built that discount into your normal prices. Running a promotion before you officially launch a new product or service can also help build hype!
Strategies To Try
Exit Popup - We’d always prefer people to pay full price so triggering an offer only once someone goes to exit your site can be a way to only offer a discount to people who were going to leave without buying something.
Separate Sales from Non-Sales Items - One of the worst things you can do is put two items that are relatively similar side-by-side and expect people to buy the higher-cost item. For example, if you’re selling this season’s shirt at full price and right next to it I can see that I can score last season’s tee for half off… well, maybe I’m not the most stylish but I’m going to go for the half-off version. To try to prevent this, move all sale items to a separate sales category or page on your site. This means that most shoppers (who are looking for the latest and newest) will shop in your regular section without price distraction and bargain-hunters will head to the sales section first. Everyone wins!
Offer Free Shipping - Shipping discounts are my favorite for a few reasons. First, everyone loves free shipping. Second, shipping discounts don’t devalue what you’re selling. Third, people often assume shipping is going to be super expensive so they may actually think the discount is worth more than it really is. I always say it’s better to mark up your prices across the board and offer free shipping no matter what but I realize that’s not always feasible. If you're in an industry where product-to-product comparisons are easily made, it may be important that you keep your individual prices low. If that’s the case, I would recommend offering free shipping with a minimum cart value (i.e. free shipping on all orders over $X)
Abandoned Cart savings - I mention this briefly above but if I think if you’re going to discount, you might as well only offer that to people who weren’t otherwise going to pay full price. Utilizing your abandoned cart email to deliver a coupon or incentive to return to your site to make a purchase is a way to only show discounts to certain people. Word of warning: there are a lot of people who have become savvy to this tactic and will purposely leave an item in their cart and wait for a coupon to show up in their inbox the next day. I think this kind of is what it is, but just know that these people are out there.
Make Discounts Automatic - Think beyond the coupon code and make things as easy as possible for people by just automatically applying whatever offer you’ve set up to their cart once the criteria are met. I think that this helps make happier customers because it reduces mental load (no need to remember a coupon code!) and makes people feel like they achieved a goal.
Set an Expiration Date - Not only do expiration dates create a sense of urgency, making sure all your discounts and coupons have an expiration date ensures that you can make changes down the road without people feeling like they got the old bait-n-switch.
Limit Usage - This is a good hype-building way to discount. Limiting your offer to only a certain number of people, only a specific group of customers, or by how many times it can be redeemed is a great way to encourage people to buy quickly or even boost brand loyalty by encouraging people to attain a certain “tier” status in order to qualify for a discount.
Other Misc Ideas (That Don’t Really Need Any Commentary)
Discount entire categories or brands versus the whole store
Offer BOGO or B2G1 offers
Offer a tiered discount so people get more off based on buying more of an item
Discount orders over a certain amount
Offer a free gift with a purchase total over a certain amount
Offer a discount on the most or least valued item in their cart with a total purchase over a specific amount
Provide discounts based on customer loyalty to encourage repeat purchases
Hopefully, you now feel like you have a better handle on coupons, offers, discounts, and promos and know how to incorporate one of these strategies successfully. My last piece of advice is to implement and then monitor often. Don’t be afraid to give something a try and adjust as needed once you see how your audience responds. This is another great reason to put an expiration on offers - so that you can tinker with things as needed to find the perfect sweet spot for your brand.

Should You Offer “Buy Now, Pay Later” Options on Your eCommerce Website?
It's becoming super popular to see "Buy Now, Pay Later" options on websites big and small. In this post, I explain how they work, whether you should give one a try and how to add an alternative payment option to your eCommerce website.
Installment payments aren't new - layaway plans have been around forever. But "Buy Now, Pay Later" (BNPL) services like Affirm and Afterpay have put a digital spin on installment financing in the world of online shopping.
I took notice when BNPL options started proliferating across checkout pages. These services promise higher conversion rates and order values. Flexible financing is clearly enticing for shoppers seeking to avoid credit card debt.
Still, I wondered if BNPL delivers everything it claims for merchants. Is it really a miracle conversion booster, or a potential consumer debt trap? I suspect the truth lies somewhere in between.
I was mulling this over while listening to Marketplace on NPR the other day. They featured a segment on BNPL and the growing popularity of deferred payment services. It got me thinking we should dig deeper into the merchant side of things.
In this post, we’ll explore how BNPL actually works and break down potential upsides and drawbacks for eComm shops. My goal is to arm you with enough info to decide if BNPL deserves a spot at your checkout. Sound good? Alright, let's get into it - but first here’s that little audio snippet if you’d like to check it out for yourself:
They begin, of course, by stating the obvious; which in this case is the fact that the pandemic drove everyone to online shopping like never before. If you’re one of those people, you’ve most likely noticed a few new payment options popping up everywhere online. And these aren’t just the normal “alternate” ways to pay like Apple Pay or Google Pay. These new offerings offer financing and payment plans in addition to traditional payments run through a merchant payment processor like Stripe or Paypal.
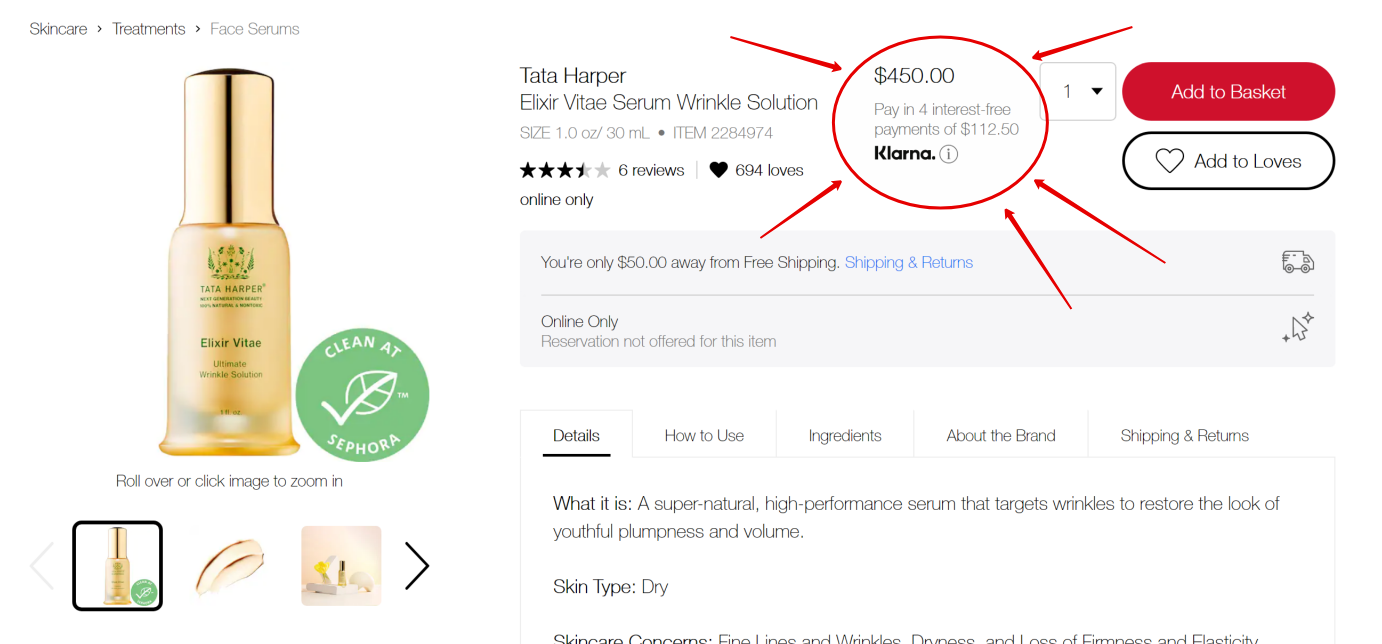
Here’s one of my faves, Sephora - letting me know that this $450 wrinkle serum can be mine for 4 easy payments of just $122.50!

Here’s Anthropologie encouraging me to buy this super cozy looking blanket at the low, low price of just 4 interest free payments of $37.

And it’s not just luxury or premium brands getting in on the action. Here’s Walmart letting me know that this super big TV can show up at my door for just $74/mo. It’s enough to make you want to sort prices from high to low, right?
This Ain’t Your Grandma’s Layaway Plan
Online sellers of all sizes are turning to services like Klarna, Afterpay, Affirm, and others to offer financing for purchases big and small. Payment plans are obviously nothing new but unlike old school layaway plans where the retailer held the item until it was paid in full, in this case, people can check out and receive their orders on the promise of making their monthly payments to the company the merchant has partnered with.
The idea of merchant-side financing also isn’t exactly new. Home shopping networks like QVC and HSN have offered things like “Easy Pay” and “Flex Pay”, respectively, for a while. They were early adopters of the idea that there are profits to be had if you make it as easy as humanly possible for people to buy from you, and reduce any and all friction in the process - even if that’s financial friction.
When it comes to eCommerce, my friends at NPR pointed out that payment plans like these are especially popular amongst younger shoppers who are leary of amassing credit card debt. This doesn’t mean that the arrangement is without some risk to the consumer… and some cost to the seller. So, what are the benefits and drawbacks? Let’s dig in!
How It Works
Whether you call it financing, “Buy Now, Pay Later” or payment plans, all of the services pretty much work like this:
Customer Side
Shop like normal. At checkout, select the alternative payment method and sign up for an account with the provider (i.e. Klarna, Afterpay, Affirm, etc.). Make the regular payments as agreed directly to the payment service provider.
Merchant Side
Orders come in and are fulfilled like normal. You’re paid in full, less the processing fee charged by the payment service provider. They’re basically stepping in as the middle man, offering to pay you now while they get paid overtime.
By The Numbers
All of the various companies have different stats to promote their services but when I dug into the numbers offered up by all of them and compared them, there were some definite commonalities.
Adding an alternate payment method:
Increases average order value
Increases conversion rates, especially amongst first-time visitors
Boosts repeat visits
Reduces cart abandonment
Reduces return rates
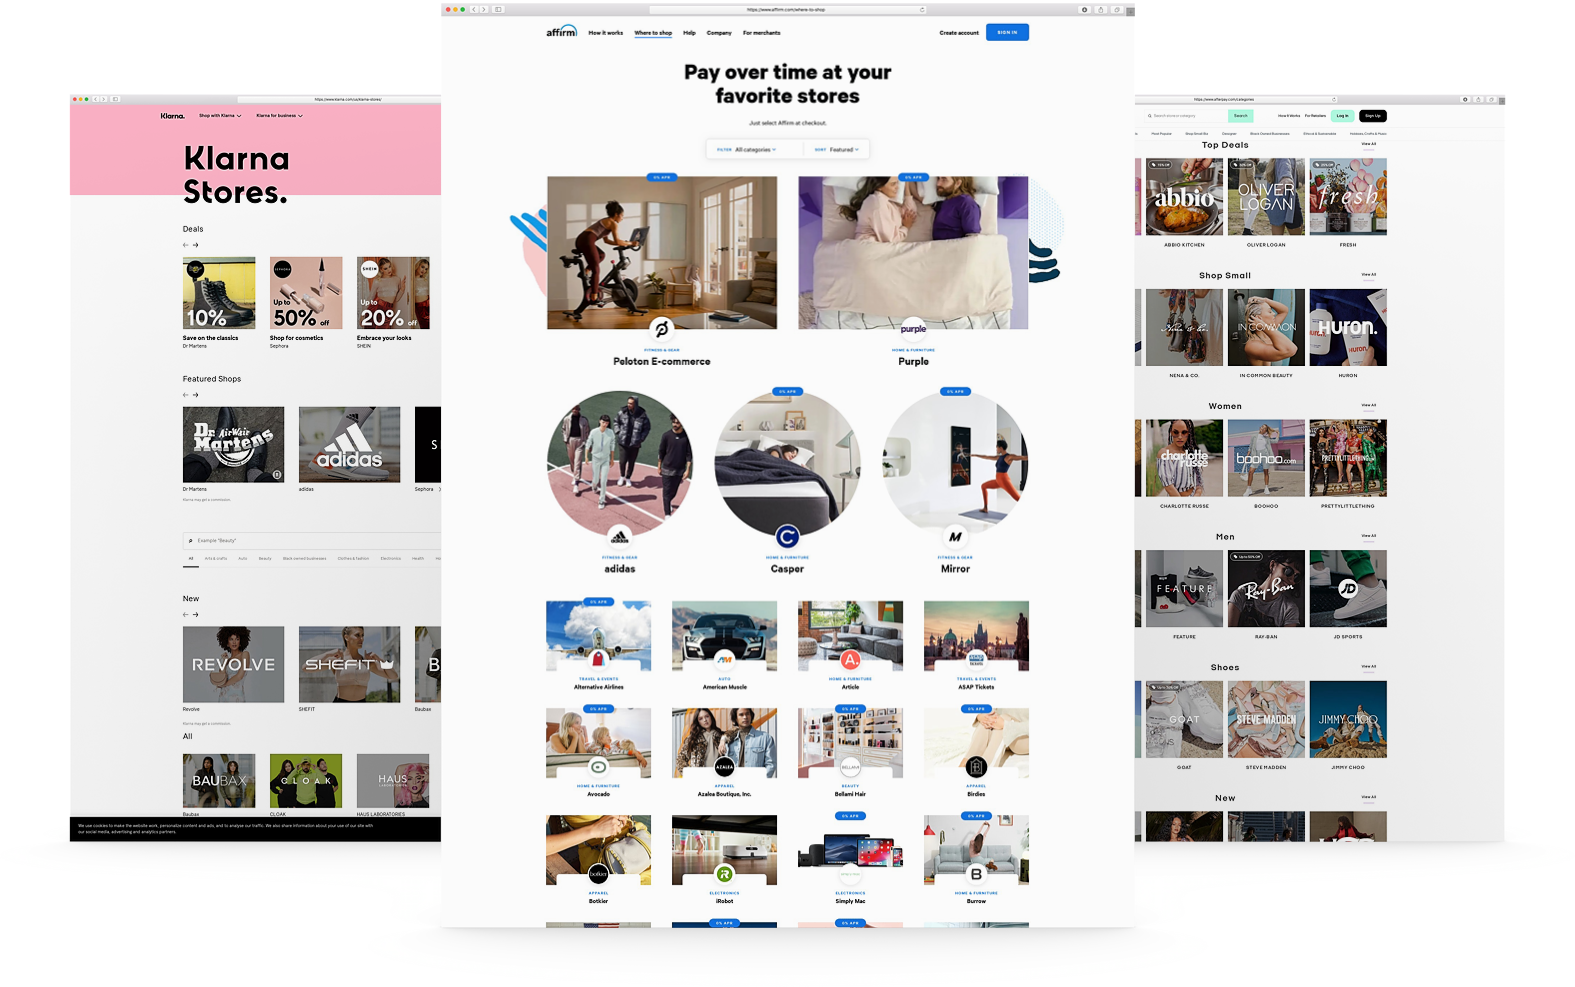
Another hidden perk offered by pretty much all of the companies doing this right now is that your brand will automatically show up on their list of merchants, right alongside other big names who use the same service. This can be a huge way to get noticed by fresh eyes and help you get some traction if you’re on the smaller side or your brand is completely new.
What’s the catch?
If you’re thinking that all of this seems too good to be true, you’re only partly right. In the NPR story, they reported that it’s easy for some consumers to get in over their head on payment plans and, of course, if payments are missed there are financial ramifications. At least one of the providers, Affirm, does tout that although applying does require a quick credit check to determine eligibility that this won’t negatively impact the shopper’s credit score and that on time payments can actually help them boost their rating.
Merchants will also see higher merchant fees charged on orders that used the financing gateway to checkout, though payment service providers are also quick to point out that increased cart values, higher conversion rates and lower return costs among other benefits all offset the small percentage they charge over traditional merchant processors. And, in case you’re wondering, that extra percentage will vary but is between 2% and 6% on average.
Should You Do This?
In short, my answer is yes. Here’s why. Even though you will pay more in merchant fees for each order where the customers select this option you have to keep the following things in mind:
Just because you offer financing as an option, doesn’t mean everyone will take it. The people who were going to buy from you anyways will still use their credit cards like normal.
A percentage of something is better than a fraction of nothing. The people who weren’t going to buy from you but needed this as a little incentive are all incremental sales.
It can make you look bigger and more established if you’re a new or smaller brand. Think of the sales pages and apps offered by financing providers as another sales channel. The percentage you pay to them is just your entrance fee to be listed on their pages. New fans may come to you through those pages but then become fans that buy from you again and again! (If this resonates with you, you may also like this post on how your small business can compete with Amazon on shipping.)
If you’re not sure, I would say there’s nothing to lose by adding a “Buy Now, Pay Later” option and just see how it resonates with your fans. You can always decide later that it’s not for you or if this fad fades out just turn it off. My guess is that it won’t, but - hey, just know you have the option!
For instructions on how to add Afterpay to Squarespace, check out this post!

Fun With Zapier for eCommerce
If you’re not already using Zapier to make running your eCommerce business easier, don’t be intimidated by it! I’m breaking down the best apps for shipping, email marketing and eCommerce - plus some fun zap ideas to get you started!
Of all the business stats I track, there’s one that I really look forward to seeing more than all the others: the number of tasks my Zapier account runs each month. Seeing how many mundane tasks I’ve automated that used to eat up my precious time just makes me so happy!
The surprising thing to me is always learning just how many business owners aren’t already using the power of Zapier to simplify their lives. Zapier is like having a very well-behaved personal assistant that never asks for a day off - plus, it’s fun! You don’t have to be really technical at all and I promise that you can’t help but get a little giddy when work gets done magically in the background for you.
Not sure what to automate? The rule of thumb is that anything you have to do over and over could and should probably be automated. This is going to look different for every business depending on the exact tools you use but to get your wheels turning, below are some ideas specifically for eCommerce businesses!
Zapier 101
If you’re a Zapier neophyte, here’s the gist. You have triggers and you have actions. This is basically saying when this one thing happens (the trigger), do this other thing (the action). Each “zap” needs to have at least one trigger + one action. (Some advanced setups can string lots of different actions together or get really complex with different things like filters and conditional rules but that’s for another day.)
When you are setting up a Zap, Zapier will ask you which apps you want to connect but I think if you remember that you’re not just connecting them but rather asking them to talk to one another, that's the key. Each app that is connected to Zapier comes with its own playbook; a certain set of actions and triggers that that particular app’s developers built into it.
The reason why this is important is, as you’ll see below, knowing which actions can trigger other actions is the start of building yourself a future where you make technology work for you instead of the other way around. Now, while all my apps are busy talking to one another, I can be hanging out doing nothing. No more babysitting my apps. That’s it. Easy!
Ok, on to what I think are the best apps for shipping, email marketing, and eCommerce, along with some zap ideas to get your creative juices flowing.
Shipping Extensions
Shipping is kind of the linchpin of eCommerce, right? A lot of businesses are already using a shipping extension to make shipping faster, easier, or more affordable so why not take things a step further and include your shipping activity in some fun automations?
Winner: Easyship
Easyship just released their Zapier integration and it has some of the best triggers available when it comes to shipping extensions.

Fun Zaps to try:
(Bonus: these both can go hand-in-hand with the email marketing recommendations from the next section.)
Shipment Delivered (Trigger) - How awesome would you look to your customers if you sent them a nice little note right after their shipment was delivered saying thanks, letting them know what to expect or what to do if something isn’t right? You can use the Shipment Delivered trigger to do this or even to tag a customer in your CRM so you know to follow up X number of days later.
Shipment in Transit (Trigger) - Build some hype and excitement for what’s en route by letting customers know not just that their order has shipped but that it’s getting close. Depending on what your product is, this could also be useful if you are shipping anything timely or perishable that you want to make sure people know to keep an eye out for.
Runners Up: ShipStation and Shippo
ShipStation and Shippo don't have all the same cool triggers that Easyship does but they are both still plenty powerful. ShipStation has an “Order Shipped” trigger and Shippo has a “New Shipping Label” trigger that could both be used to keep customers in the loop on their order status.
Email Marketing
You know I preach the power of an email list time and again. Your email list is clutch and, when connected to all the other apps you use in business, worth its weight in gold.
Winner: FloDesk
This was a close one because Klaviyo (below) is super powerful when it comes to eCommerce email marketing and nice integrations with both Shopify & Squarespace, but when it comes to Zapier, Flodesk (use my code K4I8S1 to get 50% off for life!) has more triggers and actions to play with and that’s what makes it the front runner to me. This should show you that with Zapier it doesn’t matter if the apps you love have native integrations or not - you just make them on your own!
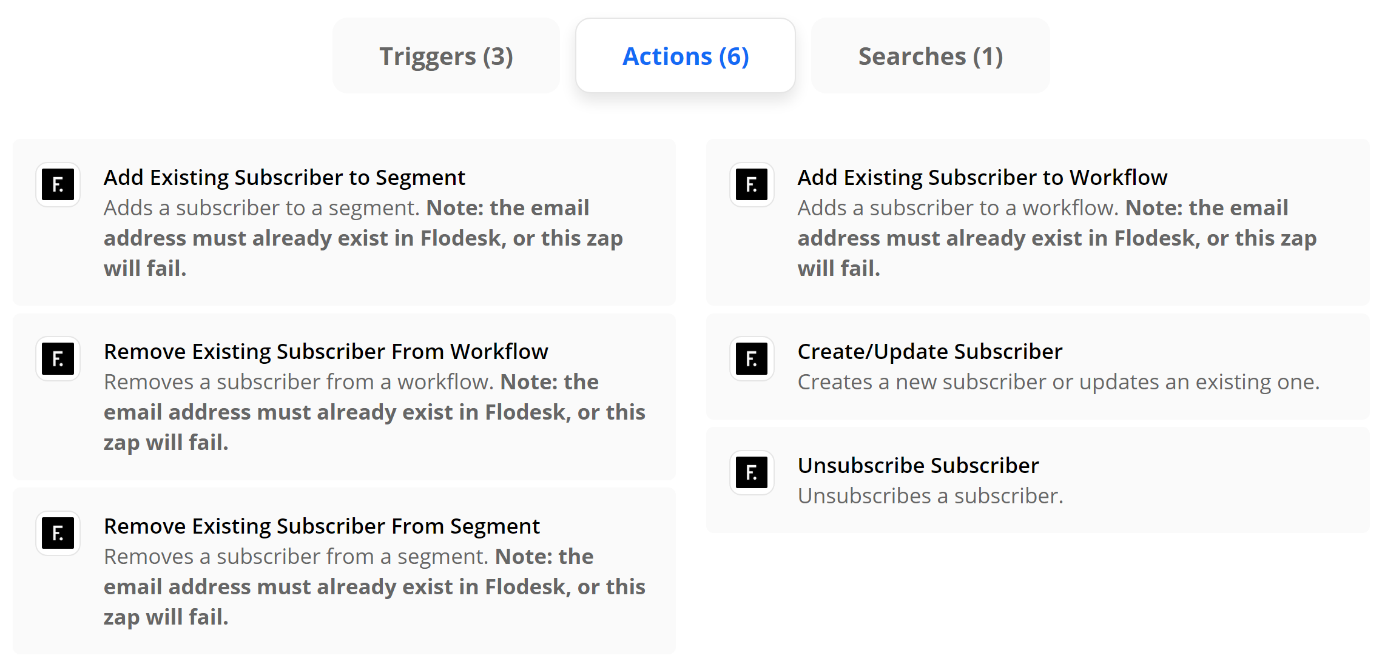
Fun Zaps to try:
Add or Remove Subscribers to/from Segments (Action) - Fun triggers to pair with this action would be things like when someone buys X, add them to X segment; when someone buys Y, remove them from Y segment, etc. This is especially useful when paired with the internal automations within Flodesk so that certain workflows are triggered based on getting added to certain segments.
Subscriber Added to Segment (Trigger) - This is different from above in that you can also think of what you might want to happen after someone gets added to a segment. Using the subscriber added to segment trigger, you could set up an email to automatically get sent out to someone on your sales team so they can follow up with leads personally or you could also add the subscriber’s name to your CRM so you don’t have to worry about double entry.
Remove from Workflow (Action) - Think of this as the escape hatch out of your email funnel! There’s nothing more annoying than companies that still send you sales emails after you’ve already become a customer. It really underscores how automated things are instead of using automation to make things feel personalized. Use a trigger that says when someone finally buys [the thing you’re selling], to remove them from the sales workflow so they no longer receive any of the sales emails.
Runner Up: Klaviyo
In much the same way as above, you can connect Klaviyo to a number of apps to help you send highly targeted messages. Some ideas are to create an event in Klaviyo anytime someone fills out the contact form on your website or to update a subscriber based on their activity so they only receive the messages that are most pertinent to them.
eCommerce
Help make sure your website isn’t lonely by connecting it to other apps! Keep in mind that I definitely wouldn’t choose a platform based on Zapier alone but it is definitely nice to know what the capabilities are for each of these if you’re starting to explore making a move to one of them from another.
Winner: Shopify
Shopify is the leader when it comes to Zapier with a whopping 10 Triggers, 9 Actions, and 6 Search functions available. The best thing to me is that even the lowest-paid Zapier plan (Starter, $19.95) could replace a ton of third-party apps that most Shopify store owners find themselves needing to add in order to get the functionality they’re looking for. All these apps add bloat - and cost! A little Zapier savviness could help on both those fronts.

Fun Zaps to try:
New Abandoned Cart (Trigger) - give people a reason to come back to your site with a custom abandoned cart email. Use this trigger to connect to an email marketing action (see above) and you can send abandoned cart emails that are 1000x better looking - and higher converting - than something generic.
Update Product (Action) - want to keep all your inventory in a nice little Google sheet and then have any updates automatically show up on Shopify? Totally possible and a total game-changer if you find logging in to your website every time you want to put something on sale super tedious and unnecessary.
Runner Up: Squarespace
Squarespace is woefully lacking in the primary triggers and actions department, but their Commerce API and some creative advanced Zapier tricks can make almost anything possible! For more on this, check out this post: How to Connect Squarespace to Anything!

The Secrets to Quick eCommerce Success
No get rich quick schemes, here! Just some super simple not-so-secret secrets to help you get to launch day faster so you can start building on your eCommerce successes early.
Whether you’re just embarking on your eCommerce journey or have been around for a while, it’s easy to get overwhelmed and overloaded with apps, tools, details, and ideas that you incorporate with the best of intentions but that ultimately distract from the task at hand AKA getting people to buy from you.
My pure little minimalist heart just loves paring things down to the most minimally viable product, a concept co-opted from the product development realm where it refers to the idea of putting out a version of your product that has just enough features to satisfy early adopters, who will, in turn, provide feedback for future iterations.
Put simply, it’s finding the Goldilocks version of a product -- one that lives in that sweet spot between “not enough” and “too much”. So, when it comes to eCommerce, what’s the sweet spot? What are the bare minimum things you’ll need to get crossed off that to-do list in order to get you to launch day?
The Keys to Success: Launching Quickly & Focusing on The Essentials
As I’ve mentioned before here, one of the biggest mistakes new online sellers make is trying to go too big from the start. In doing so, they lose time that they could be selling working on nitpicky things that don’t really matter. I say the key to success is launching fast, even if it’s not “complete”. To get to launch day fast, select a great template, and then complete this quick checklist of the most essential eCommerce tasks. Get these taken care of and you’re off to the races; the rest you can work on later while you watch the first sales from your early adopters roll in.
1. Product Info
I mean, you have to have the details of what you’re selling, right? Depending on what that is, this may be more or less complex, but at minimum, you’ll need to have the following attributes organized for your core products. These are your “best sellers” - or the things you think will be most popular or profitable if you haven’t launched yet.
Product Name
Product Description
Price
Product Photo(s)
Product Variations (things like size or color)
Inventory count for each variation, if you’ll be tracking inventory
Shipping dimensions and weight (See #3 below on how to skip this one!)
2. Money Info
All of this means nothing if there’s not a direct connection between your website and your bank account 🤑 When it comes to getting paid, you have “traditional” or more “mainstream” options like Stripe, Square, or Paypal, but options Afterpay that provide deferred or multiple payments (or that are accepted in more countries worldwide) are becoming more popular and in demand.
3. Shipping Info
Shipping is usually any new online seller’s Achilles heel. Seriously. It seems easy but can get really complicated super fast. This is why I recommend either offering free shipping or setting up flat rate shipping. (Bonus, this also gets you out of needing to come up with the shipping size and weights of all your products from #1, above.)
To set up shipping, you just need to know these basic things:

Shipping origin address (where you’ll be shipping from)
Any limits you’d like to have on where you’ll ship to (i.e. only certain states/provinces or countries, etc.)
Which options you’d like to offer: free shipping, flat rate, or others. When in doubt, don’t overthink this: just offer free shipping. Make it simple. People like free shipping and you should price your products to account for this cost. Don’t fall into the trap of thinking that shipping costs are too high and that you need to nickel and dime your customers in order to make up for it. Also this is the perfect excuse to pull my favorite Drake meme out. And because I know you’re wondering, yes, I do have this image saved to my desktop. That’s how often I have to refer to it.
4. Tax Info
Thinking about taxes are usually the last thing on any online seller’s mind and rightfully so as setting up and collecting sales tax online is confusing at best and maddening at worst. Trying to understand all the rules, which ones you have to comply with and which ones aren’t applicable and then setting things up correspondingly is a literal nightmare. And that’s coming from someone who does this for a living.
To me, the best solution is the automatic one. Let the tax experts do their thing.
Getting to Launch Day Faster by Focusing on The Essentials
Ok, good news? By focusing on just the four areas above, you can go from zero to launched in no time at all. Will there be more to work on in the future? Sure. But you’ll be up and running and have something viable to build on. You’ll have the bare basics without sacrificing one iota of user experience. And that, to me, is the first step towards success.

7 Ways to Build Trust (and Boost Sales) on Your eCommerce Website
Building trust with online customers and clients online can be an uphill battle - but not if you incorporate these 8 things on your website! Simple trust signals can go a long way in boosting sales on your eCommerce site.
If there’s one thing that watching too much Catfish will teach you is that you basically can’t trust anyone on the internet. Pretty much anyone can make a website these days and unfortunately that includes schemers and scammers out there making it hard for the rest of us who run legit businesses online. When it comes to eCommerce, you definitely have a hurdle to overcome that you don’t have IRL and that is: how do you get people to trust you?
Turns out there are a few subtle things that people look for on websites that are like little beacons of hope that they aren’t going to be robbed of their life savings by working with you and they are called TRUST SIGNALS. Incorporating some (or all) of these into your site goes a long way towards letting people know that amid all the nonsense happening online, you’re one of the good guys.
To build trust online, make sure your site has these:
Social proof. Incorporate reviews, recommendations, feedback, or testimonials from past clients on your website so that future customers can see what it’s like to work with you or buy from you. Bonus points if they are third-party verified like those from Google or Wiremo.
A clear shipping & return policy, if you sell physical products. People will look to the footer of your website for info on shipping and returns and without this info, you could look like you’re trying to be kinda shady. Also, a secret little eCommerce trick to instantly building trust: offering free returns. As it turns out, scammers won’t tell you that you can send your order back at no charge.
A picture of you or your team. This one is so simple and yet so effective: show your face. People do business with people and that means being able to look you in the eye, even if it’s virtual ;) This is one I can personally attest to the effectiveness of; despite my years of hesitation in putting a picture of myself on my website, I finally added one about a year ago. The analytics don’t lie and I truly believe that this had a major impact on an uptick in leads and inquiries. Give it a try!
Your address, if you have a physical location. (Although I will say there’s no shame if you’re completely virtual and either doesn’t have or don’t want to put your address out there!) That being said, if you have a physical location, adding an address is a huge trust builder. I would say that even if it’s not a street address saying something like “Based in the Pacific Northwest” is better than nothing.
An SSL certificate. Not only does the little lock symbol in your browser bar mean that people can confidently trust that transactions on your site are secure, but this also matters a ton to Google and insecure sites give everyone major red flags! Don’t worry if you just had to actually Google what an “SSL certificate” is -- my fave platforms (Squarespace & Shopify) take care of this for you! Winning.
Social media links - but only links to active accounts! LOL, I had to add that little caveat there because there’s nothing more unnerving than clicking on a social link and realizing that the last time someone was actually on Twitter was 2013. I mean, does this mean you’re no longer in business? Are you in jail? Did you get abducted by aliens? Add links to accounts you’re active on so that people can engage with you. That’s the point of social, after all.
Clear ways to contact you. This can be a simple contact page with a contact form, or a page that lists contact phone numbers and email addresses for your business. You could also go a step further and add a live chat widget. Not convinced that live chat is where it’s at? Check out this post or this one where I dig into this specific feature even deeper!
Hopefully, you see how adding even just a few of these trust signals to your eCommerce website can help you build major consumer confidence!

Kristine Neil
Fractional Web Partner
I'm Kristine Neil - a communications strategist who has spent 20+ years designing websites, first running a full-scale design and marketing agency, and now leading my own studio. I've been the creative director managing the work, the coder quietly fixing what others couldn't, and the strategist in the room asking why before how. Somewhere between the MBA and the other degrees, I decided web design was just one tool in a much bigger toolbox - the real work is figuring out what you're trying to say, who needs to hear it, and what's getting in the way. A website is just where all of that comes to life.
I build on Squarespace, and after years deep in the platform I know how far it can go and when to push past its limits. These days, I'm especially drawn to working as a fractional partner - getting to know an organization over time and helping with whatever moves them forward, whether that's a full redesign, an ongoing hand with content and strategy, or just being the person who knows their site best. I write here about eCommerce, web strategy, and making the complex feel a little more human.