

Notes on building smarter websites for actual humans.

Maximizing Your Squarespace Site with Extensions, Plugins, and Code Snippets: A Comprehensive Guide
Maximize your Squarespace site with this guide to extensions, plugins, code snippets, and apps. Learn the differences between these tools and discover every Squarespace extension available, along with trusted plugin and code resources.
If you're using Squarespace to create your website, you're probably aware that extensions, plugins, code snippets, and apps can help you do so much more with your site. But, do you know the differences between them and how to use them effectively?
In this post, I’ll go over everything you need to know about Squarespace extensions, plugins, code snippets, and apps. I'll explain the differences between them and provide useful tips for using them in the most effective way possible.
I'll also give you a rundown of every single Squarespace extension currently available. That's right, every.single.one! We’re talking extensions for shipping and fulfillment, finance, inventory and products, sales and marketing, and more. You'll get a comprehensive list of all the add-ons that integrate seamlessly with Squarespace, and to help you get to the bottom of things quickly I'll even highlight my favorite ones.
And, since I know that finding the right plugin or code snippet can be a daunting task, I’ve got some trusted plugin and code resources to check out. Whether you're a beginner or an experienced Squarespace user, you'll find something useful in this post.
So, if you're ready to take your Squarespace site to the next level, keep reading! I'll help you make the most of Squarespace extensions, plugins, code snippets, and apps.
Extensions, Plugins, Code Snippets, Apps - what’s the difference?
Plugins can be anything from short code snippets to more complex code solutions. Most Squarespace plugins allow you to change the look of something on your site with CSS or to do something that isn’t necessarily possible by Squarespace right out of the box using JavaScript. These are all written and created by third-party developers outside of Squarespace.
Extensions are third-party apps or programs to help you manage, optimize, and expand your site’s functionality or help you in some tangentially related aspect of business (such as with accounting, taxes or shipping). Think of these as “official” Squarespace plugins or Squarespace apps if Squarespace had an app store.
3 Squarespace Code & Plugin Tips
Less is More - I usually advise that extra code and plugins are added sparingly. Consider these the “accessories” to a really great outfit instead of the main show. You’re always best off doing as much as possible sans code (and that’s actually quite a lot, thanks to Squarespace 7.1’s Fluid Engine!) and then peppering in a few impactful code tweaks just to personalize things a touch. This not only makes it a lot easier (less custom code to sort through!) but can also help ensure that your site loads quickly which is great for SEO.
Know Your Platform - There’s a lot of legacy code floating around out there for Squarespace 7.0 but all new sites are built on Squarespace 7.1 and the code is often not applicable to both platforms! A good code developer will make sure to indicate which platforms (or themes for 7.0 sites) their code works on but if you find something out there that’s not working the first thing I would check is that you’ve found code that applies to the platform you’re currently on.
Test Thoroughly - It’s easy on Squarespace to add in some code and just walk away but you always want to be sure to to test that things are working as expected when you’re not in edit mode. View your site in an incognito window and on different screen sizes. Does everything look and act as it should? Is your code having any unintended impact on other areas of your site? Even well-written code snippets and plugins can have some negative interactions with other customizations you may have added so test, test and test again just to be on the safe side.
What doesn’t require an extension on Squarespace?
There are so many different things that don’t require any additional add-ons or extras on Squarespace that I think they’re worth mentioning! These are all things that often require extra third-party apps or add-ons on other platforms but that are just built right in on Squarespace.
Social Media - Facebook, Instagram, LinkedIn, Pinterest
Content - YouTube, Vimeo, Spotify, SoundCloud
Payments - Stripe, PayPal, Apple Pay, Afterpay
Shipping - USPS, FedEx, UPS
Files - Google Sheets, Dropbox
Google Things - Google Search Console, Google Analytics
To connect any of the things above, you can do so right from within Squarespace!
A Brief Rundown of Every Single Squarespace Extension Currently Available
As mentioned above, consider this list of Squarespace Extensions like the “Squarespace App Store.” All of these add-ons integrate seamlessly with Squarespace - they have the official Squarespace stamp of approval! (p.s. This is a looooong list so I’ve highlighted my faves 😉)
Shipping & Fulfillment
Aftership - Boost sales with branded tracking pages, proactive notifications, and actionable shipping insights (Related post: How to Send Delivery Confirmation Messages with Squarespace)
Easyship - Save up to 91% on shipping across 550+ courier services & boost global revenue growth 56% with this feature-rich platform (Related post: How To Set Up a Profitable Shipping Strategy on Squarespace)
Order Desk - Order management app that helps you automate your order fulfillment process
Returns Center by Aftership - Frictionless self-service returns management portal to give smooth returns experiences (Related post: How to Manage eCommerce Returns on Your Small Business Website)
ShipBob - Simple, fast, affordable two-day fulfillment from a global fulfillment network
Shippo - Save time and money on shipping
ShipStation - Import, organize, and ship orders from over 180 channels, carriers, and fulfillment providers
Finance
Avalara - Create ready-to-file sales tax returns
Dext - Simplify, standardize and streamline your digital sales accounting with Dext Commerce (formerly Greenback)
FreshBooks - Generate reports and automatically sync clients, items, and orders from all your sales channels
MYOB - Automate the flow of your Squarespace sales, payment and tax information into your MYOB file through a daily sync.
Quickbooks Online - Connect Squarespace to QuickBooks Online to automate accounting of your sales data
TaxJar - Automated sales tax calculations, reporting, and filing (Related post: The Definitive Guide to Squarespace Sales Tax)
Xero - Automate the flow of your Squarespace sales, payment and tax information into your Xero file through a daily sync.
Inventory & Products
Art of Where - Design your custom printed products made on-demand. Leggings, silk scarves, t-shirts, handbags, notebooks & more
Candid Wholesale - A better way to buy, sell, and pay for wholesale (Related post: How to Set up a Wholesale Shop on Squarespace)
Printful - Print on demand for your Squarespace site powered by Printful (Related post: 3 Ways to Crush This Holiday Selling Season with Your Squarespace eCommerce Website)
inFlow Cloud - A complete inventory management system (Related post: A Minimalist’s Guide to Squarespace Inventory & Product Extensions)
LitCommerce - Enable Multichannel Selling: Bulk List Products & Sync Orders with the top-global marketplaces such as Amazon, eBay, Etsy, Walmart, TikTok Shop, etc.
Printify - Create, sell, and ship custom products anywhere in the world (Related post: Creating a Custom Print-on-Demand Store with Squarespace)
Printique - Professional photo lab delivering high quality fine art prints, frames, canvas, acrylic, and metal
Soona - Meet Soona. The virtual content studio for e-commerce product photography and video. Over 15k brands love Soona. Only pay for the content you love. $39/photo and $93/video. (Related post: 6 Simple Tips for eCommerce Photography that Converts)
Spocket - Add dropshipping products from US & EU suppliers directly to your store
SPOD - Design & sell custom products
Syncee - Find products for your dropshipping business
Trunk - Multi-channel real-time stock syncing and bundling (Related post: How to Sell Bundles & Kits on Squarespace)
Sales & Marketing
Channable - Empowering your eCommerce growth
Delighted - Automate post-purchase customer feedback surveys
EZ Texting - Send Smarter text promotions and automated SMS campaigns to your customers
GoDataFeed - Transform static product catalogs into dynamic product feeds for hundreds of channels like Google, Facebook, and Amazon
Judge.me - Product reviews with free photos & videos for social proof
LiveChat - Delight your customers and fuel your sales with a complete customer service platform (Related post: How to Add LiveChat to Squarespace)
MailChimp for Commerce - Drive traffic and sales with personalized marketing
Outfy - Create stunning social media graphics and automate social media posts
Progressier - Transform your Squarespace site into a mobile app and deliver push notifications
Sprout - Use Sprout to easily plant trees, become more sustainable, and reach eco-conscious customers.
Weglot Translate - Translate your website into multiple languages
Want to connect something not on the list above? Don’t worry - it’s probably still possible through the use of the Squarespace Commerce API + Zapier!
My Most Trusted Plugin & Code Resources
Will Myers’ Curious Coder Membership - If you’d like to learn a little behind how code works (or even how to write some yourself), I highly recommend Will’s Curious Code Membership! There are some code snippets you can just copy and paste which is nice when you’re in a hurry to just solve a problem but the real magic is in Will’s super easy-to-understand videos where he explains how and why things work the way they do.
Inside The Square - Becca’s YouTube is filled with answers to all of your most frequently asked Squarespace code questions and she always keeps it fun and high energy.
Chris Schwartz-Edmisten - Chris has a really great way of explaining things that I also really enjoy.
Beatriz Caraballo - Beatriz has a ton of great code resources, especially if you’re a fellow Squarespace web designer.
Ghost Plugins - My favorite all-around source for plugins is Ghost because I trust that they’ll all work well and they’re curated and sourced from the best Squarespace pros around (including yours truly).
For specific plugins that I use & recommend, check out one of these round-up posts:
Bottom Line
You now know all the basic ins and outs on Squarespace extensions, plugins, code snippets, and apps! With this knowledge, you can now explore the vast world of Squarespace customization and know when and how you can get the most out of your Squarespace website. By experimenting with different plugins, code snippets, and apps, you can add exciting new features and functionalities to your site and make it even more effective and impressive. Whether you want to optimize your site for search engines, enhance its performance, or simply make it look more beautiful, Squarespace has everything you need to achieve your goals. So go ahead and try new things and experiment with different tools and techniques. With Squarespace, the sky's the limit!

All About Courses on Squarespace
Sell access to course content directly on your Squarespace website. Same user experience, same content and branding - just a whole new way to expand your eCommerce offerings!
Squarespace’s latest update completely revamps digital products and adds a new feature: the ability to add course content right on your own Squarespace website! If you’ve been toying with the idea of augmenting your eCommerce lineup with a course or other digital product - I think you’re going to be so excited by this. If you haven’t yet thought about adding a course or digital bundle to your online shop, I think that once you’ll see how easy and beautiful it is your mind is going to start thinking of things (or at least that was just me 🤣)!
Crash Course on Squarespace Courses?
It’s as simple as it sounds and as pretty as you’d expect a feature from Squarespace to be! Squarespace Courses allows you to build online courses, offer them for sale in whatever way works for you and have everything live right online next to the rest of your content. Here’s the features in a nutshell:
Keep your students & customers on your site with everything you sell in one place.
Create a standalone course or bundle digital products together.
Offer pricing that works for you: one-time payments that offer lifetime access, monthly access with recurring payments, or free!
Courses can feature video, text or whatever content fits your needs & industry.
Offer discounts & promotions on digital products.
Customers are all managed in one place - the same as customers buying other products types from you.
Most importantly, it's easy to make your content look good because it's Squarespace! Built-in project tracking, clean course navigation, simple chapters & lessons and a beautiful course overview page are just the latest.
What’s the difference between Courses and Member Areas?
Good Q. Courses allow you to create sequential lessons (organized into chapters, if you’d like) where your customers aka students can visually track their progress. Even though both require paid access this differs from a Member Area in that it has that traditional course structure in place. So, for example: if you were an expert in making pies and wanted to offer student access to your paid video library of pie-making videos, creating gated content through a Member Area would be perfect for you. However, if you wanted to organize those videos into an order that helps give more structure to the lessons (first you talk about ingredients, then prep, then actually making the dough and rolling it out before moving on to fillings, etc.) then Courses is what you want.
What about bundles of content?
Want to bundle together your beginner’s guide to pie making and your advanced pie making tips into one mega pie making super class? DONE. New digital product pricing plans allow you to do just that so that granting access to multiple things can happen in one fell swoop.
What does Squarespace Courses cost?
Ok, let’s break this down because at first glance I’ll admit that it’s a lot to take in!
First, keep in mind that the pricing info below is on top of your regular Squarespace subscription. (Check out this post if you want my breakdown on those options. Hint: I always recommend at least Basic Commerce to all my clients to avoid transaction fees and score a ton of other perks.) Now this is also a benefit because if you’re on a Commerce Plan already, technically you don’t need to add anything else in order to start selling a Course or other digital product such as a Member Area. There are some
Selling Without
Add-On
Any Commerce Plan
9% Transaction Fees on Digital Products
(still 0% fee for physical products)
Digital Products
Add-On Pricing
Starter
7% Transaction Fees
10 Hours of Video Storage
$9/mo
Core
3% Transaction Fees
50 Hours of Video Storage
$34/mo
Professional
0% Transaction Fees
Unlimited Video Storage
$119/mo
So, as you can see the only thing that’s different about the options above are the transaction fees and the # of hours of allowed video storage. All other features including the ability to sell unlimited courses & memberships, have unlimited students, offer multiple pricing plans including bundled options, and access to customer analytics & insights are all included on ALL plans.
How does this pricing compare to other learning management platforms?
Things range quite a bit in this space so it can be tough to compare apples to apples. For example, my favorite course platform up to this point has been Podia and it’s most expensive plan tops out at $75/mo.
Comparatively speaking that does make Squarespace the more expensive option however, I think there’s something to having everything in one place.
Here’s how similar plans on other platforms compare to Squarespace’s top-of-the-line Professional Digital Products Add-On:
Kajabi - $399/mo
Teachable - $199/mo
Thinkific - $199/mo
Podia - $75/mo
Other alternative checkout methods with even more pared down features are available for less.
Bottom Line
This new feature is a really powerful addition to Squarespace’s Commerce lineup and if you’re anything like me, it should inspire you to start thinking of what knowledge you have that you might be able to start sharing with your audience. Even if you only offer a free class to start to try it out, I think you’ll find that brand fans are always eager for new ways to engage with you. Adding Squarespace Courses or new digital products can be a great way to augment your existing product lineup - or even offer a way to stick your pinky toe into the pool! Give it a try!

More Squarespace Plugins to Level Up Your eCommerce Site
Ready to take your site to the next level? Give one of these plugins or apps a try to take your basic site up a notch. From shipping to marketing there’s a little something here for you!
Here are some of plugins and apps I’ve been turning to again and again lately! These will take your already awesome Squarespace site and turn it into a super powerful eCommerce powerhouse. As a reminder, my take on plugins or apps is to use them judiciously; add in one or two to tweak or customize your site - you don’t need them all!
However, unlike some of my previous posts about plugins (check the bottom of this post for links!) these ones really hone in on specific pain points you may be facing on your Squarespace site. From making sure your shop pages look super unique to adding video to your product details pages, all of these plugins or apps come in super handy for eCommerce on Squarespace!
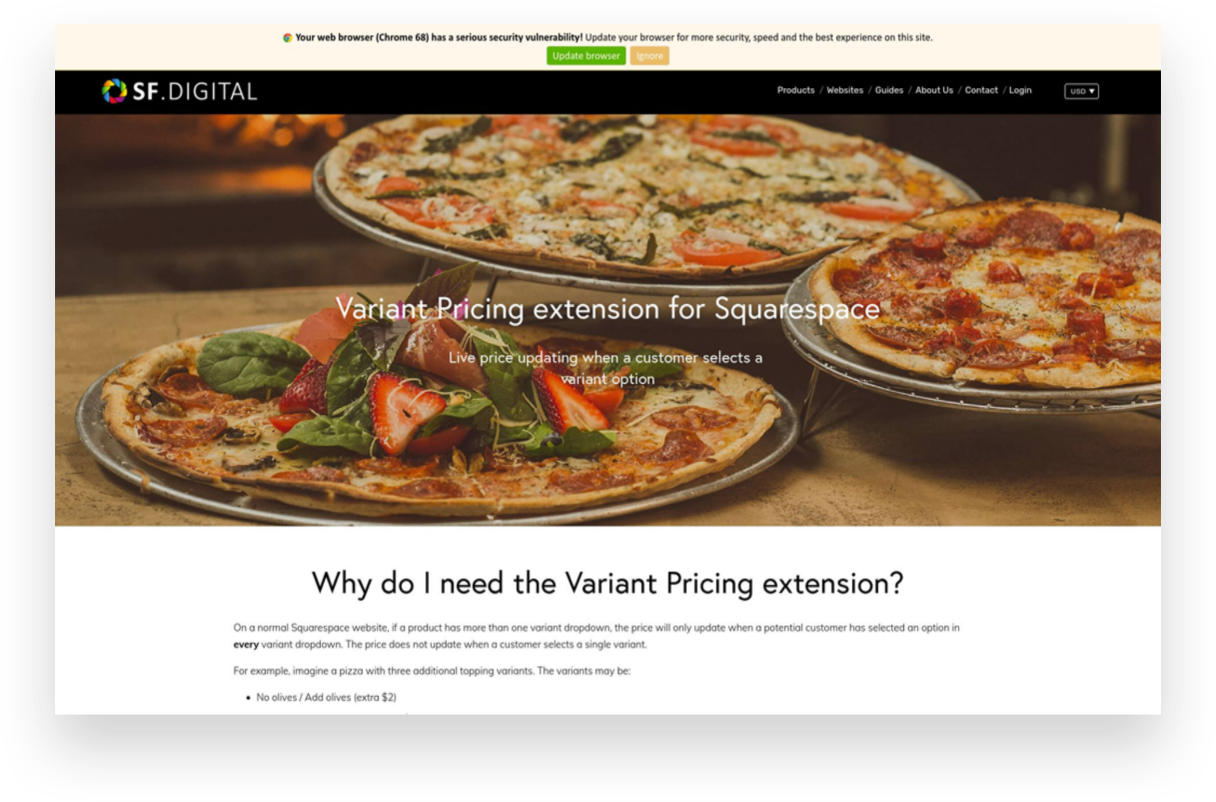
Variant Pricing Extension
Paid ($30)
If you’re selling customizable products on Squarespace or want to offer upsells or add-ons, this plugin is for you! It ingeniously creates an intuitive customer experience where they can select from some options/variants to increase the cost but can also bypass options if they’re fine with the base product.
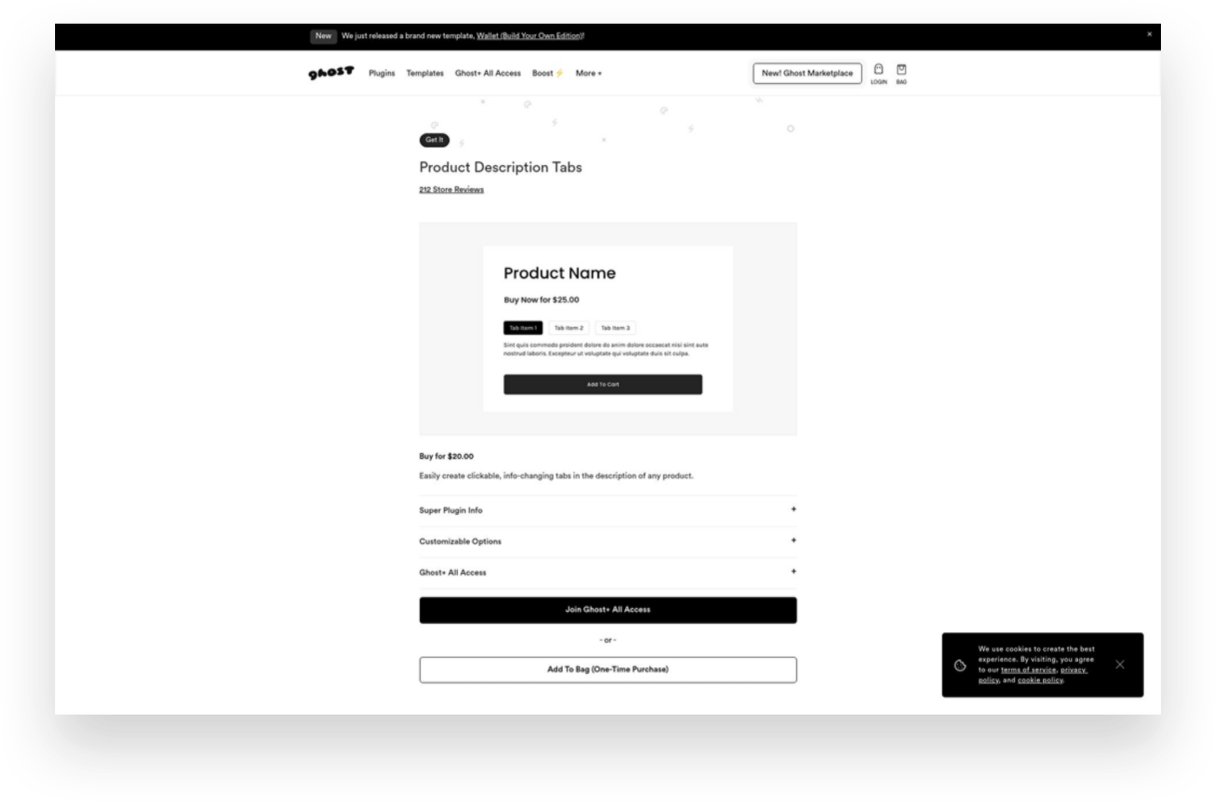
Product Description Tabs
Paid ($20)
Want to give your product details pages a little facelift? Ditch the long, boring descriptions and consolidate info into these cool-looking product tabs. I especially like this type of layout for products that have details like care instructions or other specs that might be helpful to some shoppers but that everyone doesn’t necessarily need to see right up front.
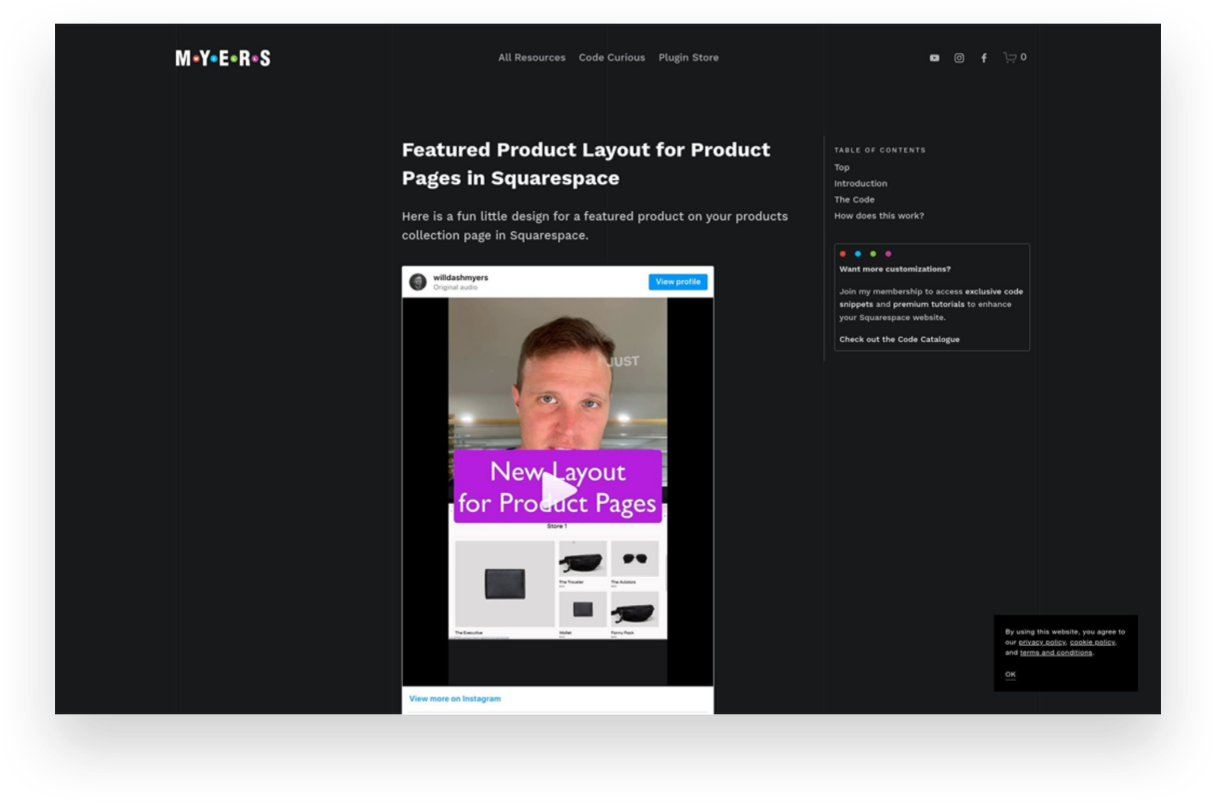
Featured Product Layout for Product Pages
Free
I showed my pal Will Myers if he could come up with a solution for shop pages that would allow you to feature a product versus just having everything the same size in the grid. You know, just to give things a little more flavor. Boy did he deliver! This simple code does just the trick and will help your shop pages look way more interesting.

Offerwhere App
Paid ($40/mo+)
I often have clients ask about how to set up a loyalty program on Squarespace and this the app I refer to them to. This app allows your customers to collect points for shopping with you and then allows them to use them in exchange for rewards or deals you set up. This is a fun way to reward your most loyal customers!

Squarespace Product Gallery Video Plugin
Paid ($29)
Product videos - especially ones that can show your product from all angles or those with 360 degree views - are super highly converting. Oddly, Squarespace doesn’t allow you to add video alongside product thumbnails on your product details pages. Luckily, this plugin does just that and videos look just like the native Squarespace thumbnails so no one would ever know this is an add-on!
Looking for more great eCommerce plugins for Squarespace?
Check out these other plugin posts:

Squarespace Holiday Selling Guide: Boost Your eCommerce Success
Are you ready for the 2023 holiday selling season? Discover 10 essential tips and strategies to maximize your eCommerce success on Squarespace. From chat widgets to free shipping and personalized checkout forms, my comprehensive guide will help you navigate the holiday rush and boost your sales.
Are you ready for the 2023 holiday selling season? The holiday shopping season provides a huge opportunity to bring in business from new and returning customers, and it's the most wonderful time of the year to spread some holiday cheer while boosting your sales. There’s a reason it’s called Black Friday, after all!
We all know that Black Friday and Cyber Monday are known for incredible deals and major discounts, setting the stage for a frenzy of shopping both in real life and online. The weeks between Thanksgiving and New Year's Day are the most hectic time of the year for brick-and-mortar retailers in the U.S., but eCommerce sellers tend to have a much longer crazy period. (In 2022, Black Friday generated a record-breaking $10.8 billion in online sales, making it the largest online spending day in U.S. history. Not to be outdone, Cyber Monday recorded a staggering $11.0 billion in online sales, surpassing Black Friday as the top online spending day ever.) What’s important to note is that the holiday season has expanded way beyond the traditional Thanksgiving weekend, encompassing the entire period from late November to early January. Shoppers now spread their purchases across several weeks and months, making it crucial for businesses to maintain consistent marketing efforts and be at the top of their games throughout the entire season.
To get ahead of this months-long holiday rush, here are my top 10 tips to get your brand ready for the season:
1. Have a Clear Return Policy (& Offer Free Returns)
One of the best eCommerce tips I can offer is to have a clear return policy and offer free returns. This will increase online sales, build trust with customers, and reduce abandonment rates. Customers may feel hesitant to make a purchase if they think they won't be able to return it if it's not what they expected. In fact, I've personally decided not to shop with companies that don't offer returns or exchanges. This time of year is a great opportunity to make sure your return policy is clear and easy to use. You don't want to be the scrooge that ruins a great experience with your stingy policies! For more information on setting up a self-serve returns portal, check out this post!
2. Offer Free Shipping
It's no secret that customers love free shipping, especially during the holiday season. This is why it’s a cornerstone of my most recommended shipping strategy! Even if you don’t do it the rest of the year (even though you should) offering free shipping as a way to incentivize shoppers to make a purchase is a great idea during the holidays. You can choose to provide free shipping on orders over a specific amount or for a limited time. This strategy not only encourages customers to buy but also eliminates any hesitation they may have due to additional shipping costs. Spread the holiday cheer by offering free shipping!
3. Turn on Afterpay
Many people prefer to spread out their purchases over time without relying on credit cards. It's similar to how your grandma might have put something on layaway at Kmart in the summer and paid it off over several months just in time for Christmas. However, with Afterpay, customers receive their order right away and pay Afterpay back over time. (Don't worry, you still receive 100% payment up front!) To learn more about how Afterpay works and how to enable it on your shop, check out this post.
4. Add Gift Cards
Gift cards are a fantastic option for shoppers who may be unsure of what to buy or prefer to let the recipient choose their own present. Some people think that gift cards are impersonal but I say that’s only true if the gift card is from a big box retailer. People LOVE shopping with small brands so consider adding gift cards to your product offerings. You can allow customers to purchase gift cards directly from your website by simply adding a new product and choosing the gift card option. This not only expands your sales opportunities but also caters to a wider range of customer preferences. Spread the joy of giving with the flexibility of gift cards.
5. Use Your Announcement Bar
The announcement bar on your website is valuable real estate for sharing important information with your customers. During the holiday season, make the most of this space by displaying enticing offers, shipping cut-off dates, or any other promotions you want to highlight. Captivate your visitors' attention and drive them towards making a purchase by leveraging the power of your announcement bar. 💡Bonus tip: if you’re looking to jazz up your announcement bar, I love this code from my pal Becca!
6. Reward Loyal Shoppers
Last Christmas, my family and I did a “favorite things” party instead of traditional Christmas gifts. The point was to share a little something that you used and loved throughout the year. The gifts weren’t necessarily huge or fancy - a really great pair of socks, a jar of someone’s favorite local-made hot sauce, another person’s must have scented candle. The point is that this is the time of year people are looking to the brands they already know and trust for gifts. Rewards could be simple (a special coupon code sent out to your VIP customer list) or more complex (I’m loving Offerwhere for a loyalty program that integrates amazingly with Squarespace) - whatever works best for you!
7. Add a Chat Widget
The holiday season can get pretty hectic, and this is when providing exceptional customer service is mission crucial. A chat widget (my favorite is LiveChat - all about that here!) can be a game-changer. By implementing a chatbot on your website, you can quickly address frequently asked questions, guide customers through the checkout process, provide product recommendations, and offer support in real-time. This efficient tool will help your customers feel heard and attended to, even during the busiest shopping days.
8. Offer Local Pickup
Even in the world of eCommerce, supporting local customers is important. By offering a local pickup option, you provide convenience to those who prefer to avoid shipping costs and long delivery times. Local pickup also gives you the opportunity to connect with your community and foster a sense of local pride. Don't forget to highlight this option on your website and let your customers know they can shop local even in the digital realm. For more on this, check out this post on how to set up local pickup or curbside delivery on Squarespace.
9. Add a Custom Checkout Form
Personalize the gift-giving experience by adding a custom checkout form to your website. This is such a simple way to allow customers to include a heartfelt gift note with their orders or offer them the option to add gift wrapping, if you offer it. Don’t forget, for those who want their purchases shipped directly to recipients, at checkout customers can enter the recipient's address in the shipping section instead of their own. You could use a custom form to allow people to indicate that the order is a gift and to not include any billing info along with the shipment. This small touch goes a long way in adding a personal and thoughtful element to each order that goes out this holiday season.
10. Create Gift Guides
Holiday shopping can sometimes feel overwhelming, with countless options to choose from. (And people are notoriously bad at making decisions when given too many options.) Help your customers navigate the gifting process by creating thoughtful gift guides. Curate collections for different categories of recipients, such as "gifts for him," "gifts for kids," or "gifts for the home." Include a mix of your own products and/or complementary offerings from other brands. By providing curated options, you make it easier for shoppers to find the perfect gifts and increase the likelihood of making a purchase. 💡Bonus tip! - an easy way to create shoppable gift categories is by using tags or categories to help shoppers filter their search!
As the holiday season approaches, it's essential to prepare your eCommerce business for the bustling days ahead. By following these tips, you can optimize your online presence, engage with customers effectively, and boost your sales during this festive time of year. Embrace the spirit of the season, spread holiday cheer, and get ready for a successful sales season!

How FAQs Can Boost SEO and Customer Satisfaction on Your Squarespace eCommerce Website
Are you looking to enhance your online business and provide a seamless customer experience? Discover the power of FAQ pages! Learn how FAQs can answer burning questions, boost trust, save time, smooth the shopping experience, showcase your expertise, and amp up your SEO awesomeness.
Real talk: FAQ pages aren't exactly the most glamorous topic in web design. Let's face it, no one starts a conversation about their website by raving about their awesome FAQ page. But here's the thing: FAQ pages are often overlooked or added as an afterthought, leaving visitors searching for missing information. That's why I believe it's smart to include a FAQ page right from the start, even if you're not sure how "frequently" those questions are asked!
Here are my tips to ensure your FAQ page does its job:
Pay attention to design & organization: While FAQ pages may seem a bit mundane, they don't have to be ugly. Organize your page effectively using accordion menus, tabs, or dropdowns to prevent it from looking overwhelming. Headers and subheaders can make the page skimmable, and anchor links improve the user experience. Function matters more than form, but a messy FAQ page can be a red flag.
Answer the questions no one asked: Sure, FAQs are meant to address frequently asked questions, but they can also be an opportunity to showcase your brand's personality. Consider including questions that no one would think to ask, but that allow you to share a bit of your brand's story or values. Think of them as the "I'm so glad you asked that" type of questions.
It's okay to repeat yourself: Don't assume that visitors have read every page on your site. Even if you have a dedicated shipping page, include shipping-related FAQs on your FAQ page. People tend to skim websites, so your FAQ page serves as a highlight reel of important information from across your site. Include key details that visitors may have missed and provide links to relevant pages for more in-depth information.
If you're unsure about what to include on your FAQ page, here are some ideas:
Contact information
Unique selling points of your product or service
Guidance on choosing the right product/service
Things customers might need to know but haven't thought to ask
Return policy
Shipping options and timelines
Password reset instructions
Refund policy
In a nutshell, every website can benefit from a well-crafted FAQ page, even if it's short and sweet. Think of it as an opportunity to educate your customers and build their confidence in doing business with you. A well-organized FAQ page with thoughtful answers shows your commitment to providing exceptional customer support. So, let's give your visitors the answers they're looking for and create an FAQ page that truly shines.

Creating a Custom Print on Demand Store with Squarespace
Discover how to create a custom print-on-demand (POD) store with Squarespace and stand out in the competitive eCommerce market. This step-by-step guide will help you set up your Squarespace store, choose a POD provider, optimize your website for SEO, and launch your store to start selling customized products worldwide.
The eCommerce market provides a huge opportunity for entrepreneurs to start their own successful businesses. However, given the huge number of opportunities, the industry swells with competition too.
Customers today are more likely to buy from online retailers who have well-designed websites. After all, things might get a bit boring if everyone follows the same format and offers the same things in the online stores that all look the same. Therefore, one of the keys to eCommerce success is finding ways to differentiate yourself from the competition.
It's always beneficial to have an advantage over the opposition with a well-designed online store that will attract more customers and result in more purchases. The good news is that those who have joined the most recent waves of online businesses can rely on Squarespace for being their hidden weapon.
Wondering how to get started? In this article, I’ll help you create your very own custom print-on-demand (POD) store with Squarespace.
Benefits of Having a Print-on-Demand Store With Squarespace
With a POD business, you partner with a third-party vendor that prints out individual orders as they come in from your customers. So, for example, if you’re selling custom tumblers, they will only manufacture it when someone places an order for it on your website.
One major perk is that you and others like you may launch a business without having to worry about the hassle of investing in an inventory or managing it. You can focus on running your company while your POD partner handles production, packaging, and shipping.
There are several options for setting up a POD storefront, including eCommerce platforms, such as Shopify, WooCommerce, BigCommerce, etc. Out of these, Squarespace makes a compelling case for why it should be your ideal website builder. They offer superior graphic power, ease of use, and overall value for your money. A personal domain name and unlimited storage space are both included.
Steps to Create a Custom Print-on-Demand Store With Squarespace
Now that you understand why creating a POD website with Squarespace is your best bet let’s help you set up a store and start earning.
1. Set Up Your Squarespace Store
To set up your Squarespace store, you’ll need to first create an account. Squarespace provides a 14-day free trial that allows you access to all its tools. (p.s. When you’re ready to subscribe, you can use my code KRISTINE10 to save 10% on your annual subscription!)
After you’ve created an account, choose a template or design your own! You will have lots of options to choose from but this post will help you know what to look for.
Simply enter your email address or use your Google account to sign in to Squarespace. The next page will prompt you to enter a title for your website before providing some general editing tips. Depending on your vision for your website, you can:
Add pages
Organize the structure for easy navigation
Add content
Choose color scheme
Add branding elements like logos, fonts, store policies, etc.
Once your store is all set up, you’re ready to move to the next step.
2. Pick Print-on-Demand Provider
You may connect to a number of print-on-demand services with Squarespace Extensions. The success of your print-on-demand venture hinges on picking the right POD partner to work with your eCommerce platform. But how do you choose the best POD service when there are so many? Here's a rundown of some things to think about:

Your budget
The catalog size
Quality of products
Customization options
Delivery timeline
Quality of support
Ease of integration
I like Printify because it provides an extensive catalog of more than 800 high-quality white-label products. You can sell anything and everything from custom jackets to custom phone cases, stickers to shoes - whatever you can think of! They also have a free mockup generator that helps you create beautiful designs easily and create 3D mockups. Lastly, they guarantee a production time of 10 days. If they don’t meet the timeline, they’ll process a refund! And if you ever get stuck, they’re available around the clock to help you with any issues.
Once you’ve selected your POD provider, it’s time to understand what it’ll take to survive and thrive in the market. For that, we move on to the next step!
3. Do a Competitive Analysis
Competitive analysis is a technique for gauging the business's market standing in relation to that of its competitors. It is a technique for gathering information and making it useful.
Conducting a comprehensive competitive analysis positions you to outperform the competition and win over loyal customers. Competitor analysis is an integral part of developing a successful company plan. A thorough competitor analysis will help you in the following ways:
Learn more about the current corporate climate, which may assist you in better positioning your brand;
Find your niche and stand out from the competition;
Take note of the areas in which your rivals excel;
Use opportunities to benefit you and take advantage of your rivals' shortcomings.
Learn from the marketing moves made by your competitors and use those lessons in your own approach.
4. Choose Your Products and Upload them to the Store
After the competitor analysis, you should be clear about what you want to offer. Now, link your POD provider with Squarespace and display your products on your website.
With Squarespace and Printify working together with its integration, this is a breeze. Browse the comprehensive collection and pick the items that you believe will appeal best to your intended audience.
Using Printify's straightforward interface, you can add your company's logo or other custom artwork to any of your selected products. You may easily customize the appearance of your products by uploading and positioning your own custom artwork. You can personalize your products with art, typography, and more with Printify's mockup generator and state-of-the-art design tools.
Once your designs are ready, simply upload them to your store with a descriptive title, compelling description, and the selling price.
5. Create a Marketing Strategy
Online retailers need to work harder to attract customers than traditional stores since they can't just rely on foot traffic. You can't expect clients to appear out of thin air if you launch an online store.
While the products offered in each online store may be unique, their marketing approaches are consistent. To help you replicate this strategy on your own, you’ll have to do the following:
Define your unique selling point, meaning what makes you stand out from your competitors.
Create a marketing funnel from discovery to purchase to understand the customer journey.
Set marketing objectives for each stage of the funnel and how you’ll achieve them.
Define your budget and determine what methods you can afford.
Define your marketing channels and key performance indicators (KPI) to measure progress.
Determine a timeline to implement the strategies and stick to them.
Track your progress, see what you can do better, and implement changes.
Related Post: Crash Course: The Squarespace Commerce Analytics Panel
6. Launch Your Store
Once your marketing strategy is in place, it’s time for action! Find out what kind of fulfillment alternatives and shipping costs the POD provider offers before you start selling online. Some POD services may have the ability to fulfill and ship orders mechanically.
Make sure your shipping policies are in line with the requirements of the POD supplier you plan to use before you announce them to the public.
That’s it launch your store and publish it on all marketing channels to start making sales!
More Tips While Creating a Custom Print-on-Demand Store With Squarespace
Squarespace websites are built keeping search engine indexing in mind, but how well people find your new store still depends heavily on the material you provide as well as how you exhibit it. I strongly suggest you take advantage of the SEO tools that Squarespace provides or use a tool like SEOSpace to help your site get noticed. You can also optimize your Squarespace website by:
Targeting keywords
Optimizing product pages, their images, title, and description
Creating regular content in the form of blogs
Creating inbound and outbound links
and following other SEO practices found on their official checklist.
Another strategy you can implement is setting up an affiliate or referral program for your shop. Adding an affiliate strategy will boost your marketing returns multi folds and visibly show results with increased brand awareness, customer loyalty, generation of leads, and conversion rates. For more on my favorite affiliate and referral marketing tool check out this post!
Conclusion
The eCommerce industry is booming with opportunities, and Squarespace provides a great solution for entrepreneurs to create visually stunning websites with little to no coding knowledge. You have a lot of freedom with Squarespace when it comes to designing your eCommerce platform and handling client orders, including the option to use POD services. With this article, you’re equipped to start your own print-on-demand store and sell customized items to the world. Get started with your very own POD store on a Squarespace website today!

5 Simple Steps to Optimize Your eCommerce Site for Mobile Sales
With mobile purchases making up about half of all eCommerce sales, it's important to optimize your website for mobile sales. It’s not enough to just put your products or services online for people to discover. You’ve got to make sure that your site is designed for selling on devices big and small.
It's highly likely that your clients or customers are searching for your products or services on their mobile phones, regardless of what you sell. In fact, some estimates suggest that mobile purchases account for roughly half of all eCommerce sales! This means it's crucial to consider these users when designing your website. They don't just want information about your company or offerings; they want to take action, make purchases, enroll, sign up, and connect with you. For many users, the entire process from research and discovery to purchase and beyond occurs on their mobile devices.
Is “Mobile First” outdated?
Web designers have been discussing "mobile-first" web design since the first iPhone was released, but as with all things tech, there have been numerous improvements and changes over the years. Mobile-first design simply means that instead of designing a website for desktop screens first and then attempting to scale it down to fit mobile devices, it may be more effective to approach it the other way around.
While this buzzword is relevant when considering eCommerce, modern web design platforms like Squarespace and Shopify now handle responsive design so well that we don't need to focus as much on creating two separate experiences. Instead, it's more important to build an empathetic brand that considers the distractions and emotions users may experience while visiting your site. This entails paying attention to your content, organization, structure, layout, and site architecture just as much as the design of your website.
So, knowing that mobile commerce is something we need to think about as we take all phases of our interaction with brands onto our phones, here are five things you can do to optimize your website for mobile sales.
1. Have your site built on a platform that does eCommerce well.
If you're considering building your eCommerce site on Squarespace or Shopify, you're already ahead of the game! Page layouts on both platforms automatically adjust to any screen size, from the smallest phone to the largest desktop. This is crucial because users prefer vertical scrolling on small screens rather than having to zoom in or scroll sideways. Plus, Google rewards mobile responsiveness with higher search engine rankings!
If you're struggling to make your design work seamlessly on mobile devices, Squarespace 7.1 Fluid Engine has got you covered. With the added feature of adjusting layouts exclusively for mobile, you can create bespoke designs that cater to users on varying screen sizes. For more information on Squarespace 7.1 and its impact on eCommerce sites, be sure to read this post.
2. Pay attention to site speed.
Slow loading times can be detrimental to your website's success, not just because it's frustrating for users. Google takes note of this and may penalize your site accordingly. To improve the speed of your site, pay attention to page size (keep them under 5 MB) and image size (below 500 KB or with a width of no more than 2500px). You can easily compress or downsize your image files using free online tools before uploading them to your site. If you're experiencing slow loading times, start by reducing your image sizes. If you're interested in doing more to optimize your Squarespace site's SEO, I highly recommend SEOSpace!
3. Consider a minimalist’s approach to visual content.
Some design trends may look stunning on a 27-inch iMac, but they can be a disaster when viewed on mobile devices. There’s a fine line between designing for the sake of design and designing for conversion. Every aspect of your website, from headlines to images to text blocks, buttons, and even white space, should serve a purpose. If an image looks great on your giant desktop but crops weirdly on mobile, it’s not going to work. And you’d be remiss to sacrifice the mobile experience for the sake of desktop aesthetics.
Keep in mind that things need to work when stacked vertically, one element at a time, which is how they are viewed on mobile. You’ve only got a few scrolls to get your point across or visitors will abandon your site - most likely off to one of your competitors.
Struggling to keep your design in check? Check out my post on this: A Minimalist’s Guide to Branding
4. Navigation matters more than page content.
I want to emphasize that your page's content is crucial, but I often see clients fixate on minor details for a paragraph buried deep in their website while neglecting the organization of their site as a whole. The way you structure and present your information, known as information architecture, is vital to your site's success, particularly if you want to appeal to mobile users.
Of course, page content matters too - visitors shouldn't have to struggle to understand what you're offering. To be mobile-friendly, prioritize smart content and intuitive navigation. For eCommerce sites, consider using categories and subcategories to thoughtfully nest information. When it comes to main navigation, keep titles brief and limit the number of links. Or consider one of my favorite suggestions: replace your typical website navigation (Home, About, Contact) with your shop categories instead!
For more on making sure your site is as user-friendly and easily navigable as possible, check out this post: UX Lessons from a Former Sign Designer.
5. Make checkout easy.
If you’ve done all of the above and got someone to add something to their cart, don’t make it hard for them once they get there! To optimize the checkout experience, I highly recommend minimizing the amount of information required. While it may seem beneficial to gather additional details such as a customer's birthday or how they found you, these actions create friction that can lead to lost sales. The checkout process is not the ideal time to get to know your customers better. Instead, consider shifting all extraneous communications to a weekly newsletter, social media feed, or personalized post-sale follow-up email. For more information on setting up product-specific email automations, check out this helpful guide.
Bottom Line: Elevating the Mobile eCommerce Experience
To maximize your mobile sales, it's crucial to pay attention to the small details. Keep in mind that your customers may be distracted or in a hurry when browsing on their mobile devices. Therefore, your goal should be to make it as easy as possible for them to discover and purchase your products. With the increasing number of mobile shoppers, optimizing your website's size, content, and checkout process is more important than ever. For additional web design tips, check out this post: Website Tips from an eCommerce Pro!

How to Design Your Own Squarespace Template
Your search for the perfect template for your new eCommerce website ends here. In this post, I’m going to show you how you can design your own custom template in just a few easy steps. Includes a walk-through video showing you exactly what to do!
I know what you’re thinking — designing your own custom Squarespace template must be a super hard process that only the most advanced and skilled Squarespace web designers can pull off, right? Don’t worry; it’s easier than it sounds!
Sure, there are a lot of templates out there to comb through and pick from, and I even have a bunch of posts all about templates if you’d like to check those out:
But I really think that designing your own template is an option worth your serious consideration.
Here’s why:
It’s fast and easy to customize your own template, so you can spend more time on other things.
It's free and included on Squarespace, so you can just jump in and start editing.
It’s flexible, so no matter how you decide to pivot or grow, there’s room to build on.
Get Started
So how exactly do you design your own template for your eCommerce website on Squarespace? The exact steps are covered below, but if you prefer to watch, check out my walkthrough of this process in my YouTube video.
You can also follow along with my steps by starting your own free trial of Squarespace. Click the button below to get started and you can work along with me!

Squarespace Blueprint’s Step-by-Step Guide
We’re skipping the template library and building our very own template. Squarespace makes this as easy as pie! Just by selecting from a few preliminary options and settings, a completely custom site is created for you, ready to fill in with your content and products.

STEP 1
Add Your Site Title
The first step asks you to give your website a name. This is important because even if you end up adding a logo to your site later on, the Site Title is what search engines see. So don’t get weird - just give this your company name!

STEP 2
Build Your Homepage
In this section, you’ll work through recommendations for your home page layout from top to bottom. You can change up any of these if they aren’t perfect but try to pick layouts and sections that are as close as possible as you’d like each to look like to save yourself time later on. You can choose as many or as few sections as you like, but I recommend definitely adding one from each, as it will help you frame out a complete home page.

STEP 3
Add Additional Pages
This section is where you can define which other pages you’d like Squarespace to populate for you, so take the shortcut! Select all but Services (unless you also offer services, of course). That means that Shop, About & Contact should all be selected.

STEP 4
Choose Your Color Palette
Here you’ll be presented with some designer-approved color palettes to select from. It’s probably not very likely that your exact brand colors are represented, and that’s ok - just pick something close. If you’re unsure where to start, I recommend selecting from an option in the “Neutral” section - most of those make for a nice jumping-off point and work with a wide range of brand accent colors.

STEP 5
Choose Your Font Pairing
Lastly, you’ll need to select a set of fonts to use as a (you guessed it) jumping-off point. Just like with colors, it’s ok if you have some predefined fonts you use for your brand and don’t see them represented in the options. You can always tweak them later as needed. That being said, if you don’t already have any brand fonts picked out or aren’t sure that the fonts you’ve chosen will work well for the web, these are all great options. Choose a sans serif font pairing if your brand skews minimal/modern, a serif font pairing for a traditional/elevated brand or a mixed pair to make things feel dynamic/fun.
TADA!
Check Out Your New Site & Next Steps
Once you’ve worked through the 5 onboarding steps, Squarespace will do its magic and generate your own custom template to match your preferences and selections! It’s ok if everything isn’t exactly perfect; my guess is that it’s already feeling a lot more YOU than a generic template. From here, you’ve got the groundwork set to go in and customize the placeholder text and swap out the stock images with your own. Use the template wording as a guide for how much copy you need to write and what spaces you have to fill. If you’re needing a little help with stock photography, check out this post all about how to use Unsplash to curate your website images. W
When you’re ready to start selling, follow these steps in A Step-by-Step Guide on How to Set Up Your First Online Shop and use code KRISTINE10 for 10% off your Squarespace subscription! You’re in business!

9 Ways to Recession-Proof Your eCommerce Business
Worried about the economic times we live in? Well, I can’t do much about a lot of it, but I do have 9 strategies for you to consider implementing to help ease your customer’s spending concerns - and your worried mind. From what to focus on to how to pivot, this post is full of quick wins for hard times.
Times of economic uncertainty can undoubtedly be the cause of sleepless nights. And, c'mon - it would be weird if worries about customers' ability or willingness to spend and other general financial concerns didn't get to us!
But savvy entrepreneurs have a way of always getting creative when times seem the toughest. This is where brands, especially smaller ones, get to show off their flexibility and ability to pivot in ways that giant corporations simply cannot.
For small eCommerce brands specifically, there are some quick changes you can make to your online store to ensure you can weather any financial storm that may lie ahead. In this post, we'll explore practical ways to recession-proof your eCommerce website. We will discuss strategies for rethinking marketing, focusing on customer retention and inventory management. Bonus: these are all relatively easy-to-implement, low or no-cost ideas you can implement immediately to boost average cart values, deal with lower conversion rates and cope with less traffic to your site. Let's dig in!
Add subscriptions to your mix. If you find that customers routinely return to your shop to buy the same products repeatedly, make it easy for them by offering those same products as a subscription. Offer a discount versus paying for the same products or services piecemeal. Not only will your customers enjoy the savings and added convenience, but you'll also be able to add recurring revenue to the books.
Don't give up on your free shipping offer. I cannot preach enough about the importance of a free shipping offer. If you must rethink pricing, preserve and protect your free shipping offer with your life. Price-sensitive customers hate feeling like they were nickel-and-dimed over shipping fees and like thinking they're getting a great deal. Better yet, a free shipping option for orders over a certain amount helps boost your average cart values and reduce abandoned cart rates by people surprised by shipping costs.
Focus on customer loyalty. You know that saying about how acquiring a new customer costs more than keeping an old one? It's true. With the prospect of smaller average cart values or less traffic overall due to tightened budgets, focus on customer loyalty first and foremost. You can do this in many ways, such as setting up a loyalty program that allows customers to pay for purchases with earned points or perks.
Rethink marketing. You can reduce wasteful spending and boost revenue by cutting back on digital paid spend and going straight to the horse's mouth. Rather than continuing to invest in expensive paid advertising, consider shifting your focus to utilizing customer data to guide your marketing decisions. Consider leveraging the power of small influencers (or even your own satisfied customers!) to help spread your message. Another idea is to explore collaborations with relevant brands and creators and consider offering products as gifts to small influencers to help build brand awareness.
Manage inventory better. Does it seem like there's always either too much or too little stock on hand? If you need help with the former problem, try focusing on building industry partnerships or collabs to introduce your products to new markets. If the latter is more of your issue, it might be time to start looking for new suppliers closer to home or sourcing from multiple suppliers. And for all, try adding a custom label to products you can keep consistently in stock and ready to ship so customers know they can get those items right away. I've seen a few brands do this or even create whole "Quick Ship" categories, and I think it's such a great idea!
Focus on your brand. To make the most of limited resources, prioritize establishing a solid brand. This involves ensuring consistency in your message, tone, and visual identity, as confusing branding can hinder customer conversion. Additionally, take time to evaluate and improve your customer service and clearly understand your target audience. Remember that you can't appeal to everyone, so focusing on a segmented marketplace actually allows you to best serve your core customers.
Boost customer confidence on the product page. Optimizing your product details pages can impact your bottom line in two ways. First by increasing customer confidence in their purchase decisions and second by reducing costly returns. Be sure to include detailed and comprehensive product descriptions that accurately convey the features and benefits of the product. Incorporate video - especially 360-degree views that allow customers to thoroughly examine the product from all angles and better understand what they can expect. Also, ensure you're displaying customer reviews, as they can help build trust and provide valuable insights into the product's performance and suitability. (For more tips on optimizing your Squarespace product pages check out this post!)
Incorporate user-generated video. Studies have repeatedly shown that videos (especially short videos that answer the question "Why should I buy?") are great conversion tools - but video production can be overwhelming and expensive. Luckily, videos from past customers are just as helpful as content you might produce on your own - acting as part social proof and part explainer video all in one.
Expand local pickup & delivery options. If you're an online seller that also offers in-person buying opportunities, the Venn diagram of online customers and in-person customers probably has a ton of overlap. Offering local pickup options (and/or delivery if you can swing it) has a few benefits. First, it's generally faster and cheaper than shipping goods, which can appeal to shoppers on a budget. Second, it allows you to build stronger personal relationships with your customers and invite them to explore other offerings they may have yet to consider. Don't have a brick-and-mortar location? Try teaming up with another local business that does and see if they'd be open to allowing your customers to pick up from their location - this could be a win-win for both companies!
Silver Linings
Looking at the list above, I see a few themes that may just be the silver linings. One of the biggest is that, in many ways, while eCommerce opens up the whole world to us, locality still matters. Whether we're sourcing products from suppliers closer to home, building relationships with micro-influencers, or offering ways to bring online convenience to brick-and-mortar shopping - I love to see it!
Also, let's be honest: only some businesses have the strength or fortitude to ride out a downturn. While that's definitely sad, it also opens up opportunities for newcomers to the market to step in and fill in the gaps. Starting a business in a downturn can help you seize market share and build a strong foundation coming out the other side. If you've been sitting on a big idea, this may be just the time to take your shot.

The Best Alternative Checkout Methods
Squarespace offers a way to sell almost everything almost everywhere, but sometimes you just need another option. Whether it’s because you sell something super custom or because you’re just wanting to create a specific user experience for your customers - here are the best alternative checkout methods that can all be embedded or linked to from your current website.
Updated April 2023
Squarespace offers the ability to sell so many different types of things but sometimes you might need to look to an alternate checkout method. This could be because you’re selling something super unique that doesn’t fit well within Squarespace’s existing checkout options or because you use other business tools that integrate better with other options. Whatever the case may be, there are a number of alternate checkout methods that you can integrate into your current Squarespace website and still offer a streamlined way to get paid. Check out some of my favorite options below but be sure not to miss my final notes at the very bottom of this post with some tips on how to pull this off seamlessly!
Stripe
There’s a reason this is at the top of the list, and that’s because if you’re going to circumvent the built-in checkout system on your website, you might as well go straight to who was going to be processing the payments anyways, which in 99% of cases is Stripe. Stripe has been rolling out some awesome no-code and low-code solutions that offer some powerful ways to get paid while still keeping that sleek, minimalist design that makes my heart sing.
What I would use this for:
Pricing tables
Subscriptions
Client Portals
Payment Links
Quoting
What it costs: 2.9% + 30¢ which is the same rate as you’d be charged for accepting credit card payments through your site. (There are some additional features that come with additional fees, but most elements are included at no extra charge. See Stripe’s pricing page here.)
Flodesk Checkout
Most people know Flodesk for their great-looking email templates and easy-to-use email marketing platform, but they recently released Flodesk Checkout, which allows you to sell services, digital products, access to a course, or membership - whatever it is you sell! The process is smooth and, in true Flodesk fashion, pretty stylish too! This is an especially attractive solution because Flodesk automatically segments customers based on purchase activity, so you can seamlessly send targeted follow-up emails.
What I would use this for:
Digital goods or services
One-click upsells
Mini sales pages
Targeted email campaigns as a result of a purchase
What it costs: $35/mo as a standalone product; $59/mo to access all of the Email features in addition to Checkout. There are no other platform fees or limits, just the standard Stripe processing fee of 2.9% + 30¢ per transaction.
ConvertKit Commerce
ConvertKit is another popular email marketing platform (and the one I love most), and it has its own built-in way to get paid for things like ebooks, music, presets, or coaching. The biggest difference between Flodesk Checkout, above, and CovertKit Commerce is that you can set up subscription options. This means that in addition to all the regular digital or service products, you could also use ConvertKit to set up a subscription-only email newsletter or other services with recurring billing.
What I would use this for:
Digital goods, services, or subscriptions
Embeddable “buy now” buttons
Multiple pricing options: standard, subscription, donation, or payment plans
Targeted email campaigns as a result of a purchase
What it costs: ConvertKit has a free plan, but most people will want to be on the Creator plan, which starts at $9/mo. Commerce purchases are charged a 3.5% + 30¢ transaction fee.
Gumroad
Gumroad is a great option if you’re interested in spending less time tinkering around with the platform you’re selling on and more time creating whatever it is you sell! You can really get up and running in no time at all on Gumroad because it’s just so simple and well-designed. Another thing that sets Gumroad apart is that you can create a little community of people, not just customers. People can follow your page, and you can even embed a “follow” button on your website. They also recently launched the ability to offer upsells (an upgrade to whatever they intended to purchase) and cross-sells (new products that might pair well with what they’re purchasing. You can offer discounts on these and completely customize the experience for users.
What I would use this for:
One-click upsells & cross-sells
Digital services, memberships, subscriptions
Selling software or other licensed products
Selling multiple versions of products
Accepting payments in multiple currencies
What it costs: 10% flat (plus the standard i.e. 2.9% + 30¢ per transaction for Stripe).
Buy Me a Coffee
If you’re looking for a simple alternative checkout method that allows you to accept donations, sell memberships or offer commissions, you should definitely consider Buy Me a Coffee! You can even use it as a digital tip jar (like I do here 😉) or build wishlists for your fans to buy from. I really like the public-facing landing page that Buy Me a Coffee creates for you, and there are also options to embed your BMAC link on your site or even create a QR code for people to scan and pay you. It’s overall just so easy to use for all!
What I would use this for:
Memberships, services, donations
Commissions and physical products
Embeddable widgets
One Tap Payments
What it costs: There is no fee to create a Buy Me a Coffee account, and you can use all features like email and publishing for free. There is a 5% transaction fee charged for things aside from donations, in which case you’re just charged Stripe’s transaction fee (2.9% + 30¢ per transaction), which you can opt to cover for your customers or choose to have them pay for.
Paperform
I’ve written before about how Paperform can be used to create a custom order form for Squarespace, but the commerce capabilities really need more of a shout out! On Paperform you can create products, set up subscriptions, book paid appointments or other services on a calendar, and collect as much or as little extra information as you need from your customers in the process. I love how customizable Paperform is and how simple it is to create a really nice-looking checkout process that you can either embed on your own site or link out to, depending on the flow you’re going for.
What I would use this for:
Services or bookings
Subscriptions
Complex or highly customizable products that require advanced calculations or conditional formatting
Any instance where you also need to collect extra info at the time of checkout
What it costs: There are no transaction fees charged by Paperform - just the standard processing fees by Stripe or Paypal. Paperform subscriptions start at $24/month but I would suggest an annual Pro subscription ($40/mo) for most.
Proceed With Caution: Drawbacks to Keep in Mind
If you decide to implement one of the options above, you’ll need to keep in mind that doing so bypasses Squarespace Commerce entirely, which means that you’ll need to take care of things like order confirmation emails and reporting on your own somehow. Most of the options listed have some of their own options for things like this, but some don’t.
Just know that any products, services, classes, subscriptions, or downloads you sell through an alternate checkout method will NOT show up on Squarespace, and you may need to take some extra steps to do things like generate shipping labels (for physical products) or make sure your customers receive adequate communication from you about their purchases.
This isn’t to say that one of the above options isn’t a perfectly good solution for your unique business needs, just a reminder to think about the whole experience from start to finish for both you and your customer!

My Favorite Squarespace eCommerce Templates for 2023
Check out 6 of my favorite new templates + exactly what I would do to each of them to make them eCommerce ready.
I’ve posted before about some great templates to check out if you’re looking to launch or update your Squarespace eCommerce website (see here and here) but I’m back with some of the latest and greatest for 2023!
Keep in mind that while not all of these are necessarily eCommerce-forward right out of the gate, there’s no reason why you can’t add a shop big or small to any of them. This is one of the things I love most about Squarespace: that you can have a beautiful content-rich website AND an eCommerce storefront all in one place. If you’re feeling skeptical about how to transform any template you may find into your online shop’s new home, be sure to read the notes on each template below on what I would do for each of these to make them more shop-able. It may be easier than you think!

Plate
GHOST - $199
What I like:
This fun template by Ghost (one of my faves!) immediately stands out because of it’s bright color but that’s not the only thing to love. I really like how the lines and shapes create well-defined sections. This template’s design allows for plenty of areas to call out content without feeling cluttered in any way.
What would make it even better for eCommerce:
This template could easily transform into something perfect for an online shop. I would use the sections at the top of the home page to call out shop categories and the section on the home page that currently features the menu a place for shop bestsellers. This template would work especially well for a brand with a mission that needs to be conveyed - think: a B Corp or woman-led business, etc.
Save 10% off any Ghost template with discount code: KRISTINENEIL

Quinn Method
GOLIVE - $299
What I like:
GoLive always does a great job at providing lots of space for content to shine so I would use this template to show off benefits and features of your online course, membership, classes or community. I love that it has a place for reviews and that pricing table is also pretty cool!
What would make it even better for eCommerce:
This template is already set up as a sales page for an online course so I think it would be perfect if you’re selling any sort of digital good or services. I think this template would also work well if you’re using Squarespace Scheduling or Podia to book classes, sell memberships, provide access to a community and more.

Seen
Squarespace - FREE
What I like:
This free template from Squarespace is already set up as an eCommerce shop so it’s a great jumping off point. I love the minimal aesthetic and it would expand easily to fit almost any brand. I especially enjoy the scrolling banner on the homepage with the featured coupon code. Many sites put this at the very top so adding it a little below the fold makes it unique and eye-catching.
What would make it even better for eCommerce:
I would bulk up the home page content by adding a section about the brand plus ones that help shoppers discover helpful information such as a FAQ page or returns info. Also, instead of the section with a featured product I might make that for featured shop categories so that people can see at a glance what the shop is all about.

Boho Social
Applet Studio - $189
What I like:
This template by Applet Studio is a great mix of cheerful + minimal which is an aesthetic right up my alley! I love the strong CTA in the home page banner and that there’s a spot right away to sign up for an email list - so important for eCommerce! I could easily see this template working well for a fashion, jewelry or home good line.
What would make it even better for eCommerce:
Something to keep an eye out for whenever you’re looking for an eCommerce template is a template that already highlights a blog, as this one does. It’s easy to convert section highlighting posts into ones featuring products. A shop is really just a blog that you can take action on!

Tilt - Paper Template
Ghost - $149
What I like:
If you have a hard time seeing the forest through the trees, any of the Paper templates from Ghost should be on your radar. These are just like regular templates except there’s no placeholder branding to have to update; everything is in black and white making it a blank slate ready for you to customize to match your brand. Genius!
What would make it even better for eCommerce:
What I like about this template (be sure to check out the demo) is the tidy header area. I would add shop categories and just like my tip above, change any featured blog posts out to shop products instead. All those pics on the home page could be featured products or categories!
Start Your Site With Tilt - Paper →
Save 10% off any Ghost template with discount code: KRISTINENEIL
Affiliate Shop Page Add-On
GoLive - $99
What I like:
The last item on this list is another one that’s a little different but I think is so smart! This template from GoLive is designed to be an add-on to any existing website. It will automatically update to match your existing site’s branding and is perfect if you are looking to add an affiliate shop to your site so that you can show off sponsored content or even link out to your Like To Know It.
What would make it even better for eCommerce:
I wouldn’t change a thing! This add-on is already perfectly designed for adding an affiliate shop to your existing Squarespace site. I think it’s so important that this add-on allows you to keep all this content on your own site - great for a SEO boost!

Upcoming Privacy Laws and How You Can Protect Your Business
Those teeny little links at the bottom of every website for Privacy & Terms pages may not be super sexy but they sure are important! Learn why privacy matters so much, all about upcoming privacy laws and how you can protect your business online.
Note: This post is regularly updated to include the latest data privacy laws. (Most recently updated in Februrary 2023)
I used to pick on FAQ pages for being one of the least alluring pages on a website but I was wrong. When it comes to the ugly duckling of web pages, privacy policies and terms of service take the cake. Usually buried in teeny tiny links at the bottom of websites, only clicked on by lawyers, and almost never actually read word-for-word -- the legal pages of your website are probably the last thing on your mind every day.
So why does every website need these pages filled with what looks like gibberish and legalese? Well, #1 because it’s just good business and #2 because there are current laws - and many proposed new ones coming down the pike - that could equate to fines for violations of privacy laws starting at $2,500... per website visitor 😱 Don’t do the math on that, it will def make you sick to your stomach. And that’s just the start. In this post, we’re looking at what a privacy policy is, why it’s important that you have one that’s always kept up to date, and what I think the best solution is.
What is a Privacy Policy?
In short, a privacy policy is a document that discloses what personal information you collect on your website, what you can do with that information, and who you share it with, among other things. Your website needs a privacy policy if you use it to collect personal info such as names and email, which is pretty much every website out there. I mean, I’ve never made a website that doesn’t collect this type of information and more ever. Basically, if you even have a contact form or an email newsletter signup form on your site, you need a privacy policy.
Why is a Privacy Policy Important
Having an up-to-date privacy policy on your website can help you avoid fines and lawsuits. Remember what I said above about the only people really checking these pages out are lawyers? Well, I wasn’t exaggerating. Currently, there are a number of laws in the US and EU that require websites that collect personal information to have a privacy policy. These include:
European Union’s General Data Protection Regulation (GDPR)
The California Online Privacy Protection Act (CalOPPA)
The California Consumer Privacy Act (CCPA)
Nevada’s Revised Statutes Chapter 603A and SB220
Nevada Senate Bill 260 - signed into law June 2021
There are 6 new laws that are going into effect in 2023 that will cover even more ground:
The California Privacy Rights Act (CPRA)
Virginia Consumer Data Protection Act (VCDPA)
Colorado Privacy Act (SB190)
Utah Consumer Privacy Act
Connecticut SB6
Quebec Bill 64
These laws all are designed to protect consumers of those states and countries - which is good - but these laws are not in place to protect online businesses like yours. What this means is that these laws can apply to businesses outside of those states and countries and may apply to you if you collect the personal information of or enter into transactions with consumers from the EU, California, or Nevada. With eCommerce being a truly global endeavor, there’s no way to prevent people from anywhere accessing your site and exposing you to some level of risk.
Why You Need to Keep Your Privacy Policy Up to Date
In addition to the laws above, several US states have proposed privacy bills that, if passed, would require websites that collect personal information to have a compliant Privacy Policy. This is all well and good but things get tricky when you consider that these bills all have different requirements for the disclosures that need to be made in a Privacy Policy and would impose heavy fines for failing to include those disclosures.
In fact, some states are proposing to allow consumers to sue businesses directly for not having a compliant privacy policy. This boils down to the fact that if your website gets inquiries or does business across state lines (and let’s hope it does!) it’s not enough to just have a privacy policy; you need to have a privacy policy that complies with multiple state privacy laws. Yikes. Now, I’ve done a fair bit of research into privacy policies and website terms of service and I know for sure that I don’t have the bandwidth or legal acumen to stay on top of all of this myself.
The Best Solution I Know Of: Termageddon
Termageddon is an auto-updating privacy policy generator. This means that it will automatically update your website’s policies any time laws change, making sure you are always 100% in compliance. It works through small snippets of code that are added to your privacy and terms pages and uses information from a simple questionnaire that you only have to answer once at setup. It’s also fun to know that it is the only privacy policy tool listed as a trusted privacy technology vendor by the International Association of Privacy Professionals.
A super affordable solution:
Most people aren’t looking to spend thousands for a lawyer to draft these types of documents up for them which means that most people are out there unprotected from risk. The thing I like about Termageddon is that for just $10/mo or $99/yr, you receive the following expert-prepared policies to protect your site:
Privacy Policy
Terms of Service
Disclaimer
End User Licence Agreement
Why they’re awesome:
I mean beyond the tech magic that makes sure your site is always in compliance, you can set up your policies in 15 mins or less and the team at Termageddon is top-notch. You’ll basically have access to the best of the best when it comes to privacy and data protection if you ever have any questions. Their team has already helped some of my clients that have some pretty unique setups ensure they are protected now… and in face of whatever future laws may bring. Privacy matters a ton but so does protecting your business need to continue to do business online confidently.
BONUS: You can use this link or code KRISTINE for 10% off your first-year payment on your Termageddon subscription!

How to Display Your Products on Google for Free
I bet you didn’t know that one of the easiest tools you have out there to get your products seen in Google search results and across Google is not only easy to set up, but it’s also completely free to do so! Here are the steps you need to take to set up a free Google Merchant Center account and sync your Squarespace eCommerce site up to it.
I bet you didn’t know that one of the easiest tools you have out there to get your products seen in Google search results and across Google is not only easy to set up, it’s completely free to do so! Here are the exact steps you need to take to set up a free Google Merchant Center account and sync your Squarespace eCommerce site up to it.
Bonuses:
🚫 No confusing CSV files to format.
🚫 No manually adding products to Google one-by-one.
🚫 No need to update Google anytime you make a change to your shop’s inventory.
🆓 (Did I mention it’s free??)
What is Google Merchant Center & Where Do Products Display?
Google Merchant Center is the place where you’re basically telling Google what it is you sell and how you sell it. It’s where you can set up and manage free product listings that control how your products are displayed across Google’s various products, such as:


Create a Google Merchant Center Account & Connect It To Squarespace
Connecting your eCommerce site to Google Merchant Center is the way to go because it allows you to automatically sync all your products to Google versus having to add them one by one or worrying about formatting everything correctly. Here are step-by-step instructions on how to display your Squarespace products in Google Product Listings:
On your Squarespace site, go to the Commerce panel and then click on Google under Sales Channels.
At the bottom of the page click on “Sign Up With Google.” Assuming you don’t already have a Google Merchant Center account, you’ll be presented with a few prompts to help you create a new account. (Alternatively, you can also go directly to Google Merchant Center here and create your account first. The steps will be the same from here.)
Once you’ve create your Google Merchant Center Account, click Verify & Claim Website and copy the code provided for the HTML tag.
Back on Squarespace, click on the "Paste Google verification code into site header” button which will jump you to that section of Squarespace. (You can also get there by going to Settings > Advanced > Code Injection.) Paste the code provided by Google into the Header Code Injection area which is the top box on that page.
Click Save!
What happens next?
Now that you’ve connected your site and store to Google, all the physical products that you sell will be automatically synced and sent to Google Product Listings. If you’d like to check on the sync status, you can always head back to Commerce > Google right within Squarespace.
Squarespace + Google Merchant Center FAQs
-
A google-based email address (note: this does NOT mean you need a gmail.com address but just a business email address that’s through Google Workspace)
A business phone number that you can receive a phone or text on for verification purposes
-
If you’re having issues creating a Google Merchant Center account or connecting it to Squarespace, make sure you meet the following requirements:
You sell physical products. Google Merchant Center doesn’t work for service-based products. (Note: you can sell both on your site, but only the physical products will sync.)
Make sure your site language is set to English (United States). (Sorry, this is the only one it works with for now!)
Make sure that you’ve already set up at least one shipping option in Squarespace.
-
LOL I understand the skepticism.
Of course, Google would love it if you also decided to pay for Google Ads after you have all your products set up BUT, yes, displaying your products and store on Google is completely free.
Think of it this way: adding your products to Google allows them to be seen in search results just like how your site shows up on Google BUT if you want to jump to the very top of that list you’ll need to pay for it.
-
Yes! Why wouldn’t you take every free opportunity out there to get your products on Google’s radar? You can set this all up and never mess with paid Google ads if you don’t want to. But the potential payoff here is pretty big considering the set up process is so simple!
-
Once you’re all connected (meaning your site is claimed & verified by pasting the Google code on your Squarespace site), you can always check on the sync status for your physical products by going to Commerce > Google.
If you want more information, you can also log in directly to Google Merchant Center.
-
Nope. It’s all or nothing for all the physical products you sell. However, if you log in to your Google Merchant Center account you can see some more options for managing how your products are displayed.
-
Once your Squarespace site is set up and connected to Google Merchant Center, any product changes you make on Squarespace are automatically synced to Google meaning you never really need to do anything else. Magic! 🔮
If you’ve got 15 minutes, you can get your Squarespace products synced to Google!

My Favorite Squarespace Plugins & Extensions for eCommerce
Squarespace has (almost) everything you need built right in for eCommerce but when you’re ready to take things to the next level or want to boost your customer’s experience in your online shop, check out these favorites I turn to time and again.
One of my favorite things about Squarespace is that almost everything you need to run your eCommerce business is built right in. Believe it or not, there are some website platforms where adding simple things like an Instagram feed or a contact form require (paid) third party apps (lookin’ at you, Shopify 😬). Luckily, Squarespace does both of those things - and much more - for us! However, there are a few areas where you may still need to look to a few strategic add-ons to enhance the eCommerce experience for your customers, or make life easier on you as the store owner. Here are the Squarespace plugins and third party apps I look to time and again for almost every eCommerce project I do on Squarespace.
Plugins
Squarespace plugins are little code snippets that allow you to extend or customize the way Squarespace looks or functions. Most plugins come with a one-time upfront cost and once you add the code to your site you’re done.

Custom Order Confirmation Page
FREE
This plugin from Ghost is quick and easy to install - the perfect way to add a little personality to your site and replace the boring order confirmation page with something that matches your brand and personality.

Custom Cart Slide Out Plugin
$40
This plugin makes it so your customer don’t have to scroll back up to hunt for their cart. It’s easy to install and offers a lot of customizable options.

Breadcrumbs Plugin
$37
Breadcrumbs are the little bits of navigation that help shoppers remember where they’ve been or how they got to the page they’re on. As a default, Squarespace shows only the first page and current page - and no steps in between! This plugin is probably one of my most often used and adds true breadcrumbs to your shop’s navigation.

Product Color Image Swatch Plugin
Change up those boring text dropdowns to color icons! You can even upload your own images to show different patterns or textures - whatever you’d like! This plugin is a must for any sort of apparel or fashion site.

Sync Product Variant Images Plugin
$49
This plugin works great on it’s own or in conjunction with the swatch plugin above. This plugin extends the way product variant images are displayed. By default, Squarespace will show a variant image (assuming you’ve assigned one) but it only works in one direction and doesn’t allow you to group images based on the variant selected.

Upsell Plugin
FREE
It’s easy to add an upsell page to Squarespace using this plugin! The way this works is that your customers are redirected to a landing page after they add something to their cart. This plugin is great because you can design the landing page however you like.

Universal Filter Plugin
$70
This plugin is probably the most intensive as far as coding goes but also one of the most powerful! I would say it is a necessity if you have a lot of categories or tags you’d like shoppers to be able to search and filter by. This functionality here blows Squarespace’s built-in search out of the water!
Extensions
Unlike plugins, Squarespace extensions typically come with a monthly subscription cost. They aren’t just code snippet you copy and paste into your site, they are third party apps that you can sync up to your Squarespace shop to extend the functionality of your site.
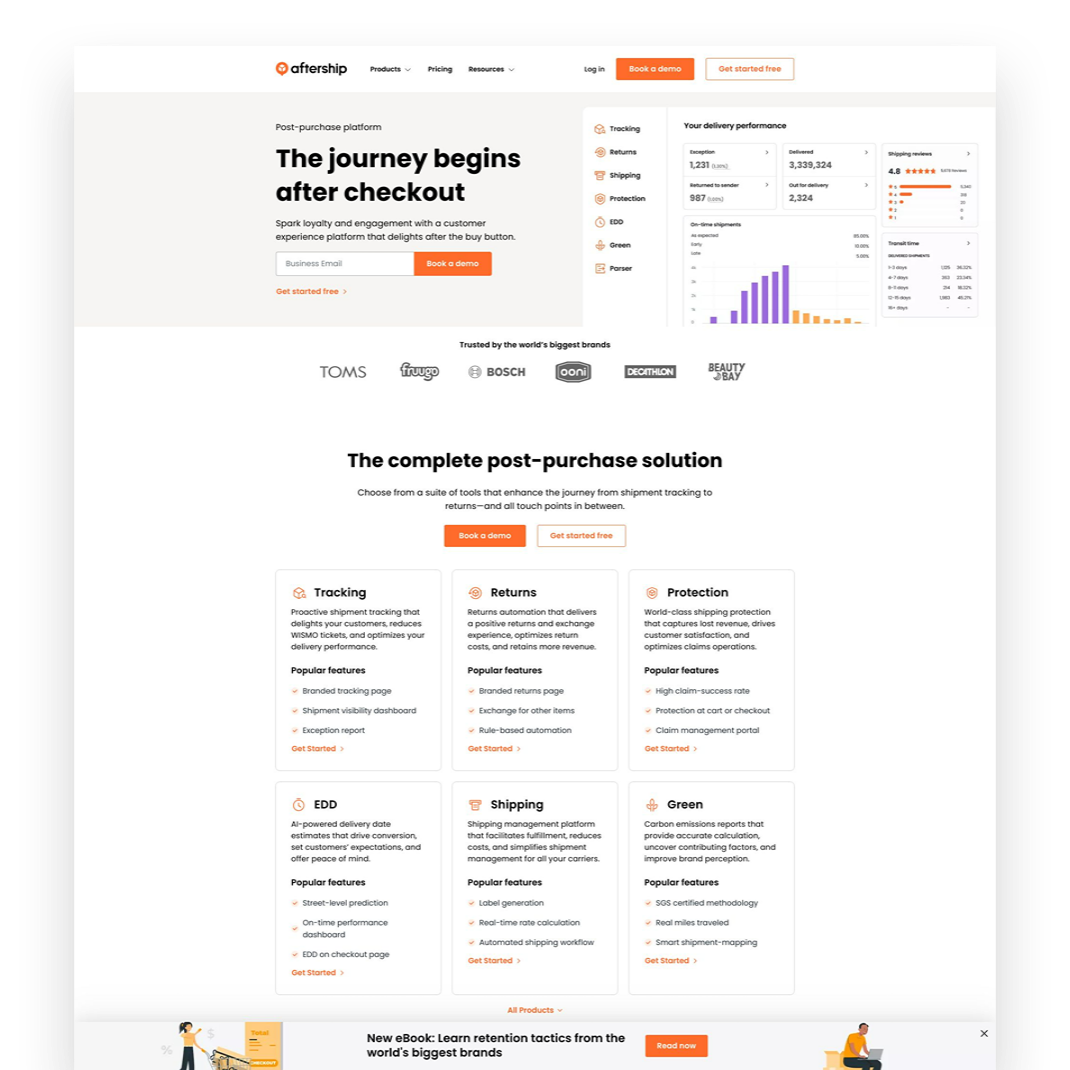
Aftership Tracking
PLANS START AT $11/MO
This extension allows you to provide customers with a branded tracking page and even send updates about deliveries - which I love! You can even use the tracking page to add links to other offers or specials to attract people back to your shop.
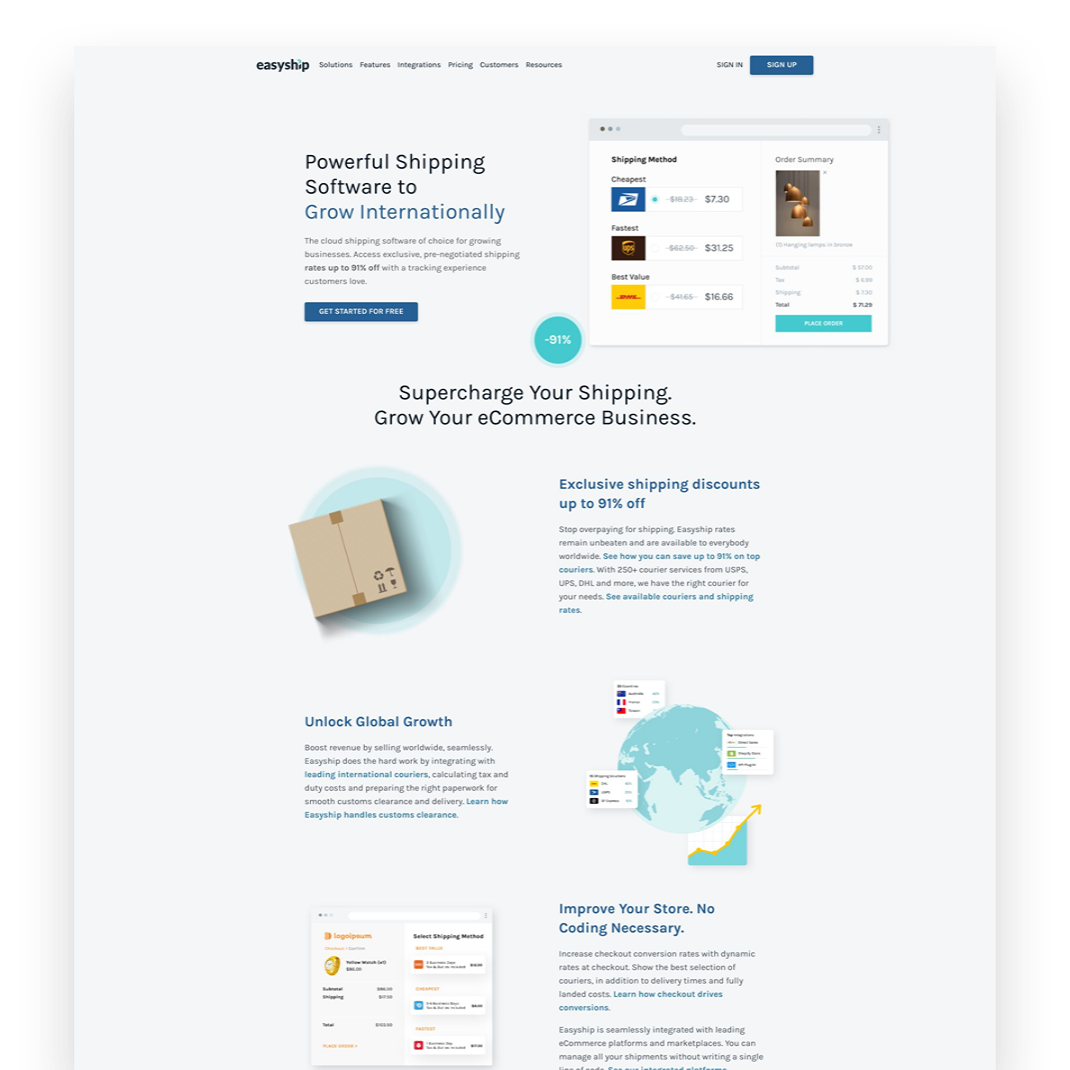
Easyship
PLANS START AT $29/MO
My hands down favorite shipping extension that I think everyone should be using. Easyship makes it… easy to fulfill orders with the added benefit of discounted shipping rates versus paying retail or printing labels directly through Squarespace.

Aftership Returns
PLANS START AT $11/MO
Even if you never process a single return, this extension is worth the minimum plan since customers LOVE being able to see that they could return if they wanted to. This extension creates a self-service returns portal just like all the major eCommerce brands have.

Candid Wholesale
PLANS START AT $39/MO
If you’re selling wholesale another way now - or looking to add a wholesale channel in the future - save yourself the headaches, skip all other options, and go with Candid. Everything you need to manage those relationships and sell in a secure way to your wholesale partners.

Trunk
PLANS START AT $35/MO
If you’re selling on multiple channels (think Etsy, Amazon, Shopify) OR you sell bundles or kits on Squarespace, this nifty little app will help you keep your inventory in check. Update in one place and -magic!- all your various sales channels follow suit.
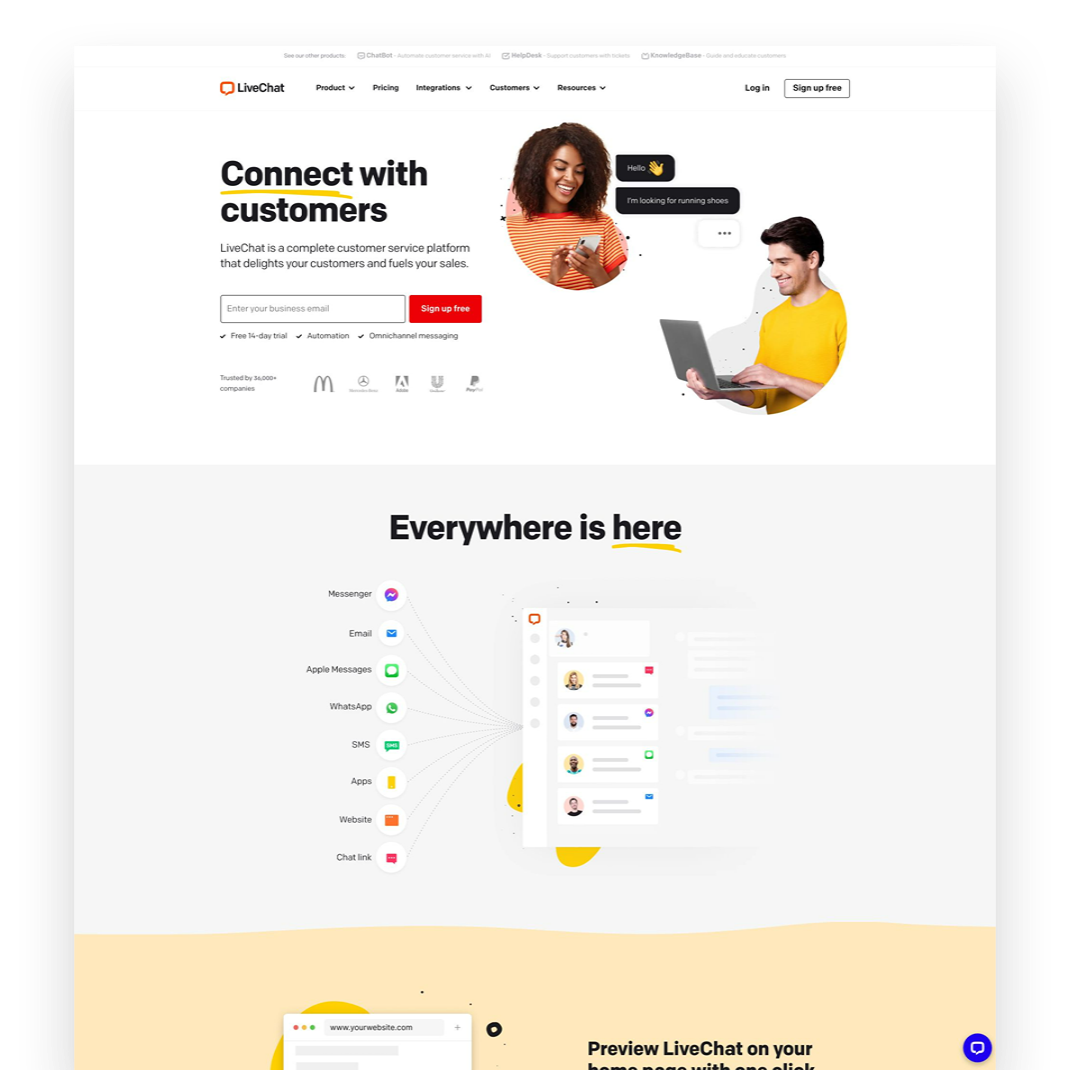
LiveChat
PLANS START AT $20/MO
Personal story time: since adding LiveChat to my site people rarely fill out my contact form. Why? People trust a live chat widget more than they do a form and it’s everyone’s favorite way to communicate! LiveChat is simple to install and you can get started really fast!
Bottom Line
With a few simple, strategic add-ons you can take your basic Squarespace site and turn it into a stellar eCommerce powerhouse. With the right plugins and extensions you can customize the customer experience, improve your metrics and even see more sales! Thankfully, most of what we need to sell on Squarespace is already built right in but these tools come in handy when you just want to go the extra mile.

How to Add LiveChat to Squarespace
LiveChat is now an official Squarespace integration so it’s easier than ever to add this highly converting feature to your eCommerce website! Follow this step-by-step guide to get started and check out my tips for live chat success.
LiveChat is now an official Squarespace integration, so it’s easier than ever to add this highly converting feature to your eCommerce website! Follow this step-by-step guide to get started, and check out my tips for live chat success. First, a quick reminder of how awesome adding a live chat widget to your website can be.
Live Chat Stats For The Skeptics
Before we get into the step-by-step details, I just wanted to round up some of my favorite live chat stats in case you’re unsure whether incorporating this feature into your eCommerce website is worth it.
Live chat is customer’s preferred method of communication. Customers find live chat or messaging the most satisfying way to communicate with a business, with 73% of people preferring it to phone or email communication. When asked, 44% of online consumers say that having questions answered by a live person during an online purchase is one of the most important features a website can offer. When I hear a stat like that, I know this feature should be higher on most sellers’ web design wish lists! Having a live chat feature is almost as basic of a requirement as a contact form.
Live chat builds trust with buyers. One of the biggest objections to adding live chat - especially from small business owners - is the worry that it will suddenly take up all their time responding to live questions from online shoppers. This would be a good problem to have but in reality, out of every several hundred visitors, you may only get one who actually chats. Now, you may think that if every visitor isn’t going to chat, why even bother adding the feature? Here’s why: a staggering 90% of customers said that just seeing a live chat button reassures them that they could get help if needed and gives them confidence even if they don’t chat. (‼️) So, just setting up the widget itself is worth it, even if it never gets used! To prove this point, 77% of customers surveyed said they wouldn’t purchase on a site if there were no live chat option available. All of this says that just the mere presence of a live chat option helps build trust with visitors, and the absence of one may mean you’re missing out on sales for no other measurable reason. Bonus: 63% of consumers said they are more likely to return to a website offering live chat. Now that’s brand loyalty!
Live chat increases sales & conversions. Customers who chat with a brand are 3x more likely to purchase and have a 10-15% higher average order value. 57% of customers abandon their purchase if they can’t get their questions answered quickly and customers who chat are also 50% less likely to make a return. This means that you can reduce abandoned carts, increase the likelihood of visitors making a purchase, increase average order value and decrease returns by simply adding live chat to your eCommerc website!

The Best Live Chat Widget for Squarespace
LiveChat! I’ve tried a lot of live chat widgets, and this one is my favorite all around. Here’s why:
It has all the features you need, such as the ability to customize your widget, set up canned responses, create target messages based on customer activity, and more.
You can pull all your customer communication into one place, including messages from Facebook and Instagram - even text messages!
Easily convert chats to tickets so that you can respond without having to be online 24/7.
14-day free trial and paid plans starting at just $20/mo.
How to Set Up LiveChat on Squarespace
Head here to start your free 14-day free trial of LiveChat.
From the back end of your Squarespace account, click on Settings > Extensions and scroll down to find the LiveChat extension - or start typing LiveChat into the search box, and it will pop right up.
On the next screen, click the black Connect button in the top left corner. (If you have multiple sites in your Squarespace account, select the one you want to connect with.)
A screen will pop up asking you to give LiveChat permissions on your site; click Allow.
On the next screen, look for “Already have an account? Log in” in the far top right corner. Click on log in and use the account credentials you created in Step 1.
You should now be on the settings page in LiveChat. From here, just click the “Chat Enabled” to toggle it on.
How to Customize Your LiveChat Widget
Technically, you’re all done, but you’ll probably also want to spend a little time customizing things to match your brand. Here’s what I would recommend customizing:
Add your photo so people know who they are chatting with. (Click on the profile icon in the bottom left corner, then your name to get into your agent profile.)
Customize your chat widget with your brand colors. (Settings > Chat Widget > Customization)
Change your welcome message. (Settings > Targeted Messages)
Set up pre-chat or post-chat forms. (Settings > Forms)
Bottom Line
Shoppers have very positive associations with live chat vs. other support methods such as making a phone call or submitting a ticket or email. They know that they are getting a better experience and a more authentic, honest interaction with your brand which builds trust and loyalty. You can use live chat to help customers discover new products and more customers than ever expect brands to offer this feature. Setting up live chat with LiveChat on Squarespace is easier than ever so you can get started quickly and start discovering all these benefits for yourself.

SEO Best Practices for Product Pages
How do you help the right people discover your products? Follow these tips and best practices for your product pages to appeal to customers and search engines alike.
When it comes to Squarespace SEO, I usually defer to the experts and always recommend starting from Squarespace’s own SEO checklist. This is a great resource to start dabbling in improving your site’s search performance and touches on all the site-wide best practices. There are some specific things you can do on your product pages to give things a boost as well though and that’s what we’re going to be talking about here!
First, A Big Fat Disclaimer
SEO is crazy complex and a niche unto itself. When we talk about improving things for SEO purposes, we’re talking about the super long game. Changes you make today will have virtually no impact on how things perform tomorrow but may have measurable ripple effects over time. So, if you’re here thinking that making these changes are going to magically change how your site performs in search overnight, you will be disappointed.
BUT this does not mean that they aren’t worth doing – just want to set some realistic expectations here! Ok, onward!
Squarespace eCommerce SEO
One of the most important things you can do before you jump into your product pages specifically is make sure your site is connected to Google Search Console. (Step-by-step instructions on that in this Squarespace support article.) Doing this will help serve up some pretty helpful info to your Squarespace analytics dashboard. You’ll want to use this info to help you compile a list of relevant keywords that you can incorporate into your product pages.
Related Post: Crash Course: The Squarespace Commerce Analytics Panel
Once you have that done, it’s time to head to your shop and take a look at your products.
How to Optimize Your Product Pages for SEO
Here’s a checklist of 6 specific things each of your product pages should have in place.

Product Names
Remember that keyword list I told you to make using the info from your analytics panel, above? Whenever possible, using one or more of those relevant keywords right in your product names can help connect your product to a customer's search query.
Don’t work too hard to force anything (human readers matter more than robot ones!) – and know that for the most part your product names are naturally going to be relevant without needing to try too hard. (If they aren’t, ask yourself whether they truly have a place in your shop.)
It can also be helpful to use descriptive words that might match up to your shop’s tags or categories right in the product name. Example: instead of “sweatshirt” try “Women’s 100% Cotton Vintage Sweatshirt”

Product Descriptions
For each product, you’ll want to be sure to write descriptions that include more of those keywords from your list. Describe what sets your item apart from the competition, highlight relevant features or explain what makes your product worth buying.
If you’re struggling with what to say, I always think that tapping into one of the 5 senses helps; for example - describing the way a fabric feels in detail or how a candle smells using descriptive words.
The one thing you don’t want to do is drone on for too long in your main product description. Keep things relatively short (roughly 3 sentences at most) is a good guide. Add other information, including technical details, product specs, longer descriptions and more to the Additional Information section. This makes it so people don’t have to scroll too far from the top of your page to get to the “Add to Cart” button!

Product Images
I promise not to tell you that a picture is worth a thousand words. But I can’t lie to you: your product photography can really make or break your entire eCommerce experience. There’s nothing that will make a potential customer click away faster than bad product photos (think: poorly shot, poorly lit, inconsistent in style). So don’t be stingy on product photos! For each product, include shots of the front, back and sides if you can. Depending on what you’re selling you may also want to include close-up shots of details (so people can see things like fabric texture or how a product is assembled) or other angles. Bonus points for 360 videos or gifs!
Related Post: 6 Simple Tips for eCommerce Photography that Converts

Product Prices
I’m kind of hoping that you already did this before deciding to launch your business 😬 but please take the time to research products similar to what you’re selling to make sure your prices are competitive. This is another situation where not only will your actual human shoppers notice when things feel off but so will Google and other search engines.
If there’s a reason why your products are significantly higher (or lower) than the competition, you’ll want to make sure that your copy (including relevant keywords) backs that up. Example: if your line of soda is priced significantly higher than average make sure that you’re describing why using keywords like: organic, hand-crafted, small batch, locally sourced ingredients, etc. This information can help explain that we’re not comparing apples to apples.

Product URLs
I’ve hinted at this a bit above but one of the most important things about SEO is to remember that you need to appeal to both humans and search engines alike. Sellers used to try to “trick” search engines by stuffing keywords into every nook and cranny, including product URLs. But remember that Google is very smart and you cannot get by with any dirty little tricks like this.
So, the secret to a great product URL is to keep things short and sweet. URLs with too many keywords are red flags as are keywords that contain much more than the simple product name.
If you followed the advice above on how to name your products using relevant keywords where appropriate, making your product URLs your simple product name is all you’ll need to do.
(Bonus tip: clean up any odd bits that get added automatically to URLs if you’re duplicating products. For example, change “womens-wool-socks-h3lm23” to just “womens-wool-socks.”

Product SEO Title & Description
For each of your products on Squarespace, you also get a chance to write specific information that you’d like search engines to pick up. In the absence of this info, Google will use the other info on the page to try to fill in the blanks so it’s best to just serve it up exactly how you’d like it.
SEO titles for products should be about 100 characters or between 5 and 10 words to make sure it appears correctly in search results. Longer titles may get cut off. If your product names are about this length, I would say to just make your SEO title = your product name but if you have any extra room you could add the name of your collection or another product attribute.
SEO product descriptions are what displays right below the title above in search results. You want to cap this at about 400 characters and first and foremost make it human-readable. Use product keywords naturally incorporated into a shortened product description and you’ll make it easy for customers to find your products as a result of their search queries!
Bottom Line
SEO can be a little overwhelming but most of the best practices help improve your site as much for your real life customers as they do search engines. Thinking about how your customers experience your site, what information they need and how you can best communicate to them digitally will ultimately also help your site perform better in search. When it comes to your product pages, incorporate the tips in the 7 areas above for each and every item you sell and over time you should find that more of the right people are finding you.

How to Enable AfterPay on Squarespace
Setting up AfterPay as a payment option on Squarespace is easy but there are some limitations and caveats to keep in mind. Here are the (super easy) instructions on how to enable this payment option plus answers to common questions about how it works.
Updated: Nov 2022
If you’ve checked out this post: Should You Offer “Buy Now, Pay Later” Options On Your eCommerce Website and decided that you’d like to give this a try, here’s how simple it is to set up! It’s almost embarrassingly easy! If you haven’t checked out that post and want the quick scoop here it is: Afterpay is a payment processor that allows your customers to pay for purchases on your site in installments with 0% interest. Afterpay basically becomes a lender to them. If a customer chooses this as a payment option, you still get paid the full amount upfront at the time of purchase. Your customer will then pay Afterpay back in four equal payments over 2 months.
How to Enable Afterpay on Squarespace
To get started you’ll need to have also set up Stripe as your merchant processor. You probably already have this enabled but if not you’ll need to take just a few minutes to sign up for and connect your account to Squarespace. From there, you’re only a few clicks away from being able to offer AfterPay! What I love about this integration is that unlike on other platforms, you don’t have to jump through any additional sign-up or application hoops.
From the Home menu > Settings > Selling > Store Payments > Stripe and then toggle the Afterpay option to On.
That’s it!
What Your Customers See at checkout
At checkout, customers will select Afterpay as their preferred payment option. After entering their billing address they will click continue and be prompted to log in to their Afterpay account. (If they don’t yet have an account, they can opt to create a new one.)
They will see a summary of their future payments for the purchase from your shop and have to accept the terms. Once they do this they will be redirected back to your site’s normal Order Confirmation page and get the same order confirmation emails as they would if they had chosen any other payment option.
While pricing for Afterpay is set at 6% + 30c per successful payment, businesses that offer Afterpay on Stripe have seen, on average, a 40% increase in average order value and a 22% increase in cart conversion. Afterpay can be used for orders ranging from $1 to $2,000 and is frequently offered by businesses that have an average order value of $100+. You are not responsible for any consumer credit or fraud risk for purchases with Afterpay. (Source: Stripe)
Common Questions:
What happens if customers miss payments? You still get paid just like if a customer misses a credit card payment. The terms including what happens if payments are missed or late are entirely between your customer and Afterpay.
What does this cost you as the merchant? The total fee is 6% of the order total plus $0.30. This includes your normal Stripe processing fee of 2.9%. So the additional cost to you for offering this option is ~3%.
Can any customer choose this option? Customers do have to have applied and been approved for an Afterpay account. They’ll need to meet Afterpay’s eligibility requirements and be under their approved credit limit. There are also spending limits that vary by country. These are determined by Afterpay, not Stripe or Squarespace. Just like a credit card, their total spending limit includes purchases they’ve made at all stores, not just yours.
What happens if an order is canceled or refunded? The payment is returned to Afterpay. This happens automatically when you mark an order as canceled or refunded in Squarespace. On the customer side, they will receive a refund of their initial payment plus any additional payment installments they’ve already made. If you issue a partial refund to a customer, the amount they owe Afterpay is adjusted to reflect the new balance. Note that Afterpay’s transaction fees are nonrefundable.
Limitations
AfterPay is only available for physical products and won’t be displayed as an option for digital, service, or subscription products.
It’s currently only available if you are located in the United States, Canada, New Zealand, or Australia AND your customers are in the same country as you. For example, Canadian customers will not see this option on a site based in the US and vice versa.
You must be on either the Commerce Basic or Commerce Advanced plan (which I recommend anyway).

The Definitive Guide to Squarespace Sales Tax
Understand Squarespace sales tax in a clear and simple way. Includes a step-by-step guide on setting up automatic sales tax rates on Squarespace with TaxJar!
Updated: November 2022
Squarespace sales tax — I agree, not the most fun topic! Taxes are fun for no one. Unless you’re my husband. But he’s a CPA so that’s different. For most people, the fact that they have to manage and collect sales tax when selling online is usually seen as a hassle or (worse) an afterthought. But, it’s a necessary evil and the last thing you want to do as a small business owner is screw around with not paying taxes. So, time to buckle down and just get this done - it’s an important step if you’re just getting started on setting up your first eCommerce shop. First, a quick primer on sales tax in general, then how Squarespace’s integration with TaxJar makes the whole process as easy and painless as possible.
*** Disclaimer: I am not a tax specialist. I am not familiar with all the laws and particulars in every state or country or every industry or business type. So consider this my best advice based on owning/running my own small businesses and working in eCommerce for eons. You should absolutely, 100%, no-doubts-about-it get yourself in touch with your very own tax professional who is familiar with 1) your business, 2) the laws in your state, and 3) your industry. It’s on you to make sure you get the best accounting + legal team in place to protect yourself and your business. ***
Figuring Out Sales Tax in 3 Easy Steps
Even though it seems like we’ve all been online shopping for forever now, sales tax laws have been somewhat slow to catch up and the whole thing is still a little bit of a wild west. There are several factors that determine how tax should be calculated, if at all. One of the biggest factors is where your business is located since the majority of US states require you to collect sales tax from online sales but here’s the thing — they all have completely different rules to comply with. As a small business owner, it’s kind of unreasonable to think that you’re going to be able to keep up with all of them but as an online seller, you’re still responsible for charging your customers the right amount of sales tax and remitting the amounts collected back to the various states you sell in 🤡 Don’t worry, we’re going to break it all down here.
STEP 1: Is what you’re selling taxable?
This is the first thing to consider is whether whatever it is you’re selling is taxable where you are selling it. States all have different rules and criteria to consider so this requires a bit of research. For example, some states tax food, and others don’t. Some have different rates for certain products versus others. Each state decides which items are taxable and which aren’t so you need to check by state-by-state on this. (In some instances, what product type you’re selling also matters but I’ll get into those specific use cases down below!)
STEP 2: Where do you have nexus? (And also, what is nexus?)
All of the sales tax articles you’re going to read online are going to refer to “Nexus” which can seem like a kind of overwhelming concept. The bottom line is that “nexus” is just a legal way of describing how connected you are to a particular state. For example, if your business is based in California, you automatically have nexus in California because you’re pretty significantly connected to it! Think of it as if you had a brick-and-mortar business - you would be physically connected to wherever your shop is located.
Now, add in online sales. Instead of just selling to local people from your shop, you’re selling to people from many different states all across the country. Well, all of these places have different sales tax rules and they want their cut! This is where nexus comes in and it basically means that if you sell enough in a particular state that you are required to collect and remit sales tax to that state. The thresholds for what constitutes nexus in each state are - you guessed it - completely different. For example, you’ll need to sell over $500k to Texas residents before you are considered to have a significant presence there. By comparison, if you’re selling to residents in Florida you’ll only need to have sold $100,000 to reach nexus.
There are other reasons some states may consider you to have a physical presence in their state even if your main office is located elsewhere and you don’t sell to any of their residents. This can be anything from having a contract salesperson who lives in that state to using a third-party distributor based there or even if you’re just storing inventory in a warehouse. Long story short, there are lots of varying factors that go in to determining nexus!
STEP 3: Are you in a destination- or origin-based sales tax state?
Most (but not all!) US states have what is called destination-based sales tax. This means that tax is charged based on the buyer’s shipping address regardless of where the product originates or ships from. This means that where you are located as the online seller really doesn’t have much to do with the amount of sales tax you collect. But here’s where things get wild…
In most states, like where I live in Washington, there’s not just a state tax to contend with but lots of different local, city, and county taxes that are factored in based on zip code. So even though the base sales tax in Washington state is 6.5%, the amount of tax I need to collect on a sale to a customer downtown Seattle ends up being 10.1% but only 9.2% to a customer on neighboring Bainbridge Island. Things were set up this way because it assures that every local area receives the sales tax income based on the purchases their residents make.
On the other hand, origin-based sales tax states charge tax based on the seller’s location regardless of the buyer’s shipping address — so the complete opposite of a destination state. This means that if your business is located in Salt Lake City and you ship to a customer in Park City that you will charge every customer 7.75% (the SLC tax rate) and not 9.05% (the Park City rate). While this is somewhat easier for small businesses to administer, it only applies to in state purchases and most eCommerce shops have a wider reach than that! This is why even if you live in an origin-based state, it’s still important to understand tax implications of selling to those outside your area.
The Quick Version of All The Above
Some things sold online are taxable and others aren’t.
The amount of tax that needs to be collected can vary down to a zip-code level basis so that local sales taxes can be collected from online sales regardless of where they ship from.
Some states will require you to collect and remit sales tax even if you’ve never stepped foot there.
Some states factor in where an order is being shipped to and others factor in where an order is being shipped from.
All of this varies state by state.
How to Automatically Calculate US Sales Tax on Squarespace
Back in ye olden days of the internet, sales tax complications were a huge obstacle for most small businesses. Why? Because previously you had to enter in sales tax rates manually by zip code for everywhere you were required to collect and remit taxes. 😱 And every time those rates updated, you had to update your website. This was a painstaking process that involved downloading spreadsheets provided by states and coding in lookup functions to your cart. TL;DR not the best of times.
Now, we can take all of the above that we just learned about sales tax and effectively shelve it, or at least most people can. It’s good to know how it all works but it’s also nice to not have to manage it all yourself by simply taking care of all the intricacies of calculating Squarespace sales tax automatically using the built-in Squarespace TaxJar extension. The Squarespace extension uses TaxJar’s real-time sales tax data to calculate the correct sales tax at checkout based on all the criteria we discussed above. (Note that there are a few exceptions - see the FAQs below for notes on these!)
Step-By-Step Guide on How to Enable Automatic Rates on Squarespace
To be able to set up automatic tax rates, you’ll first connect the TaxJar extension in your Squarespace account and then flip over to TaxJar to finish setting up your business profile there.
In Squarespace: from the home menu > Commerce > Taxes > in the TaxJar box click Connect and follow the prompts to select your site and create your TaxJar account login info.
In your new TaxJar account: click on your email address in the top right and select Business Profile. Just fill out the missing fields and click Save.
Still in TaxJar: click Add State Regulations. Under “Nexus States" select your state from the dropdown and fill out the fields that come up (they may vary by state). Check the box that says “Enable TaxJar's API to calculate sales tax for this state” and click Save. Repeat this step for any other states where you have nexus.
You’re all set! The correct sales tax will now be calculated for orders in all the states you added in TaxJar.
Squarespace Sales Tax FAQs & Exceptions
-
Solution: set up tax categories! This will allow you to assign different products to different tax categories so that they are taxed at different rates at checkout. For more on tax categories in TaxJar, click here. Once you have these set up you can assign products to a category in the product editor within Squarespace.
-
In this post, I recommend that pretty much everyone selling on Squarespace should be on a Commerce level plan (either Basic or Advanced) which includes a free TaxJar account for calculating automatic sales tax rates.
Even though technically you can set up automatic tax rates if you’re on the Business plan, you won’t qualify for a free TaxJar account and the cost of upgrading to even the most expensive Squarespace Commerce plan is cheaper than a paid TaxJar account.
-
If you’re only interested in automatic tax rate calculations and you’re on a Squarespace Commerce plan (see above), you do not need to subscribe to a paid TaxJar plan. Your TaxJar account is included as part of your Squarespace subscription.
If you’d also like to take advantage of TaxJar’s sales tax filing, economic nexus monitoring and reporting features, that does require an additional subscription. TaxJar’s professional plan starts at $99/month for up to 200 monthly orders and has a tiered pricing plan for larger order volumes.
If you’re already working with a sales tax professional or accountant (as you should be!) I would say that you likely don’t need to also pay for TaxJar since they will be taking care of tax reporting and filing for you. Ask your accountant if they will be doing this to be sure!
-
If you offer local pickup or curbside delivery in your online store, you’ll want to add a manual tax rate that reflects the current sales tax percentage at your location. Then, when you’re setting up your local pickup option people will be charged tax based on your address instead of theirs.
-
Just go to Commerce > Taxes and make sure that there is a green “Connected” message in the TaxJar area.
If you’d don’t see a green “Connected” message you probably just need to complete the set up process on TaxJar. Follow the steps above to finish setting up your TaxJar business profile and adding in any states where you have nexus then recheck.
If things still don’t seem to be working or calculating correctly, be sure to read the FAQ below about exceptional use cases!
-
There are a few reasons why this may have happened:
The most common reason is that the order was placed for a state that you do not have nexus in and/or did not set up by adding it in TaxJar. If this was in error, go back to TaxJar and add the state to prevent this from happening again.
If you’ve set up tax categories in TaxJar make sure they are assigned correctly to each product in Squarespace.
If the order was for an international address, you’ll need to set up those rates separately. TaxJar only automatically calculates rates for US addresses.
-
If you’re already on a pro plan with TaxJar and want to keep it for reporting and filing, you can still connect it Squarespace to automatically calculate sales tax. When you’re connecting TaxJar to Squarespace just sign in using your existing TaxJar account info and follow the rest of the steps/prompts the same way as detailed above.
If you’re on a Squarespace Commerce plan, you do qualify for a free TaxJar account for tax rate calculations only. If that’s all you need, reach out to TaxJar here to get help moving it to the free version.
-
If you connect the TaxJar extension to Squarespace you can delete any manual tax rates for everything except:
Your location’s tax rate, if you offer local pickup.
International tax rates for any countries that you also have shipping zones set up for.
-
For US-based sellers who ship internationally OR sellers based outside of the US, you’ll need to set up rates manually. Check out this Squarespace help article for more on manual tax rates for Canadian provinces and this one about collecting VAT or GST for those details.
-
Yes but ONLY if you have nexus there. So don’t freak out if you only sell sporadically to some states and those orders come through without tax! It most cases, it’s actually illegal to charge and collect sales tax in a place you do not have nexus.
-
If you sell digital products or services and are located in an origin-based state, Squarespace does not ask for a shipping address. Because of this, TaxJar uses your client’s shipping address to lookup what tax rate should be charged. This is incorrect UNLESS you have nexus in other states aside from your own.
What do do? If the specific use case outlined above describes you, TaxJar’s product will currently NOT WORK for you. Disconnect TaxJar, turn off automatic rates and set up rates manually on a state-by-state basis instead.
If you only have nexus in your home state, add your tax rate to all locations you ship to manually.
If you have nexus in any other states as well, add those states tax rates manually and then use your home state rate for all remaining states.
-
List of origin-based sales tax states:
Arizona
California - Hybrid origin / destination
Illinois
Mississippi
Missouri
Ohio
Pennsylvania
Tennessee
Texas
Utah
Virginia
States without sales tax:
Alaska (No state tax but some locations charge local tax)
Delaware
Montana
New Hampshire
Oregon
Any state not listed above is a destination-based sales tax state.

10 Simple Ways to Prep Your eCommerce Shop for the Holidays
Getting ready for holiday sales doesn’t have to be overwhelming! The 10 simple things on this list will help you make sure that you’re ready for the influx of orders and inquiries that come with running an eCommerce business this time of year.
If you’re looking to make sure that your site and store are all prepped and ready for online sales this holiday shopping season, you’re in the right place! Even though I personally tend to prefer a strategic product drop or flash sale that doesn’t depend on seasonality, it never hurts to make sure that your site is in tip-top shape. The 10 simple things on this list will help you make sure that you’re ready for the influx of orders and inquiries that come with running an eCommerce business this time of year!
1. Make sure you’re using Squarespace to track your inventory.
And that your inventory counts are accurate and up to date! Correct inventory counts can help you know what you need to order more of, what you should discount or put on sale, prevent overselling, and create a sense of urgency to buyers. If you sell on multiple platforms or need to sync inventory into Quickbooks for accounting purposes, try Trunk (review in this post) which keeps everything synced up automatically!
2. Customize your store’s notification & cart abandonment emails.
While this is something you want to do anyways, making sure that your emails are personalized is a great tip around holiday time. Including special information about shipping timelines or return policies can help reduce the number of customer service inquiries you receive so that you and your team can focus on fulfillment instead. Personalizing your shop’s emails can also help you build a sense of community around your brand, helping boost loyalty and repeat business. And don’t forget about your cart abandonment email! Updating it so it feels relevant to the season can make it stand out and provide a gentle little nudge to come back to your site and complete their purchase. For more on customizing your Squarespace eCommerce emails, click here!
3. Connect a shipping extension to your site to make fulfillment easier.
I mean, unless waiting in line at the post office on Christmas Eve is your thing I guess? 🤷♀️ A shipping extension is basically the friendly little office assistant you never knew you always needed. The right one will select the best courier, generate labels for you and automatically update Squarespace to mark the order as fulfilled with the tracking number. You can check out this post for a review of all the available shipping extension options on Squarespace but my fave by far is Easyship.
Bonus: sign up for a new account using code GWZMUM and get a $20 account credit. Thanks, Easyship!
4. Offer FREE shipping.
The reason behind this is simple: shipping fees kill conversions. Even if you don’t want to include free shipping as part of your strategy year-round, adding a free shipping tier will help you be more competitive during the holiday shopping season. You don’t have to give it all away, though! Use an automatic discount to limit free shipping on only orders over a certain amount. This will help boost conversions AND increase average cart value! (For more on this topic, check out How to Set Up a Profitable Shipping Strategy on Squarespace.)
5. Set up local pick-up.
If recent years have taught us anything it’s that the number of people shopping online for the holidays has totally inundated carriers like UPS, FedEx, and USPS. To prevent shipping delays causing major holiday disappointment, offer your local customers the option to pick up their online orders in person. This means they can shop right up until the last minute (something they can’t do from other online retailers who’ve had to cut off shipping for the season) and could also lead to some last-minute in-person buys. Win-win! For more on exactly how to set this up, check out this post.
6. Update your FAQ page.
I love a great FAQ page. Done right, it can help your customers find instant answers to their questions and reduce customer service inquiries about basic or routine things, freeing you up to focus on more important issues. Setting up an FAQ page on Squarespace is easy (here are some tips on how to do it!) but the most important thing is obviously the content. Anticipate the needs of your customers and make it easy for them to have everything they need to feel comfortable shopping with you.
7. Add an announcement bar to highlight shipping & promo info.
Among all the built-in features to help you sell on Squarespace, I really love using an announcement bar around holiday time to keep people up to date on shipping cutoffs, promos, or any other relevant information that might motivate them to buy. If you have a lot of info, don’t try to cram it all into your announcement bar. Instead, use that real estate to link out to your FAQ page or a landing page dedicated to holiday info.
8. Offer gift cards.
Of all the things you can sell on Squarespace, gift cards are probably the easiest to set up and make perfect sense for the holidays! While I usually move gift cards to the bottom of the heap in larger stores, during the holidays I would actually do the opposite and move them right to the top! You can even feature them in a pop-up or in a prominent place on your homepage to make them a convenient option for people looking to give an easy gift.
9. Be smart about your discounts & sales.
Even though the holiday season can feel like a total frenzy doesn’t mean that you shouldn’t take the time to be methodical in what you put on sale or what discounts and promos you plan on running. All of this is a long way of saying don’t just go marking things down or making up offers willy nilly. Start by making sure you understand how discounts work on Squarespace and then make sure to check your Squarespace commerce analytics panel.
10. Hit up your mailing list!
You’ve put in all this hard work and now it’s time to tell everyone all about it! Stats always say that it costs way less to sell to an existing customer than to acquire a new one and there’s no time like the holidays to take care of your VIPs! If you’ve been using customer profiles to track your customers and their activity throughout the year, it’s easy to add frequent customers or big spenders to a special segment of your email list. Send them things like special offers or advanced notice of sales via Squarespace Email Campaigns -- everyone loves feeling like they’re in the insider’s club!

How to Set up a Wholesale Shop on Squarespace
Wondering how to sell wholesale on your Squarespace site? I've got you covered with several different ways you can make this happen! Plus, who should (and shouldn’t) give wholesale selling a try, my recommended wholesale tool and 4 wholesale tips to help you sell more confidently.
Updated: Sept 2023
There’s a lot to love about Squarespace Commerce (exhibit A, exhibit B, exhibit C, etc.) but if you’re interested in adding wholesale to the mix, you may have found you need something… more. This is because, in addition to normal eCommerce functionalities, B2B sellers might need to offer things like tiered pricing structures, alternate invoicing or net payment options, or ways to keep wholesale prices hidden from the public, among other features.
Ultimately, I think the fact that these things aren’t necessarily built-in to Squarespace isn’t a shortcoming at all; you wouldn’t be upset if your shipping software didn’t also manage your social media posts – these are just very different tools! In the same way, traditional eCommerce and wholesale are two very different things.
So let’s dig into a bit about wholesale, who should do it (and who shouldn’t), my recommendations for how to get started, and tips from some of my friends in the biz that know wholesale better than anyone. Stick around for some wholesale FAQs at the bottom of this post. Here we go!
First, is your business too small for wholesale?
Adding a wholesale arm to your eCommerce business can be a beneficial thing for many small to medium businesses (even startups!) and I would say the biggest mistake is waiting too long to get started! Establishing even a few solid wholesale connections early on can help you get your name out there and help you build a following.
This isn’t something just for the big guys or those who’ve already made a name for themselves. I would even say that forging some strong wholesale relationships early on can be a great indicator of long-term success. So if this is something you’ve been considering or sitting on - don’t wait!
Options for Setting up a Wholesale Shop on Squarespace
Once you’ve decided to start selling wholesale, you probably started tinkering around with the specifics of how to actually make that happen and quickly became stuck. I don’t blame you! If there are a million moving parts to traditional eCommerce, there are a billion more for a business looking to sell wholesale. But it doesn’t have to be scary or overwhelming! Below are some ideas on how to start selling wholesale on your Squarespace website.
Create a second shop and password protect it.
This solution is pretty low-tech (Squarespace does all the heavy lifting for you) but it’s not without several drawbacks. Running two mirror images of the same store (one for retail and the other for wholesale) may technically work but you’ll need to think about how you’ll manage inventory levels, what to do about duplicate SKUs and how you’ll take care of the administrative side of things.
Also, since commerce settings are set at the website level on Squarespace things like what shipping methods you offer and what payments you accept need to be able to apply to all shop pages on your site; there’s no way to offer different options that would be tailored to a wholesale customer’s needs and keep those out of sight to your retail customers.
And don’t even get me started on what happens if and when you need to change the password on the wholesale shop! What do you do then? Email all your wholesale customers with the new password?! Awkward.
Use a Wishlist Plugin
If you’re only selling wholesale and want to be able to have potential customers essentially “request a quote” from your online shop, you could look at using SF Digital’s Product Wishlist Extension. This plugin replaces your traditional cart functionality with a custom form that allows customers to send you their “wishlists” without needing to enter any payment or shipping information. I’ve used this plugin for just this purpose before and it works great with a few (kinda) major caveats.
The first big thing is that you cannot use this plugin on any site that you also want to have a traditional eCommerce shop on. So this may work well if you don’t have a retail shop and are only selling wholesale but not if you’d ever like to be able to do any B2C selling on your site.
The other things to consider are similar to the duplicate shop scenario, above. With the Wishlist Plugin, you’ll need to have systems in place to manually calculate shipping, process payments, and communicate with your customers. You’ll have all your inventory set up on Squarespace but all the commerce functionality as far as getting paid and sending notifications, etc. will need to occur off the platform. Where and how is up to you.
Use Custom Coupon Codes
Ok, ok. So we’ve encountered two not-so-perfect scenarios. What about just creating coupon or discount codes for each wholesale buyer? Not a bad idea at first. The good: you can control who has access to discounts on an individual account basis and can provide different wholesale buyers with various discount levels.
I’ve had some clients set up systems like this for things like influencer marketing, creating individual codes to distribute to each person they’re working with. Depending on how many accounts you have this system can quickly be hard to manage though and it’s very difficult to gain access to helpful metrics and analytics on usage. (Tip: in the case of influencer marketing, I would check out my tips for setting up an affiliate or referral program instead.)
For wholesale, I would say this is also a passable but imperfect solution. Just like in the duplicate shop scenario, it also assumes that your wholesale customers are interested in the same shipping and payment options as your retail customers and I can see the mess of tracking spreadsheets and semi-canned emails quickly making you swear off what could otherwise be a profitable venture.
Try Candid Wholesale (My Recommend Method!)
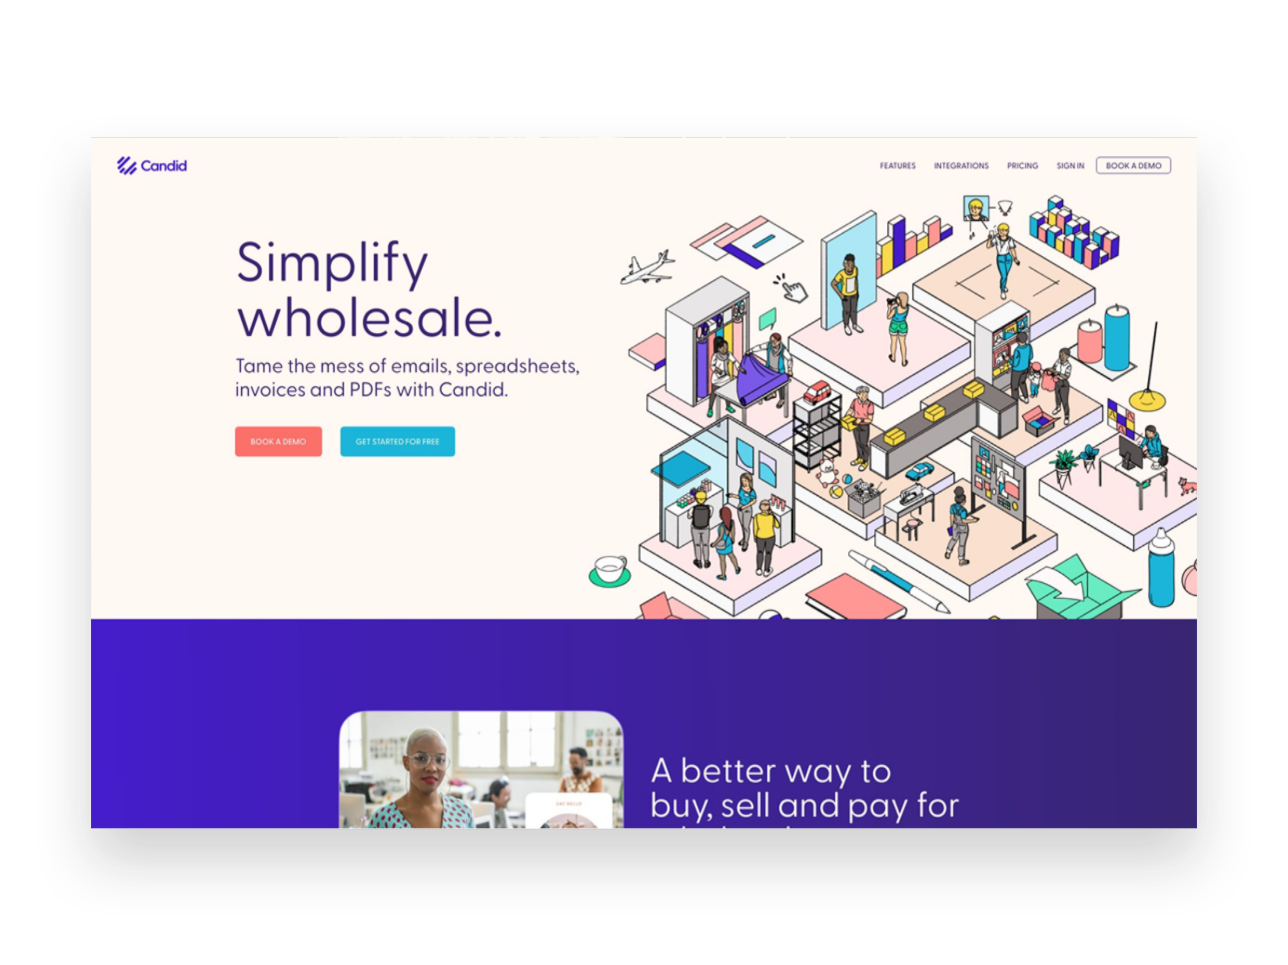
I’m always keeping my eye out for solutions that I feel I can wholeheartedly recommend to you and you know I’m keen on keeping a lean tech stack, meaning I never recommend adding third-party solutions haphazardly. They’ve got to do what they say they will, and they’ve got to do it well.
Meet: Candid Wholesale
Candid Wholesale is an official Squarespace Extension that makes managing the wholesale side of your business a breeze. Remember what we said about choosing the right tool for the job? This is it.
At its simplest, Candid is a wholesale order management tool but it's really a robust CRM system geared towards helping you grow your entire wholesale business. With Candid you can take orders, send quotes, set up custom invoices, create a custom wholesale storefront, manage your customer relationships, and more.
Candid is going to take care of the problems some of our other imperfect solutions couldn't, such as: syncing up SKUs and shipping information, providing meaningful data to help you make informed decisions, and creating a wholesale experience for your customers that’s as great as your products are.
You can keep your current retail side of things exactly as they are and Candid will automatically keep the wholesale side of things in sync. You can choose which products you want to show in your wholesale catalog, how you want them organized, and quickly set prices for your wholesale customers.
Other Notable Candid Wholesale Features:

Create collaborative order forms that you can send directly to your wholesale clients.
An integrated message system keeps conversations in one place.
Accept payments online - or not. (Perfect if you accept check payments from accounts with net terms.)
Send reminders for past-due invoices.
Track shipments and invoices in real-time.
Control access to your wholesale catalog.
All plans include unlimited orders and no commissions, you just pay one flat monthly fee. There are three pricing tiers and while the Pro Plan is going to be great for most, I really love the embedding feature of the Complete plan!
Wholesale Tips from The Pros at Candid Wholesale
I recently had a great conversation with the co-founders of Candid Wholesale, Avery Bloom & Dave Lowensohn. In addition to talking about Candid's features and some of the “why” behind the business, I asked if they had any sage wholesale advice to share. Here were their top tips:
Consider the benefits to your brand that come with being featured in someone else’s shop. Selling wholesale is about more than just the individual sale; a retailer that’s willing to stake their own business on your products is the ultimate endorsement! This can be a great way to get your name and brand out there and build relationships with more established sellers with their devoted followers.
Don’t think of wholesale as a feature that you can just turn on or off. Selling wholesale is more than just offering discounted prices in your regular eCommerce shop, as you can tell from the pros and cons of some of the solutions outlined above. You want to be able to offer payment terms, a clear and easy ordering process, and an experience that’s tailored to the wholesale experience.
Think about economies of scale. Selling wholesale can help you take advantage of price breaks on your raw materials or other components that go into your products. Instead of buying 10 of something, you’re able to buy 100 at a better unit price. Hint: this can also help you improve profit margins on all those retail orders as well!
Focus on building relationships. While we talk a lot about ways to personalize and customize the traditional eCommerce shopping experience, wholesale is in many ways still pretty old-fashioned. Great wholesale partnerships can last decades meaning it’s worth it to invest in the tools and systems to make those relationships successful and ensure you can consistently deliver on your promises.
Wholesale FAQs
-
Yes! Wholesale is not for everyone. Wholesale probably isn’t a good fit for your business if:
You’re selling products with already very thin profit margins. In this case, you probably don’t have any room to discount to a point that would be attractive to wholesale buyers. You never want to be swapping high-profit margin retail sales for lower-profit margin wholesale ones if you can’t do both.
You don’t have a way to keep up with accounts or manage the additional sales volume. It’s easy to let things fall through the cracks without good systems in place and failing to deliver for your wholesale clients can send things south fast.
-
Oh, I’m glad you asked! First, if you’re unfamiliar with Faire – it’s an online wholesale marketplace where sellers can post their goods and buyers can browse from a bunch of sellers all in one place. Think of it kind of like Etsy meets Match but for wholesale.
Faire’s pitch to sellers is seemingly attractive at first glance. They promise no setup fees, no long-term commitments, and access to thousands of eager buyers. It would be easy to assume that you’re just going to sign up and then sit back and watch the wholesale orders come rolling in. The reality is pretty bleak, though.
The truth is that if you sell on any sort of online marketplace, including Faire, you’re not doing anything to build your own brand. You don’t own the relationships you’ve built there and you don’t have any control of how your company is represented. There’s no promise that the marketplace will continue to exist - or that you won’t get kicked off the platform at any point for selling to customers 1:1, which is a violation of their terms of service. And where would you be then? (Hint: I take the same stance when it comes to selling exclusively on social media.)
It’s simple when you think about the economics of a marketplace that only makes money when they connect buyers to new sellers. Simply put: it means that it’s in Faire’s best interest to introduce your customers to your competitors. Faire may not charge a commission if those customers bought from you, but they make 25-30% if they connect them to your competition.
Bottom line: in an industry built on long-term personal relationships, be wary of anything that promises anything sounding too much like a “get rich quick” scheme. If it sounds too good to be true, it probably is.
-
One of my favorite myths to bust! Just like Squarespace, Shopify is a traditional B2C eCommerce platform. This means that all the same issues I talked about above for Squarespace apply to Shopify as well. They are simply not a wholesale platform out of the box. However, there are technically three ways to sell wholesale on Shopify which I’ll quickly cover here.
The first is via Shopify’s wholesale marketplace called Handshake. Let’s just say that all my warnings about Faire apply 100% to Handshake as well. I’m not even going to link to it. Caveat emptor.
The second is by adding the wholesale sales channel to your existing Shopify store to (wait for it) create a separate, password-protected storefront. Sound familiar? And don’t assume that just because it’s on Shopify that it’s somehow better than on Squarespace (it’s not). First of all, the fine print on the wholesale sales channel is that it is only available if you’re on Shopify Plus which starts at $2k per month and goes up from there based on sales volume.
Assuming you’ve passed on both of the options above, you could always head over to the Shopify app store and search for a suite of plugins to add to try to emulate wholesale functionality in a meaningful way. You’re going to need something for price lists, another for user/login management, something to create and manage client portals, another thing to host your catalogs, and something else to manage your bulk shipping options. Never mind that each of these apps comes with its own monthly cost, the likelihood of everything working together as it should and details not slipping through the cracks is crazy small. Another inelegant solution.
A Final Note on Wholesale
First and foremost, you’re never too small to give wholesale a try! Successful wholesale relationships can become a source of stable income and help you get your business and products out there. Using the right tools for the job, such as Candid Wholesale, can make the process smooth and easy for both you and your wholesale partners. Just remember to always keep your eyes on your margins and focus on building your own site where you can own and control the experience.
Ready to give wholesale a try? Get Started With a 7 Day Free Trial of Candid Wholesale PRO!