

Notes on building smarter websites for actual humans.

The Ultimate Squarespace eCommerce Guide
Stop chasing your tail! I've covered some of my favorite posts on everything from choosing Squarespace for your new eCommerce website to mapping out a winning eCommerce strategy, from launch day to managing the day-to-day. Wherever you are in the process, I’ve got you covered!
There’s so much information out there about Squarespace web design and eCommerce but that’s half the problem! It’s all over the place and not necessarily right where you need it! So I decided to corral some of my favorite posts on everything from choosing Squarespace for your new eCommerce website to mapping out a winning eCommerce strategy, from launch day to managing the day-to-day. Wherever you are in the process, I’ve got you covered!

Choosing Squarespace
As a small business owner, you have a lot of choices that you’re going to need to make. But it’s the first one that’s arguably the most important. To me, choosing Squarespace for eCommerce is a no-brainer but I want to help you get all the facts so you can decide for yourself.

Early Decisions
Some of the early decisions in the eCommerce web design process are things you can set and forget but even simple things can help make sure you’re set up for success moving forward.

Map Out a Winning eCommerce Strategy
I wish I could tell you that eCommerce was as easy as making a website public and watching the money roll in but the reality is you need a solid eCommerce strategy in place to keep things on track. These simple and straightforward resources are here to help!

Go above & Beyond
The difference between ho-hum and fabulous is usually just paying attention to the little details that your competition most definitely missed. Don’t worry - I’m going to make sure that you’re prepped and ready to crush it and stand out from the crowd.

Launch With Confidence
Launch day doesn’t have to be nerve-wracking! You can sell on Squarespace with confidence when you know your site is on point from all angles.

Manage the day-to-day
To me, once your site is up and running is when the fun really begins! You can build new features, add new products and continue to refine the experience - all decisions you can back up with data.

More Great Squarespace eCommerce Templates
I searched high and low so you don’t have to! Check out some more of my favorite free and paid Squarespace templates and why they’re great for eCommerce!
My post The Best eCommerce Templates for Squarespace features some great templates but there’s are so many to choose from that I’m back with another roundup of faves! Some of these I may like even more! For the new or uninitiated, Squarespace templates are a great jumping-off point that allow you to get to launch day faster and more affordably than starting from scratch. Templates are also great for eCommerce projects because they take care of a lot of the heavy lifting when it comes to design and layouts so that you can focus your energy and resources on the thing that really matters - your shop!
Another thing to note is that all of the templates I feature are for Squarespace 7.1. This is the newest version of Squarespace and one of the things I love about it (aside from all these awesome eCommerce upgrades) is that all templates have access to all features and functions; you no longer have to worry about picking a template based on what it can or can’t do - they all work great!
p.s. if you’re not sure what to even look for in a template, this is a great place to start: How to Pick the Right Squarespace Template for Your eCommerce site.
Free Built-In Templates
Free is a good price and all these templates are part of Squarespace’s included template gallery so you can just jump right into editing! Remember that it’s important to look at the content areas a template has as much as the style; you can (and should!) always change fonts and colors to suit your brand. Also, don’t get turned off on a template just because the demo content features a specific industry other than yours. Once your products and brand are added, any of these templates would work great for just about any eCommerce shop!

SKYLOOP
What I like:
Skyloop is super fun and vibrant right out of the gate but it’s still super clean and minimal! This template makes the list because it is so explicitly eCommerce-focused that I think it would make it easy for people who are struggling with seeing the selling potential of other templates. This one already features links to featured shop categories and super clean shop navigation which are nice selling tools. Overall this template is a great jumping-off point!
What I would add/change:
This template is really engaging so there’s not a lot I would change although I do think it would be nice to move the subscription box that’s featured on the home page into the footer so that it will be visible on all pages. I also think that every shop needs an FAQ page so I would add that and then possibly incorporate the shop categories into the footer navigation so that visitors can have access to that info again at the bottom of the page.

PASSERO
What I like:
Yum! Doesn’t just looking at this template make you hungry?! I love it for its great “above the fold” image and strong CTA but the home page also has room to highlight features of working with you or shopping from your site. The demo content is set up for a membership site but you could just as easily make those buttons to schedule with you or visit shop categories. The classes page could highlight any number of things like blog posts or help articles - even favorite products! I think this template really shows some of what’s possible on Squarespace in a fun way!
What I would add/change:
I think the footer could be made stronger with a newsletter signup linked to Squarespace campaigns - so that you could automatically send new clients or customers an offer! It may also be cool to embed an Instagram feed to add some dynamic content. I also really like the photos about midway down the demo home page but I don’t love that they don’t link anywhere. It would be really cool if those linked out to corresponding recipes, services, or products to make the site even more interactive!
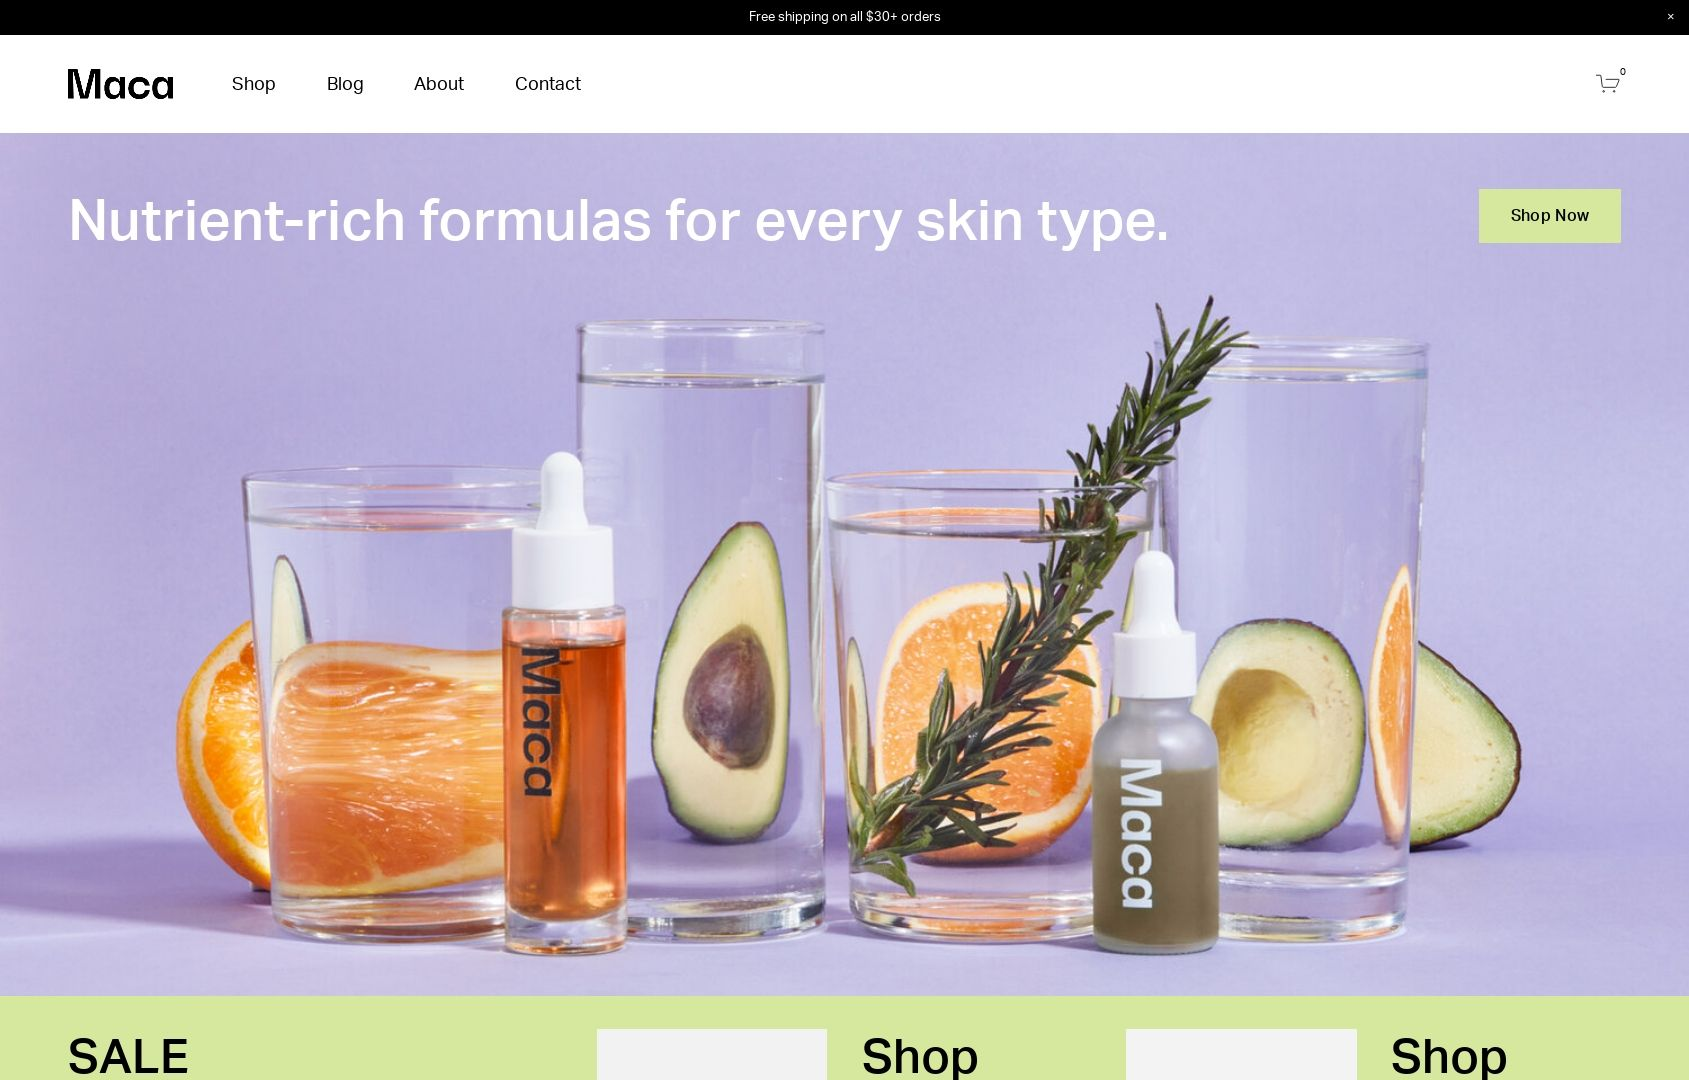
MACA
What I like:
The vibrant colors of Maca just make me happy - and I’m not even a big fan of purple! 😂 The beauty of this template is that I think it would work great even if the colors were toned down a bit. The home page of this template is also super robust with lots of content areas for everything from fave products to shop categories, informational content, and even product features. I also really appreciate the mega footer on this site - everything a customer would need is linked right there while allowing the top navigation to remain simple and tidy.
What I would add/change:
I would definitely turn on the built-in shop category navigation to help people explore the shop better. On Squarespace, you can have up to three levels of nested categories so with lots of products it’s best to put that to use to help people find what they’re looking for quickly. Speaking of categories, I would throw those in the site header just for good measure! Overall, there’s not much not to love with this template!
Paid Templates
Third-party templates like those featured below can be a great way to get a little more style and that little extra “something special” versus starting from a free template. Paid templates are still super economical compared to working with 1:1 with a designer on a complete custom project so they are still a total win in the budget department as well. My two favorite template shops are GoLiveHQ or Ghost Plugins because they are both very reputable and offer excellent customer service.
Paid templates are installed directly into your Squarespace account and you can start editing them right away just like a free template. Some of them also come with some extra CSS code already installed which can really make springing for a paid template worth it. Another bonus is that in general, paid templates tend to have more pages built out with more intricate layouts versus the free templates that may be super generic. This can help you get to “finished” even faster!
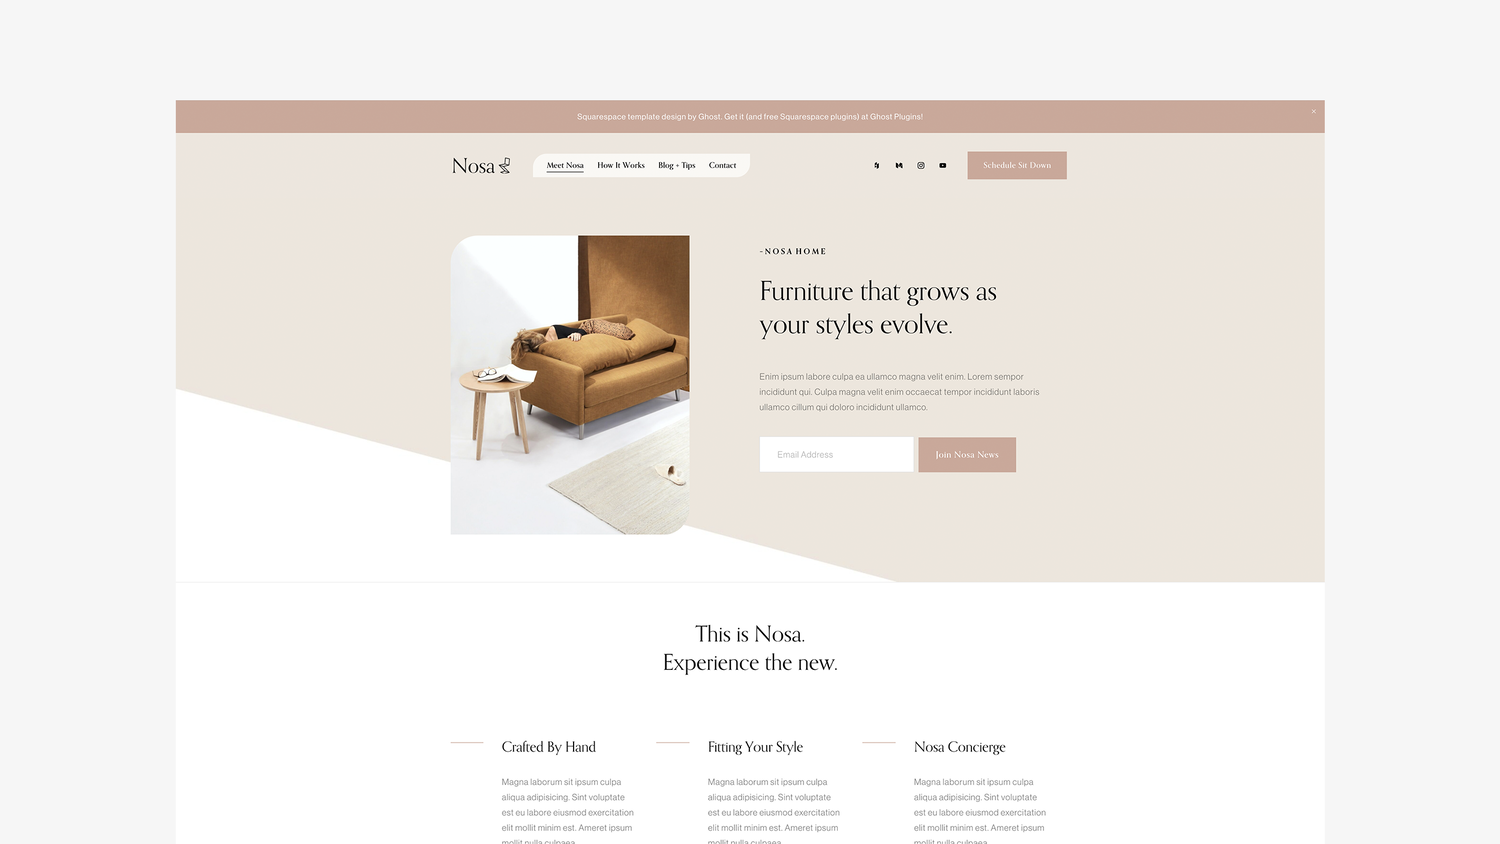
Nosa by Ghost Plugins
What I like:
So much to like! Aside from just having great style that I think could adapt to fit a range of industries and brands, there are tons of great content areas on the home page - and throughout! I love the mega footer, all the signup boxes, and even the super cute contact page! I think this template would be a great fit for a service provider who wants to integrate Squarespace Scheduling or Member Areas but it could work just as well for a subscription-based company or single-product store. Overall, a flexible design with great style!
What I would add/change:
There’s not a lot I would change but depending on the products/services being sold I might swap out the newsletter sign-up boxes in some of the hero image areas for different calls to action such as a button to check out the shop or services page. The unique shape of some of the images and the header menu is definitely a brand choice that isn’t going to work for everyone. Luckily, this can easily be made a bit more traditional by simply removing a couple lines of custom CSS.
Save 10% off any Ghost template with discount code: KRISTINENEIL

Typeset by GoLive
What I like:
This template is billed as great for service providers that have more copy than images but I think it would actually be an awesome choice for a subscription box company or a startup with just a few signature products. The template has lots of room to explain features and benefits alongside a stylish, clean design. Another thing I really love is the blog which you definitely shouldn’t skip just because your primary focus is eCommerce — blogging is a great way to attract new customers, boost SEO and show off your expertise.
What I would add/change:
I would ditch the portfolio - it’s just not needed here. But don’t worry about that leaving gaps in the content areas on the home page or navigation areas, those can be filled in with shop content or links to your subscription products! I would also beef up the footer with more links and a newsletter opt-in. Also, even though I love the fonts that have been selected as part of this template if you feel like adding a pop of color and personality, I would consider changing up the black fonts for a color that’s on-brand. It could make the bold typography really fun!
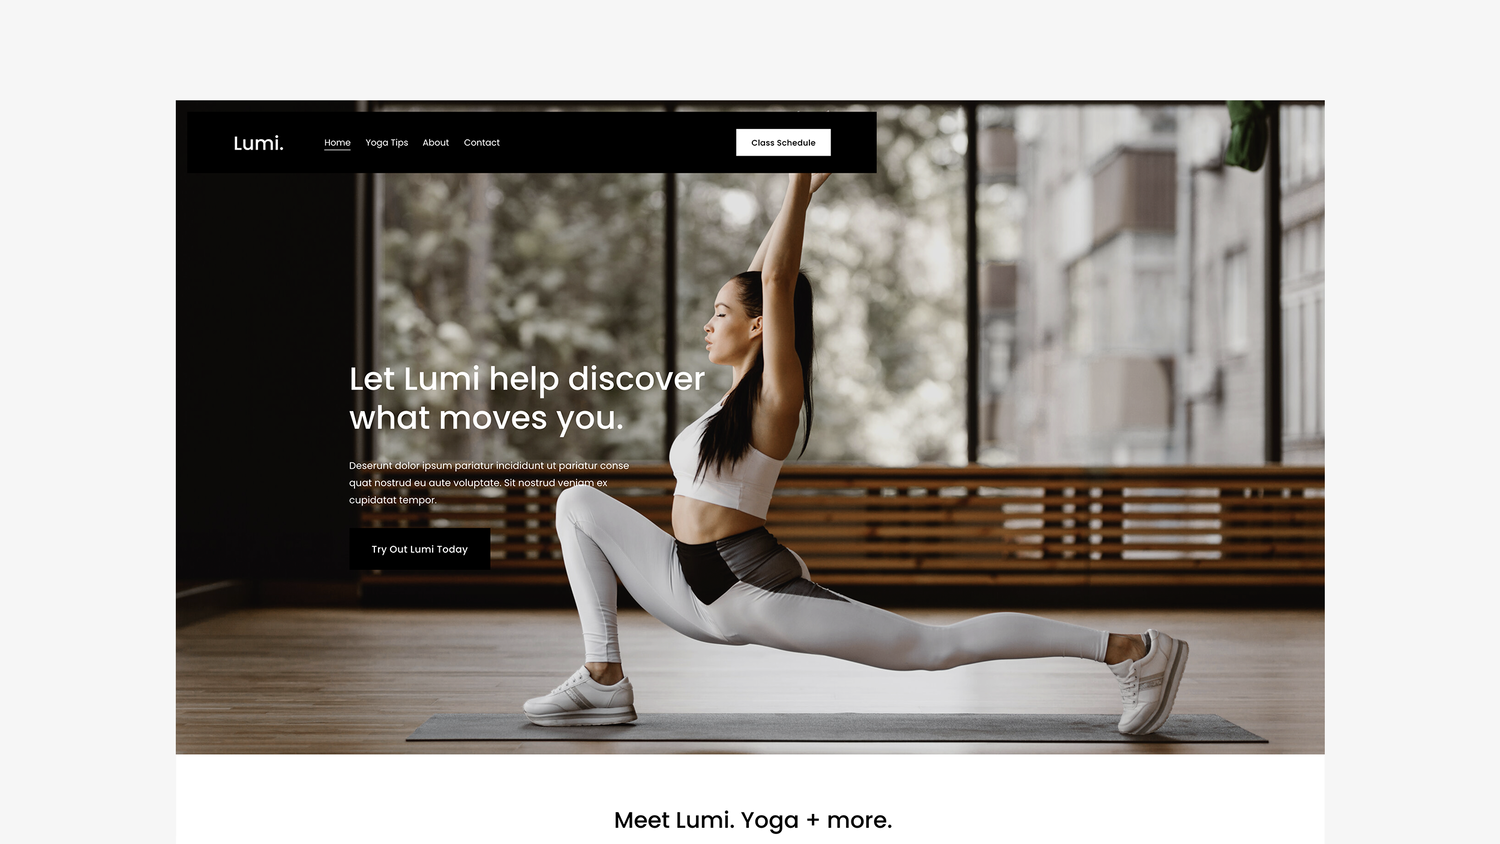
Lumi by Ghost Plugins
What I like:
This template is just so slick and cool! It is clean but still has a little edge. The floating header navigation can help keep your main links front and center (literally) but you could always disable that and keep it static if it wasn’t for you. I love the icons and features list on the home page and then all the really bold sections down below. Ghost always delivers on an awesome footer and this template is no exception - the newsletter box and links are such valuable real estate!
What I would add/change:
The demo content is set up to take advantage of a Squarespace Scheduling integration (which can be a great eCommerce tool) but if that doesn’t fit with your business, you could easily swap in membership areas, links to subscription products or boxes, or even shop categories! Also, even though I’m a fan of the black and white I wouldn’t be afraid to make this more fun, playful or bold by changing up the color palette in the site styles section. It’s so easy to update everything in just a few clicks!
Save 10% off any Ghost template with discount code: KRISTINENEIL

How to Send Delivery Confirmation Messages with Squarespace
Letting your customers know when a package has been delivered with custom delivery confirmation emails can help you increase customer satisfaction and reduce your admin time. There are two options that integrate seamlessly with Squarespace commerce and I’m sharing the pros and cons of each for you!
This is going to sound cheesy but I’ve been waiting for the perfect time to use this sentence: “I’m not just an eCommerce pro - I’m also a customer!” Cringy? Yes. But this means that a lot of the tips I recommend are because I’ve been working in eCommerce since the early 2000s... aaaand a lot of them are because I’ve been shopping online for just about as long.
As a customer, I love love love when I get an email as soon as a package I’ve ordered has been delivered. As a pro, I love that this is something that’s easier than ever for small businesses to be able to do! It’s a really great way to show customers that you care about their experience and be proactive about any issues there may be with the shipment or order. Providing tracking and delivery updates to your Squarespace customers can also really help reduce the number of status update inquiries you or your customer service team have to field so if you ask me this one is a win-win-win.
There are two ways to send custom order tracking and delivery updates to support your Squarespace eCommerce business. I’ve set up both and to me, there’s not necessarily a super clear winner; the best solution will be the one that aligns with your business needs and that may be completely different from someone else’s. I do have a favorite when it comes to simplicity but the alternative is pretty cool too! I’ll detail them both for you so that you can decide!
Easyship
Of course, my favorite shipping extension made it onto this list! And that’s because even if you like the second option below better for post-purchase tracking and delivery updates you’ll still need a shipping extension to be able to get those orders shipped out in the first place. I love Easyship because it has all the great shipping features and capabilities you want (importing orders, creating labels, carrier discounts, shipping rules, etc.) but still manages to have a super simple user interface that makes it a breeze to use.
Easyship is also the only shipping extension that integrates with Squarespace that offers a “shipment delivered” trigger on Zapier which makes it perfect for us to use to set up simple order delivery confirmation emails!
To do this, you’ll just connect both your Easyship account and your business Gmail account to Zapier. From there, it’s as simple as creating your simple stock email that goes out every time the Easyship “shipment delivered” trigger is activated. (For more on using Zapier check out this post: Fun With Zapier for eCommerce.)

Using Zapier to send simple order delivery confirmation messages from Squarespace + Easyship
Pros: Simple, minimal, not much tech setup, low/no cost
Cons: Design and formatting options for the email are limited
Accounts Needed & Costs:
Easyship - Free for up to 100 shipments/month, then $23/mo for an annual Plus plan. The Plus plan also comes with it’s own custom branded tracking page and emails if you’d like to use those instead of the ones generated by Squarespace. Bonus: give Easyship a try by using my code GWZMUM and get a $20 account credit towards shipping costs.
Zapier - Free for up to 100 single-step tasks/month, $19.99 for up to 750 tasks plus the ability to set up multi-step zaps.
Aftership
If you’re looking for the minimalist approach, stop reading and just go with the above! But if you’re looking for a few more features that will really help your small business look pretty badass, Aftership is worth looking into. You’ll still need to use a shipping extension (check out my reviews of all of them here!) to take care of the outgoing shipping situation from your shop but Aftership picks things up from there.
What may surprise you about this option is that it’s actually pretty dang affordable to do things that used to only be available to huge online sellers like sending branded step-by-step delivery updates and a tracking page with upselling marketing opportunities. While it’s definitely more labor-intensive to set up all the features (there are almost too many of them!), if you’re a growing eCommerce business it may be worth it.
Aftership is also a great option if you’ve been wanting to do things like send text updates about shipments or offer automated returns in the future since those are easy add-ons from the base subscription.
To get started with Aftership, from your Squarespace home screen go to Settings > Extensions > Aftership > Connect.
Pros: Fancier-looking emails, more options if you want to add them, low cost
Cons: Complicated set up with lots of (almost too many!) options, more apps to log in to
Accounts Needed & Costs:
Shipping extension of your choice - such as Easyship (above) in order to manage your outgoing shipments
Aftership Tracking - $9/month for up to 1,200 shipments per year, cost goes up based on usage and if you want any of the upgraded features. The Essential plan will get you a branded tracking page and custom email notifications for when order is in transit, out for delivery, there has been a failed delivery attempt, when the shipment is delivered and/or a delivery exception.
(Optional) SMS notifications - $0.04/text, to also notify customers by SMS about shipments
(Optional) Aftership Returns - free for up to 3 returns per month, paid plans start at $9/month to be able to create an interactive returns page that will allow you to manage returns to your Squarespace store
Bottom Line
Keeping your customers in the loop can not only help reduce the number of customer service inquiries you have to field, but it can also be just another way to help your small business look big online. While I definitely like to be cautious when incorporating new apps or software into my tech lineup, using Easyship or Easyship + Aftership are affordable ways to improve customer experience that integrate so seamlessly with Squarespace that they have my minimalist’s stamp of approval!

3 Squarespace eCommerce Myths - Busted!
Busting myths right and left when it comes to eCommerce on Squarespace. Haters gonna hate but they also gonna still be working on their website while you're busy watching sales roll in on Squarespace 🤷♀️
Updated August 2021
Sometimes for fun - and in the name of "competitor research” I like to Google things like “Is Squarespace good for eCommerce?” and “Should I use Squarespace for my eCommerce website?" just to see what people are saying. It helps me keep in touch with the good, the bad, the ugly, and - sometimes - the just plain wrong. Since this post was originally published Squarespace has become an even stronger eCommerce solution and yet I still regularly see outdated or even just blatantly incorrect information out there. So, in an effort to keep the misinformation to a minimum let’s bust some Squarespace eCommerce myths!
Myth #1
Design options are limited on Squarespace
Truth
Squarespace templates help you save time & money
Not only do all of Squarespace’s templates allow you to build an online store of any size but there are virtually no limits to design or functionality. And just because a template looks one way right out of the box doesn’t mean things have to (or should!) stay that way. The best part of starting from a template (whether free or paid) is that it’s a great way to not have to reinvent the wheel and start a new site from scratch each time. This is the “standing on the shoulders of giants” approach and I, for one, and here for it! By allowing a template to do some of the heavy lifting, you can devote your precious time and resources to really building out the experience of your site and getting all the selling tools in place to support your business.
Dig Deeper:
How to pick the right Squarespace template for your eCommerce site →
Myth #2
There are limits to what you can sell on Squarespace
TRUTH
You can sell more on Squarespace than Shopify
Not only are you allowed more products, more options, and more variations on Squarespace than on Shopify, there’s really no limit to what you can sell without needing to tack on additional paid apps or string multiple systems together into some sort of “hacked” experience. Additionally, because of all the different things you can sell on Squarespace without needing to look elsewhere for solutions, there tends to be a lot of wiggle room in how you can set things up so that you can make sure the experience is tailored perfectly for your brand. This allows a level of both creative & technical freedom that you’ll be hardpressed to find anywhere else.
Dig Deeper:
Myth #3
Analytics & SEO features are lacking
TRUTH
Squarespace has awesome commerce analytics & SEO Features built right in!
I think I finally figured out that the reason why this myth persists is that there are some folks out there that benefit from it being true - namely people trying to scam you with sketchy search ranking guarantees and make you doubt your own ability to read a graph or chart 🙃There’s also the misconception that just because something is easy that it can’t also be effective. Squarespace has all the same SEO powers as any other platform, they just don’t make you work double-time to access them or put them to use. They just. Work. The same thing goes for analytics; all the data you need (and then some) is right there, made plain and simple so that you can have the data you need readily available to make business decisions.
Dig Deeper:

Squarespace Discount Rules
Learn all about creating coupon codes and setting up automatic discounts on Squarespace plus what offers you can combine and which you can’t! Understanding the discount rules will help you prevent over-discounting and plan better marketing offers.
Half the battle when it comes to managing your Squarespace eCommerce website is just taking the time to learn everything that’s possible! Which is a lot! Luckily, I’ve read all the Squarespace documentation so you don’t have to :)
In this post, I’m going to walk you through the 5 steps of setting up a discount so that you know and understand all the options and what they mean. Then, I have a concise primer of all the Squarespace discount rules and exclusions. These are important to understand so that you know that 1) Squarespace has your back with controls that automatically prevent customers from stacking discounts and 2) you can plan smart promotions that you’re actually able to pull off!
Step 1
Choose Your Method
On Squarespace, there are basically two different types of discounts you can set up:
Coupon Code - offers that can be claimed with a coupon code
Automatic Discounts - don’t require a code and magically apply based on what’s in a shopper’s cart
There are good reasons to use both types but FWIW I tend to prefer automatic discounts over those that require codes because it requires less work on the customer’s part. This isn’t to say that there aren’t some times when manual discounts that require a code make a lot of sense! For example, if you’re running a targeted ad or wanting to offer something to only a select group of people using a coupon code over an automatic discount may be the way to go.
So the bottom line here is that I would use automatic discounts for things that you can market to the public on your site such as “Free shipping over $50!” Use coupon codes for situations you may want to make things seem a little more exclusive such as “$10 off for our VIP subscribers using code SD87SDFT!”
Step 2
Choose Your Promo Type
Amount Off - a flat dollar amount discount (ex: $10 off)
Percentage Off - a percentage discount (ex: 10% off)
Free Shipping - can be for any or all of the shipping methods you offer (ex: free express shipping)
Step 3
Select What Orders Your Offer Applies To
Any order - it doesn’t matter what’s in the cart or how much! Go crazy!
Orders over a certain amount - discounts only apply if the minimum order amount is met before any taxes or shipping costs are added.
Single products - apply to just one product that you specify. If you want it to apply to more than one product, use a category discount instead. Discounts for single products can come in handy if you have a new product you want to entice people to try OR if you have an old product that you’re trying to liquidate.
Product categories - apply to all products within a certain category or within multiple categories. Category discounts make it easy to apply offers to whole sections of your shop at once. If someone adds multiple items from the category that you’ve targeted, each item will receive the same discount.
Pro Tip: While shop categories are usually descriptive of the “departments” of your store, they don’t have to be! You can make a “Featured Products” category, a “Best Sellers” category, or even a “Clearance” category to make it easy to target specific items for an offer. For more on product categories check out this post.
Step 4
Set Limits
You can limit both the number of times a discount can be used in total and how many times it can be used per customer. This means that if you don’t want your discounts to have unlimited usage that you can limit usage to either one or the other of those, or both.
Unlimited - You get a discount! And you get a discount! And you get a discount! EVERYONE GETS A DISCOUNT!!!
Limit Total Uses - this counts every time the discount is used at all by anyone. Setting it to unlimited means that there’s no cap on how many times it can be used in general. For example, if you wanted to only allow the first 100 customers access to a VIP offer you could set this to 100 to create a sense of urgency and exclusivity.
Limit Per Customer - allows the discount to only be redeemed once per customer based on the email address that a customer uses at check out. This is especially handy for “Welcome” offers such as “10% off your first order of $50 more!”
Step 5
Set Expiration Date (Optional)
All discount types allow you to set an expiration date. I tend to recommend that even if your promo isn’t really time-based (i.e. 10% off all orders placed in September) that you set an expiration date of the end of the year or some other arbitrary date in the future. This just gives you a reason to go back into the discounts panel every so often to make sure you’re keeping things fresh and up to date.
Discount Limits & Rules
Now that you know all about what elements you can control when creating a discount on Squarespace, it’s important to understand what you can’t do. There are exceptions and rules to what discounts you can stack and combine to help you prevent over-discounting or creating a situation where customers can combine multiple discounts. Understanding these rules will save you the headache of dreaming up a marketing plan that you can’t actually easily pull off!
General Rules
Customers can only enter one coupon code per order
You can’t repeat coupon codes - make a new one each time even if the details are the same or similar.
Discounts apply to the subtotal amount before taxes or shipping
Discounts cannot be greater than the order total
If an order has only one product, a customer cannot combine multiple offers
If a customer tries to redeem multiple offers that aren’t compatible or an offer that is expired, they will receive an error message
Customers paying with a gift card can redeem any discounts like normal
Single Product Discount Rules
What You CAN Do:
Combine with an amount off any order offer (flat rate or percentage)
Combine with an order over offer (flat rate or percentage)
What You CAN’T Do:
Combine with a category discount
Combine multiple single product discounts
Category Discount Rules
What You CAN Do:
Combine with an amount off any order offer (flat rate or percentage)
Combine with an order over offer (flat rate or percentage)
What You CAN’T Do:
Combine multiple category discounts (for products that may be in both categories)
Flat Rate & Percentage Off Rules
If you offer both an automatic flat rate discount and an automatic percentage off discount, only the flat rate one will apply - even if it’s the smaller amount. This means that if you have multiple automatic discounts set up that could theoretically apply to the same order only the flat rate discount will be applied.
You can’t combine offers for any orders or orders over a certain amount if one of the discounts is a percentage discount.
If you do happen to have multiple automatic percentage discounts that would apply to an order, the larger of the two will be applied.
Percentage discounts can only be combined with free shipping offers.
Free Shipping Discounts
You can combine a free shipping offer with any other offer and any free shipping offers you have set up will always apply
You can limit the shipping option(s) that the discount applies to. For example, you may want to only offer free shipping for your cheapest option (like USPS Priority Mail) but still charge the full amount if someone chooses your expedited option (such as FedEx Next Day Air).
Special Notes on Discounting Memberships or Subscription Products
If you have a member area or sell subscription products on your Squarespace site, the following options are available for recurring payments:
You can choose to exclude a subscription product from a discount entirely.
You can choose to apply the discount to the first payment only (all future payments or renewals would be charged full price).
You can choose to apply the discount to all recurring payments, including the first one and all future payments/renewals.

Squarespace 7.0 vs 7.1: What’s Different for eCommerce
If your Squarespace site was built pre-2020 it might be time for an upgrade! Find out about all the new functions, features and capabilities that you can take advantage of on your eCommerce site.
Unless you’re deep in the web design industry trenches, you may not have realized that Squarespace released a new version of their platform in early 2020. It was a major change that could easily have been missed if you already had a Squarespace website built at that time. (If that’s you and you want to see which version you’re on, here's how to check.)
In this guide, I’ll provide a quick comparison of the two platforms: Squarespace 7.0 and Squarespace 7.1. This will be helpful if you already have a 7.0 site and are thinking about upgrading. (Hint: it’s worth it!) If you’re completely new to Squarespace you may still find reviewing this list helpful for a couple of reasons. First, because it shows that Squarespace is truly committed to making strong progress for eCommerce customers. And second, so you can get a feel for some of the features and capabilities available to you.
What’s The Same
Before we jump into all the ways that Squarespace 7.0 and 7.1 are different, it’s important to note that they are in a lot of ways very much the same. Here’s what has not changed:
Analytics & SEO
What you can sell, with some special notes about subscription products (included below)
Payment options
Shipping options
Customer notifications & emails
How you manage & fulfill orders
What’s Different
The major difference between the two platforms (aside from the Commerce options which we’ll get to in a second) is how you add content and style your site.
In brief, on Squarespace 7.0 there were lots of different template options but they did not all have the same features or functionality. This meant there could sometimes be pressure to choose the “right” one from the start or risk being locked into something that didn’t work. On 7.1, all templates have the same features and functionality. The templates just show different ways you can style or layout pages depending on your needs and design preferences. They’re all just a jumping-off point. Each page is infinitely customizable and easy to style which is just one of the reasons why I love Squarespace.
Okay! Jumping into those differences for eCommerce which is the whole reason why we’re here!
|
|
Squarespace 7.0 |
Squarespace 7.1 |
|
Number of products |
Up to 200 products per Store Page |
Up to 10,000 products per Store Page |
|
Number of product variations |
Up to 100 variants (classic editor) |
Up to 250 variants (new editor) |
|
Ability to mport product tags & categories |
Not possible |
Yes, including sub-categories |
|
Categories |
How categories are displayed depends on template, with some limited ability to show/hide categories |
Drag-and-drop organization Each category has a filtered category page that can be enabled or disabled |
|
Subcategories |
Not Available |
Yes, up to three levels |
|
Shop Category Navigation |
How categories are displayed by template with some having more options than others Categories can only be displayed alphabetically |
Categories & nested subcategories are displayed on the shop page automatically, either at the top or as a sidebar Optional: hide categories using the Filter Visibility toggle Categories can be arranged in any order you choose |
|
Etsy Product Import Limits |
200 |
300 |
|
Shopping Cart Icon |
Display depends on template; some show by default, some are hidden Some templates allow you to hide the icon but people will not be able to access their cart unless you have Express Checkout turned on |
Displays in header by default even if the cart is empty If you decide to hide it, a cart icon will appear at the bottom of the page when someone adds a product to their cart |
|
Customer Account Login Link |
Display depends on template; if your template is not one of them an account login link will need to manually be added to the navigation |
Displays automatically if accounts are enabled |
|
Product Waitlists |
Only available on sites with Advanced store pages |
Available on all plans |
|
Store Pages |
No other content can be added |
Ability to add content sections & blocks above or below store content |
|
Subscription Products |
Work best on a limited set of templates that include a sign in link automatically |
No limitations |
|
Product Images |
How images display depends on your template’s store page type |
All display options are universally available |
|
Product Thumbnails |
Shown on Advanced store pages |
Shown on all shop pages |
|
Image Hover Effects |
Depends on template, not universally available |
When more than one image is added, the second image is shown upon hover automatically |
|
Sold Out Labels |
Only available on sites with templates that have Advanced store pages, may be hidden |
Always shown |
In general, I think you can see that one of the biggest advantages to 7.1 over 7.0 is that you don’t need to worry about what template you choose as that no longer limits your ability to customize and set up your eCommerce store as you’d like. The only time limitations come into play is when choosing a Squarespace plan but I’ve got you covered on how to find the right plan for you in this post.
What to do if you’re on 7.0 and want to upgrade?
So excited! You’re gonna love it! The only caveat is that it’s not currently possible to do a direct upgrade from one platform to the other. What this means is that when you’re ready to make the switch, you’ll need to redesign your site on 7.1. You’ll still be able to use your same Squarespace account login and moving over your domains and any other subscriptions to the new site is super easy. The important thing to remember is that this is a whole new platform and a whole new website.
How to time your upgrade perfectly
A practical tip I have is to take a look at when your current website subscription is set to renew. (Not sure when that is? Here’s how to find out.) Strategically, making the leap to 7.1 a month or two before that would make a seamless transition. (If you really just can’t wait to upgrade, you can always change your billing cycle to monthly as a workaround 😉) Chances are if you’ve had your site long enough that it’s still on 7.0 it’s time for an update!

Crash Course: The Squarespace Commerce Analytics Panel
Understanding how your site is performing can help you meet your business and eCommerce goals in a measurable way. Learn what some of the most important metrics mean, how they are calculated and what you can do to improve your numbers!
Before you launch your site, you’re working off of a lot of guesses and hypotheses. You’re assuming a lot about your customers and their behavior based on your market research and industry knowledge. But after you launch? That’s when the fun begins. Now you have data to either back up your predictions… or help you tweak and refine your content and products.
I love the Squarespace Analytics panel because the graphs and charts are simple, easy-to-read, and straightforward. You can always head over to Google Analytics for a deep dive into some more obscure stats but there’s really no need! It’s so important to use analytic data to help you meet your business and eCommerce goals in a measurable way. Here’s a quick crash course on using Squarespace Analytics to understand how your site is performing.
Analytics Tips
The data shown in your analytics panel is almost real-time - but things may take a couple of hours to refresh. I usually wait until the first or second day of a new month to check out last month’s data.
It’s helpful if you make notes or keep track of things like ad campaigns or big site changes so that you can see how those things affect your data.
If you have reports that you look at often, you can save links to those directly to your Squarespace home screen. To do this go to Home > Settings > Advanced > Menu Shortcuts. From here you can toggle on anything you want to be able to access quickly from your main dashboard.
To ignore your own activity make sure you are logged in to Squarespace when viewing your site. This will automatically exclude your own views from the reports. You can also create a filter to exclude your IP address in Google Analytics.
Now that you know a few ins and outs of analytics, it’s time to learn about some of the most important metrics to check out and what they mean for your business!
Basics
Pageviews
This is basically a popularity ranking for all the pages on your site. If you have pages that you think should be more popular than they are, you may want to look at the navigation of your site or where/how you link to that page. This doesn’t really measure how effective your pages are though so for that check out some of the metrics below.
Time on Page
This is a measurement of how long people spend on a page before leaving for another part of your site. People who leave that page to go to a different site are not counted (those are part of the exit rate, below.) Time on page is this formula: (Total time spent on page / (Pageviews - Exits)). If you feel like people are coming to your site but not sticking around you might want to look at your messaging, keywords, or content. A short time spent on a page indicates that there might be a mismatch between your target audience and your content.
Bounce Rate
Think of this as the people who came to your site and then left without going anywhere - they just bounced right off! If your bounce rate is really high, this also signals a content problem. You’d want to look at what keywords people are using to find your site and make sure that the content and CTAs on that page are all in alignment. You want to make sure that each page clearly describes what the page is about and that it corresponds to the action you’re wanting the visitor to take.
Exit Rate
Exit rate is commonly confused with bounce rate but understanding the difference can be helpful. Whereas bounce rate can show you which initial pages people landed on that didn’t resonate with them, exit rate is going to show you where you’re losing people who have seen other pages on your site along their journey. Think of this kind of like a purchase funnel but for content.
For example, if you have a landing page that’s supposed to lead to a product/shop page it should have a low exit rate. If it has a high exit rate, you should look at why people are leaving that page without doing what you intended. Maybe you could improve the copy or button placement or make it easier for visitors by embedding your product right on the page instead of asking people to click again.
Form & Button Conversions
Forms and buttons are important CTAs (calls-to-action) and you want submissions and clicks! Squarespace makes it easy to see how people are interacting with forms and buttons and it is shown as this formula: Number of times the form or button is viewed / number of submissions or clicks. Low conversion rates might mean that people just aren’t seeing your CTAs. If that’s the case you can try moving them up the page so people don’t have to scroll so much. You may also want to adjust how much information you’re asking for in your forms - long forms are proven to be lower converting than short ones.
Commerce Analytics
Sales by Product
This is a great place to see how each product in your store is performing. Understanding which products are most popular can help you make business decisions about when to order more stock, what to put on sale, or which products might need some TLC in order to better appeal to your customers. Stats on this page include:
Revenue
Units sold
Orders
Views
Conversion Rate
Purchase Funnel
You’ve probably heard of a purchase funnel before when you were busy pulling your hair out trying to set one up manually in Google Analytics 🙃 Luckily, Squarespace makes it easy and you can check out this page to see things like how many visits result in purchases or where you’re losing customers along the way.
The four stages of the purchase funnel are: Visits > Viewed Product > Added to Cart or Started Checkout > Purchased. The percentages between each step are how many people moved on to the next stage. If you make updates to your page content, product descriptions, or prices checking out the purchase funnel analytics can help you see how conversion rates improve over time as a result.

You can also tell a lot about updates you may need to make based on where you’re losing people. For example: if you lose people on the cart page perhaps the shipping costs are too high. If people aren’t even making it that far, you may want to look at how you’re promoting or merchandising your products.
One last thing to note about the purchase funnel is that views from Product Details Pages and product Quick Views are included however views from the main store page or from product blocks or summary blocks are not. This is just something to keep in mind if you use those design elements as part of your website.
Abandoned Cart
When you’re looking at your purchase funnel (above) you’re paying attention to people that made it all the way through to purchase. But some people ditch out between the Added to Cart / Started Checkout phase and purchase. Those people are counted as Abandoned Carts. The Abandoned Cart funnel includes 5 phases:
Carts - total number of carts that were started
Abandoned - total number of carts with at least one product added that didn’t result in a check out within 24 hours
Recoverable - the total number of customers who abandoned their carts that are eligible to receive an abandoned cart recovery email. (To be eligible they either need to have entered their email address into the cart without checking out or have been logged in to their account when they ditched out.)
Emailed - the number of people who received an abandoned cart recovery email
Recovered - the total number of checkouts that were completed as a result of receiving the abandoned cart recovery email + the revenue boost from those carts!
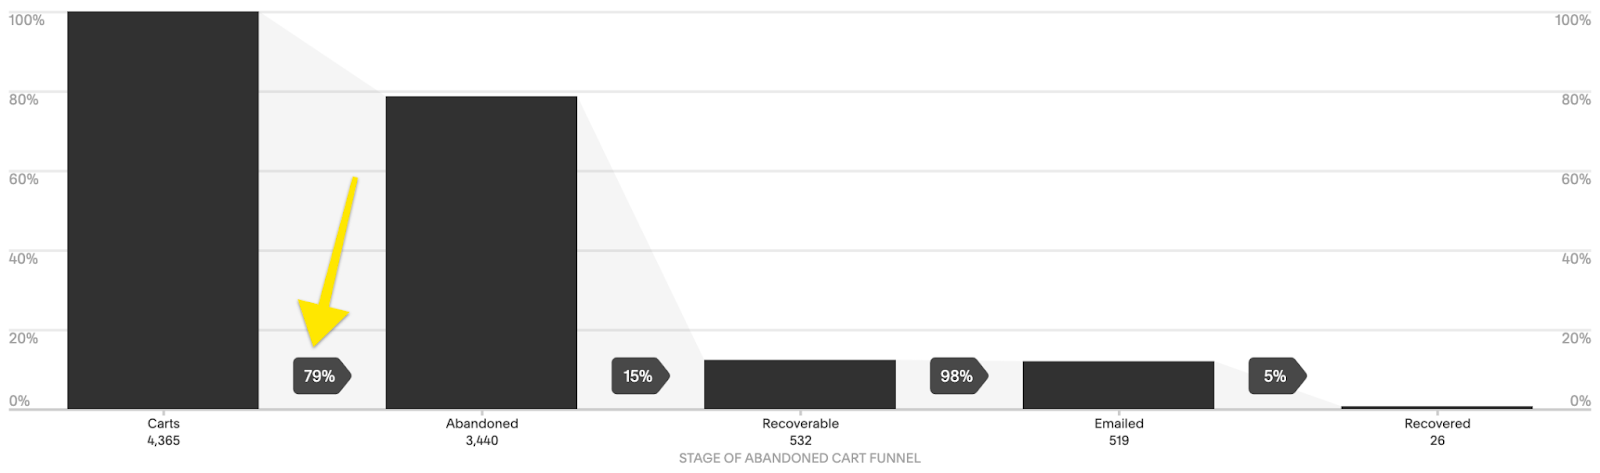
Good news if you’re seeing a high number of abandoned carts because I think this is one of the easiest metrics to improve upon! You were already doing a lot right to get people interested enough to add an item to their cart so it’s just a matter of figuring out why they aren’t checking out, fixing that, and then giving them a little nudge!
Also, before you get too worried about the reasons why people ditch out, it’s important to remember that sometimes it’s not always about you. There are always personal reasons why people might abandon their carts. Some people might have just become distracted and walked away from their computers. Others may like everything and plan on coming back on their own to purchase when their budget allows for it.
All this being said, there are some things you can do to lower your cart abandonment rates:
Consider adding another payment option so customers can pick one they prefer. If you are already using Stripe (most common), did you know that you can also enable Apple Pay or Afterpay… and if you have a Paypal business account you can also accept Venmo?
Change up your Abandoned Cart Recovery email. Personalizing the content, adding a coupon code, or even just customizing the subject line can all have a big impact. More info on that in this post!
Make sure you include a clear return policy advertised in the footer of your site and linked to in your cart. (Home > Commerce > Checkout > Checkout Page: Store Policies)
Make sure that you keep custom checkout forms short to create a seamless checkout experience.
Enable Customer Accounts so that name, address, phone number, and credit card numbers are saved for your customers to make it faster and easier for them to check out. (Bonus: this also makes sure that people get your Abandoned Cart Recovery emails!)
Other Analytics to Check Out
Google Analytics - good if you’re wanting supplemental data on anything you see in Squarespace Analytics
Stripe Reports - Squarespace reports are good for a high-level view of how your store is performing but probably aren’t going to provide enough info for accounting purposes
Squarespace Email Campaigns - if you use Squarespace Email campaigns from this dashboard you can see stats for all emails like delivered, opened, clicked, and unsubscribed. (Marketing > Email Campaigns)
Squarespace Scheduling - (Scheduling > Reports) if you use Squarespace Scheduling in the reports section you can see stats like the number of appointments, revenue, and total hours booked.

Squarespace vs. Shopify: Which is Best for Small Business?
Whether you’re just getting started or are looking to make a switch and wondering whether to go with Squarespace or Shopify, this post lists all the major considerations I look at and compares specific features between the two website platforms.
The most popular question that pops up in my inbox is someone wondering whether to go with Squarespace or Shopify for their eCommerce website. The second most popular is how to connect the two which I describe here but then try to talk you out of doing here 😉 So I think it’s fair to say that I’m always willing to give each side its fair shot, present all the pros and cons, and then let you decide what you think is best for you. I mean I clearly have my favorite but that’s not this post.
One more little soapbox before we jump into the details on this subject is that you should definitely be looking at this from within the scope of your own business. It doesn’t matter what anyone else is using or doing. It doesn’t matter if your uncle’s best friend’s daughter’s neighbor who once had a semi-successful Etsy shop thinks you should use Shopify. Hell, it doesn’t even really matter if I think you should use Squarespace! At the end of the day, even if you want to try to be as hands-off as possible, you’re the one who will be spending the most time on your website both on the front end and back end) so aside from your customers, you’re going to be the #1 user. The point is: you have to love it and at least (somewhat) enjoy using it and that’s worth something.
Moving along, in this post, I’m going to break down the main considerations I look at when I’m trying to figure this question out with a client. Some of them have clear “right” answers and some are a little more subjective.
Considerations
What You Sell
This is always the first question I ask because it does a good job of letting me know at the highest level what the eCommerce needs will be. Do you sell mostly products or services? Do you need people to book things or make appointments? Are you offering memberships or subscriptions? Maybe you’re a mix of all the above? In the most general sense, I tend to give Shopify points for people selling very large volumes of strictly physical products but Squarespace points for everything else.
Something else that factors in is how complex or customizable your products are. Squarespace has the same capabilities as Shopify when it comes to setting up complex variants and can even do simple customizable products very well.
An example of the type of customizations I’m referring to would be if you ran a custom embroidery shop. If you just needed people to be able to enter their initials for a monogram on a product when they add it to their cart, I think Squarespace does that better than Shopify. However, if you needed the price to be variable based on what letters or how many letters were entered for the monogram, that may be a better fit for Shopify + a third-party plugin. All this being said, there are ways to solve this problem and stay on Squarespace just like there may be reasons why you wouldn’t want to go the Shopify + plugin route (i.e. cost). I’ve built shops with 10,000+ variants on Squarespace and others with 5 services on Shopify and both were right for those businesses despite initial impulse telling us it would be better the other way around!
Squarespace
10,000 products per store page (can have multiple pages if needed)
Each product can have up to 6 options and up to 250 variant combinations
You can sell physical, digital, service, and subscription products in addition to memberships, events, classes, and other scheduling-based products - all without any third-party apps.
Shopify
Technically you’re allowed an unlimited number of products but some restrictions kick in after 50,000 products
Each product can have up to 3 options and up to 100 variant combinations (more allowed with apps)
You can sell physical products. Other product types (such as subscriptions or digital products) all require a third-party app from the Shopify app store.
Access to large dropshipping network
Shipping & Fulfillment
Shipping has a way of either making it or breaking it for some online retailers. I don’t know why, it’s just a lot of merchants’ Achilles heel! Most of the time, I think it’s because they’re making things more complex than they need to be. You can check out this post on why I think you should keep it simple for yourself and your customers and just offer free shipping but if that’s not part of your strategy, it’s helpful to know the types of options you would like to offer. Flat rate or weight-based? Carrier calculated rates? Will most of your shipments be domestic or will some be international? Do you also offer local pickup or delivery… or are most of your items digital and don’t even require any shipping at all?
Squarespace
Free, flat rate or rate depending on weight shipping with any carrier you choose
Carrier calculated rates for FedEx, UPS, or USPS (US Only)
Ability to create shipping zones based on country, state/province, and zip/postal code (US & Canada)
Print & pay for shipping labels directly through Squarespace or a shipping extension
Third-party fulfillment options are possible by connecting to Shipwire or Fulfillment by Amazon through ShipStation
Mutli-origin shipping through a shipping extension allows for shipping from multiple locations
Print on Demand through Printful or Printique
Shopify
Carrier calculated rates for DHL, UPS or USPS (US) or Canada Post (Canada) via Shopify Shipping
Carrier calculated rates for FedEx if you have your own account with negotiated rates
Ability to create country-wide shipping zones. Shipping zones based on zip or postal code possible with a third-party app
Print & pay for shipping labels through Shopify Shipping or a third party extension from the app store
Custom third-party fulfillment options or Fulfillment by Amazon with an Amazon Seller Central account
Ability to activate multi-origin shipping if you need to track inventory across multiple locations
Print on Demand options through the app store
Content & Design
I often hear potential clients say that they love the look of Squarespace but feel like they need the function of Shopify. In reality, you shouldn’t need to sacrifice design for function or vice versa - both are super important! Just because you’re planning on running the next big thing in eCommerce does not mean that things like style and content don’t matter. In fact, completely the opposite is true. Content is an important way to help you build an engaging brand. You’re going to want the ability to create landing pages, sales pages, a blog, and any other great-looking easily and effectively.
Squarespace
All design layouts and features are available for all pages.
Customize any page using any product block.
Create galleries, custom forms, event calendars, and portfolio pages without the need for third-party plugins
All pages have tidy URLs. For example “example.com/about” or “example.com/landing-page”
Nearly limitless style capabilities on every single page element
Rich blogging and podcasting capabilities are built-in
Easy SEO features
Shopify
Home page content capabilities are dependant upon theme
Interior pages (anything besides the home page) are created within the Shopify admin and limited to customization via custom CSS/HTML
Pages don’t have tidy URLs. For example “example.com/pages/about” or “example.com/pages/landing-page”
Limited style capabilities, some dependant upon theme
Simple blogging capabilities; layout and style are dependent upon the theme
Simple SEO features, some more robust tasks require access to code
Cost & Payments
There are some small differences in plan costs on Squarespace and Shopify. For complete details on the various plans and their features, you can check out this post for Squarespace or this page for Shopify. It’s tough to compare apples-to-apples between Squarespace plans and Shopify plans because they don’t really break them up into similar tiers. So for comparison's sake, let’s just look at both of Squarespace’s Commerce plans (Basic & Advanced) and then Shopify Basic & Shopify. The other big thing to keep in mind is that many of the built-in features on Squarespace require paid apps on Shopify. Depending on what you need, paid Shopify apps can end up costing hundreds of dollars each month alone just to get features that are included on Squarespace such as custom forms, galleries, social media tools, product merchandising, and selling features, etc.
Squarespace
Basic Commerce
Access to everything except Abandoned Carts, some advanced shipping and discount features & Commerce APIs
Unlimited Contributor Accounts
0% Transaction Fees
$26/mo (paid annually)
Advanced Commerce
Access to all Squarespace features
Unlimited Contributor Accounts
0% Transaction Fees
$40/mo (paid annually)
Shopify
Shopify Basic
Access to all features except reports & some international settings
2 Staff Accounts
2.0% transaction fees if not using Shopify payments otherwise 2.9% + 30¢ USD
$29/mo
Shopify
Access to all features except advanced reports
5 Staff Accounts
1.0% transaction fees if not using Shopify payments otherwise 2.6% + 30¢ USD
$79/mo
Wildcards
Are you starting from scratch or revamping an existing site? All of the above being said, there are always some variables and subtle nuances that I take into account when advising a client on which platform or subscription is best for them. To me, the most important of those is: do you have an existing website? If so, are there specific features or functionalities that you feel like you’re missing on that platform that you think switching to a different platform would help with?
I think people often want to change just because they think they should, or someone else told them they should, or they think that switching is going to magically solve a business problem they’re having. In reality, there may not be a need to scrap what you’ve already built entirely and it could be a better option to stay where you’re at and work on optimizing instead of moving. Moving a website to a new platform can cause a short-term dip in SEO and if you’ve built a lot of brand authority where you’re at, that’s an additional factor worth considering.
There may also be updates to the platform you’re currently on that you’re just not taking full advantage of. For example, most Squarespace sites out there could stand to be updated to the new 7.1 platform from their current 7.0 versions which would instantly make things feel fresh and new and offer some advanced eCommerce options.
Does anyone ever really move from Shopify to Squarespace? The conversation is often framed as if Squarespace is the “starter” website and that after you find a little eCommerce success, you’re ready to “graduate” or move up to Shopify. And I’m just here to challenge this assumption!
Moves can go both ways and you should select a platform that meets your business needs and goals for the next 2-4 years, regardless of what they were in the past. And, yes, this can mean moving from Shopify to Squarespace. Why would you do this? Several reasons: you’re looking for more design options and control, you want to focus on blogging as part of your key marketing strategy or you want to trim extraneous costs associated with Shopify apps just to name a few! So, while it’s definitely more common for people on Squarespace to wonder if they should be moving to Shopify, I think the future of eCommerce makes the simple, streamlined design of Squarespace a top contender as well.

How to Set Up Local Pickup or Curbside Delivery on Squarespace
Whether you call it local pickup, in-store pickup or curbside delivery: offering this option to your customers is easy to set up and a great service to market to your customers. Discover tips on making sure the process goes smoothly from start to finish and exactly how to add this feature to your Squarespace site.
Updated March 2022
Offering in-store pickup or curbside delivery are great ways to combine the ease of eCommerce with the familiarity of buying from a favorite local business. It’s about more than just convenience; providing these types of options can help you compete with the big guys! I think that if more businesses knew how easy it was to set these options up that they would definitely do it - and possibly attract a whole new batch of customers as a result! I mean, how nice would it be if your dry cleaning was loaded up in your trunk for you? Or what if you could pick up a wrapped gift from your favorite little store on your way home from work? Marketing curbside or in-store pickup as a service can really give you a competitive edge.
Like I said, setting this up is pretty easy to do from a technical perspective but here are a few quick tips to make sure you’re set up for success:
Create and document the system you will use for processing incoming orders. This includes making sure that everyone on your team is educated on the in-store pickup or curbside delivery procedures. Write down every step that happens between the time someone submits an order until that order is picked up. Who monitors for orders? Who marks them as fulfilled? How and when are customers notified? Be specific.
Answer FAQs about your specific curbside pickup process on your website. It’s important to set expectations early about how long it will take to fulfill an order, what needs to be done when the customer arrives at your location, etc. This is going to vary depending on whether you’re a boutique or a cafe, whether you have your own dedicated parking area or share a lot with other businesses, etc. (When in doubt, my rule of thumb is to treat every visitor like a lost tourist 😂)
Provide directions and the information again in your email confirmation. You may have put all the info on your site like above but not everyone is going to read it. Don’t worry about repeating yourself and provide the directions about what to do again in your email confirmation email. Be explicit. For example, are they to proceed directly to your location right away or will you be emailing again when their order is ready for pickup? Is there a phone number they need to keep handy? Can they stay in their car? Is there a special line to stand in for online orders?
Put up easy-to-read signage at your location regarding curbside pickup procedures. At the risk of repeating myself, I’m telling you to go ahead and repeat yourself :) If you need people to park in a certain spot or area, call or text a certain number or follow some other procedures, let them know. Make it simple and clear. The goal is to reduce frustration and confusion but great on-site signage also has the benefit of advertising to anyone passing by that you offer curbside pickup so be sure to list your website as well!
Creating a local pickup option on Squarespace is easier than ever and you have two options based on your needs.

Option 1: If you want to be able to offer local pickup to everyone:
You can use the built-in Local Pickup option to easily offer this to your customers at checkout. This will create an option at checkout toggle between shipping & pickup.
Get there: HOME > COMMERCE > PICKUP
You can write whatever you want in the “Pickup Information” text box. The name will display at checkout and the information will be included in the Order Confirmation email that is sent to your customer. You can include info like your address, pickup hours, and other instructions that will help customers know what to do or expect next.
Local Pickup orders won’t require your customers to enter a shipping address making this a super-fast checkout option!
Local pickup is an all or nothing thing - people can’t place an order that is half pickup / half delivery.
At this time, customers choosing this method cannot pay with Apple Pay (if you offer this as an option).
These orders won’t get sent to any shipping extensions you may have connected (like Easyship) because it’s assumed that you’re fulfilling them on your own + there is no shipping address provided by the customer.
Option 2: If you want to limit local pickup to certain zip/postal codes:

What you see when setting up an in store pick up option
In order to restrict local pickup options to people in certain areas using zip or postal codes, you’ll need to create a flat rate shipping option. While it isn’t technically necessary to limit this as an option at checkout, it’s nice to only show it to people who could reasonably choose it.
Get there: HOME > COMMERCE > SHIPPING > ADD SHIPPING OPTION > FLAT RATE
Make sure you give the pickup option a very clear name like “Curbside Pickup - YOUR AREA ONLY” or something that clearly differentiates this option from any other (potentially free) shipping options you offer.
Fill out the pricing or list $0.00 if you offer this option for free.
From the Shipping Zones tab, select your country (US or Canada) then your state/province. To get even more detailed, click on the state/province and add specific zip or postal codes that you’d like to limit this option to.
Keep in mind that the curbside pickup option is going to be displayed based on the “shipping address” that’s entered first so when in doubt, I would make your circle wider than narrower so that you don’t miss out on anyone.
Taking It Further:
Offering Local Delivery - You can set the price to whatever you want - it doesn’t have to be free. This is something to keep in mind if you wanted to replicate the instructions above to be able to offer local delivery. You’d use the same steps as option 2 above to restrict delivery to people in certain zip or postal codes, call it “Local Delivery” and give it a price. Now you have a paid local delivery option, too!
Order Confirmation & Order Ready Emails - People placing local pickup orders will receive two emails from you. The first is their order confirmation email, which is the same for all orders on your site regardless of shipping method chosen. The second one is the one that is sent once you mark their order as “ready for pickup.” In this second email, be sure to include things like your pickup hours, location, parking information, or what’s required at time of pickup (i.e. photo id or printed confirmation, etc. Again, if you explained this on an FAQ page or order page of your site it’s super helpful to just reiterate any pertinent info so people have it right in their inbox. For more on customizing these emails check out this post.

How to Set up Product-Specific Email Automations with Squarespace Campaigns
I love that Squarespace Campaigns allows you to send emails based on what people buy - it’s just such a great way to create a personalized experience with your shop! Learn how to set up your first product-specific email automation (or series of emails) plus get some ideas on how to really use this feature to its full potential.
I love tools that make life simpler and that means choosing programs and platforms that offer the most functionality possible. Squarespace is definitely where it’s at on that front because of Squarespace Campaigns, their built-in email marketing platform. And one of the things I like best is that Squarespace Campaigns offers the ability to send super-targeted, automated emails based on purchase behavior. If you want to get a primer on Squarespace Campaigns in general check out this post but here we’re going to get into sending product-specific emails because I think it’s cool enough that it’s worthy of a post all its own!
Customer Activity Automations
Squarespace emails that are triggered after someone purchases a product on your site are called “customer activity automations” and the thing to keep in mind is that the emails we’re talking about here are separate and in addition to the standard Order Confirmation and Shipping Confirmation emails that get sent out. (For more on those, check out this post.) So, just remember that these emails are ones that are set up via Squarespace Campaigns as follow-ups to the standard order communication emails that are managed in Commerce > Customer Notifications. Here are some things to note on Customer Activity Automations:
They are tied to products on your site and triggered when people buy those specific products.
Sending this type of email doesn’t automatically sign customers up for your mailing list. (That is something you can ask people to do during checkout though!)
People can unsubscribe from customer activity emails from you but that doesn’t unsubscribe them from any email lists they may have also signed up for.
This type of email does count towards the monthly send limit that your plan allows but isn’t counted as a campaign.
Now that you’ve got a good idea of what these emails are and how they work in general, here’s how to set one (or a few!) up plus some ideas on how to really use this feature.
Setting Up A Triggered Email
You’ll start by clicking on the “Create” button and then selecting “Automation.”
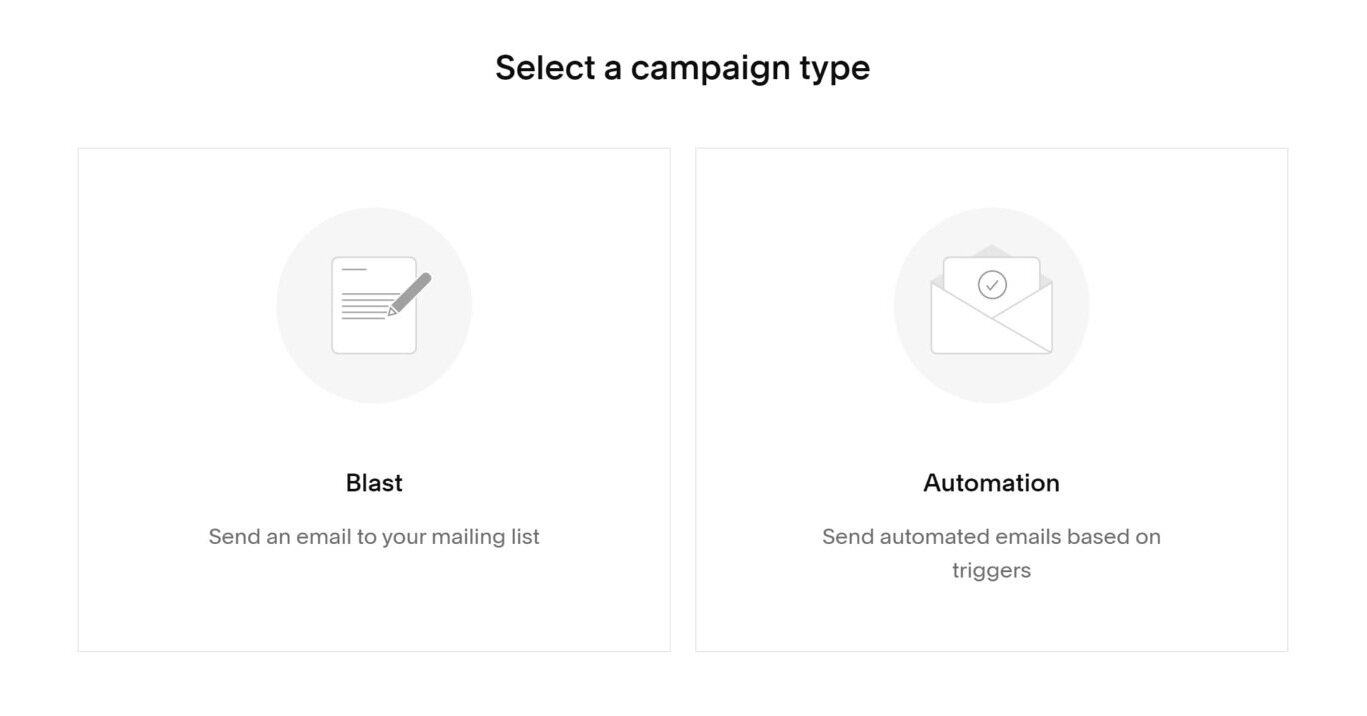
On the next screen, click on the Customer Activity tab and select from one of the three options.
Hint: there’s nothing different about any of the actual behind-the-scenes set up to any of these options, you’re just picking one because Squarespace will then display templates for you to choose from that fit what you select. If you plan on re-using one of your own templates it doesn’t really matter what you pick here at all!

Once you’ve selected from one of the premade templates or chosen one of your own, the email editor screen will open up. You’ll create, edit and style your email like normal. However, on the “Email” tab to the right you’ll also see the automation options available to you.

The top section is already set for you indicating that the automation will be sending after a purchase is made so the only things left to take care of are 1) which products this email should be connected to and 2) when to send it.
Products - you can select as many or as few products as you want to be connected to this email. If the content of your message is pretty generic (it could apply to any product someone purchased from you) there’s also a quick option to just toggle it on for “Any Product”. Other than that, you just click on the specific product(s) that you want to connect. Hint: although at the moment you can’t trigger based on shop categories you CAN use the search box above the product list to search by category. This makes it fast to filter down and see products that are just in that category even if you do have to select them one-by-one!
Timing - You can choose from any of the preset time delays or choose your own. Emails can be scheduled as far as 60 days out after the date of purchase. Also, although you can technically choose to send your automated email “immediately” after purchase I would recommend not doing so. The reason is that the standard order notification email gets sent immediately after purchase as well and getting two emails back-to-back might seem confusing or spammy. Even if you’re wanting to send an initial “thanks for your purchase” email, I would schedule it for at least 1-2 days out so that it feels more personal. You can also then use that email as an opportunity to get people excited that you’re working on their order or that it should be shipping/arriving soon, etc. (More on that below!)
When you have everything set up the way you like it be sure to hit “Activate Automation!”
Sending Multiple Emails Per Purchase

Here are some automations I have set up on my own site.
Now that you’ve seen how easy it is to set up an email triggered by a product purchase, you may have some ideas about other follow-up emails you want to send too! It’s easy to see all of your automated emails in one place by clicking on Automations from the main Campaigns screen. Here, you’ll see an overview of all the automated emails you have set up - including ones that are triggered by both subscriber activity AND customer activity. For this reason, I recommend giving your emails helpful names and even numbering them if you have to. Customers won’t see these names (they’re just for you!) so these are just a way for you to keep track of what emails do what!
If you want to set up an email series triggered by the purchase of your signature product, you’ll just repeat the steps above to create each individual email. In the Timing settings, you’ll then define when you’d like each email to send. I love this setup compared to some other email marketing platforms that require you to create duplicate workflows for each product series. In Squarespace Campaigns if everyone gets the same initial email but different second emails, you only need to create the initial email once and just tell it to apply to any product purchase. You can then set up your next emails based on either a specific product or a group of products.
Product-Specific Email Ideas
Squarespace provides templates for the following types of post-purchase emails for a reason - they’re all great ideas for ways to follow up with your customers after the sale!
Say Thanks to Customers
Recommend Additional Products
Send a Coupon to Customers
In addition to these ideas, here are some that go even further in creating an exciting brand experience for your customers. (Note that some of them require you to set up some things outside Campaigns as well, such as using Customer Profiles or Zapier.)
Let customers know when similar products or services go on sale
Send a delivery confirmation email asking if they received everything ok
Ask for feedback or a testimonial/review
Send an email that includes the most common product-specific FAQs right in the body to save them having to hunt them down on their own
Send links to product use/care guides to help them take care of or get the most out of their purchase
If your product is something they would run out of or need more of, follow up to remind them it’s time to purchase again
If your product is a service, send emails to remind them to log in or access your resources
Hopefully, these ideas spark some of your own that are specific to your own brand and what you’re selling! The most important thing is to just think of emails like this as a way to extend the brand experience. And just because they’re automated doesn’t mean that they shouldn’t feel personal! In fact, this is a great way to really make a lasting impression on each and every customer or client to encourage them to keep coming back for more. If you liked this post, be sure to also check out this one: 4 Post-Sale Emails Every eCommerce Site Needs!

The Squarespace Plugins for eCommerce Sites a Pro Uses
Plugins are a great way to take your Squarespace site to the next level, especially if you’re an eCommerce business! If you can copy and paste, you can achieve some really cool things that will make the shopping experience more engaging, easier to manage and just a little bit cooler than the norm.
If you’re looking for a way to take your eCommerce site from basic to the next level, Squarespace plugins can really come in handy! Think of them as the little copy-and-paste snippets that you can use to tweak some of the out-of-the-box functionality. The one thing I want to stress is that you shouldn’t be stressed when you click on any of these links and see code staring back at you! For the most part, all the heavy lifting is done for you and where things are a little more complicated, well, that’s what tech support is for :)
At the least, checking these out will let you know what’s possible on your Squarespace eCommerce website! I’ve built tons of eCommerce sites and write a lot of code myself but the plugins on this list are some of my favorites that I find myself either turning to time and again or keeping in my back pocket for just the perfect occasion!
Upsell Page (Free)

Product Breadcrumb Extension (Paid)

Squarespace built-in breadcrumbs will get you back to your shop’s home page but what about the product categories & subcategories?! No worries, this extension makes it easy to display nested category breadcrumbs on any Squarespace 7.1 site.
Featured Product Tag (Free)

I contributed this plugin to Ghost so, of course, I had to include it on this list :) In this plugin, I used the featured item toggle to create a special product tag. This is a great way to draw attention to featured items in your shop.
Done! Go to Cart Message (Paid)

Something that’s cool about Express Checkout for single product stores is that it automatically directs people right to their cart after choosing an item. To replicate a similar experience for a multi-product store, grab this super plugin! It just makes it easy and engaging for people to get to checkout faster.

I really like this plugin because it offers you a way to engage customers after they purchase. It’s a great way to provide or ask for more information without cluttering up your checkout experience, something I expand more on in this post: Website Tips From an eCommerce Pro. The demo shows an email sign-up form and social media links which are both great options but you could also use this to let people know what to expect next or provide other helpful links.
Testimonial Slider (Paid)

I really like this minimal-looking testimonial slider and providing some social proof like this is a great thing for almost any site. This is a paid plugin but there are so many awesome customization options that make it easy to change up the look! Ghost also has some other paid testimonial slider plugins with some slightly different styles so if this one isn’t for you in terms of aesthetic, be sure to check the others out!
2nd Nav Button (Free)

If your solo nav button is feeling lonely, give it a friend! This plugin allows you to add a second header navigation button to any Squarespace 7.1 site. You do have to edit the code just a little depending on how many menu items you have in your navigation but that could not be any easier!

If you sell items with lots of color variations, this is a great plugin that allows you to display a color picker instead of the standard text menu. I will say that this is probably one of the more technical plugins but SQSP themes has great email support. Bonus: if you’d rather show an image of a fabric, texture, or pattern for each option instead of just a color - you can do that, too!

This plugin is great if you are looking for a way to display things like sizing charts or other additional product info as a pop-up versus including it in the product details or even as a FAQ-style accordion dropdown. You can include any type of info in the pop-up just like a regular page!
Simple Pricing Tables (Free)

I really like following Beatriz Caraballo’s posts because she does a great job at walking you through how and why the code works but if the sight of code makes you a little 🤢 you can always just skip to the bottom of the post to grab the code to copy and paste! I really like this solution for pricing tables because it doesn't require using the markdown block, which I typically use for things like FAQ pages. If you’re a service-based business you def need this!
Product Shop Labels (Free)

This is another one from Beatriz Caraballo that walks you through each line of code and it’s similar to my featured product tag code, above. This takes things a step further and allows for different labels based on what you tag a product which is a good solution if you want to have multiple labels such as “coming soon”, “new” and “sale”. For just one tag, I would just go the featured product route because it’s less code.
Universal Filter (Paid)

Ok, this is definitely the most technical plugin on this list but it’s also one of the most powerful. This is not one you’re probably going to want to install yourself but once it’s up and running, it makes filtering through multiple categories and tags super easy. This makes for such a nice shopping experience to be able to filter down to just exactly what you’re looking for. Awesome customer support via email!
Bottom Line
Plugins are a great way to take your Squarespace site to the next level, especially if you’re an eCommerce business! If you can copy and paste, you can achieve some really cool things that will make the shopping experience more engaging, easier to manage and just a little bit cooler than the norm.

How To Set Up a Profitable Shipping Strategy on Squarespace
The secret to not losing your shirt (and your mind!) when it comes to shipping is to take care of both sides of the shipping equation - what your customers see and what you do behind-the-scenes. Check out this post to also find out which shipping method and shipping extension combo I recommend most!
Ah, shipping - the apparent bane of every online seller’s existence. It can sometimes feel like you’re being squeezed on shipping at both ends; customers want low/no cost while carriers seem to charge more and more at every turn.
A lot of eCommerce shop owners start looking at shipping extensions as a solution thinking that will magically take care of everything - but they only take care of half the problem. In this post, we’ll look at understanding both sides of the shipping equation and how you can optimize both. Keep reading to also find out which shipping method and shipping extension combo I recommend most!
The Shipping Equation
Shipping is just like any other product you sell in that there are two sides to the equation and both need to be taken into account to determine profitability. On one side we have what you charge your customers for shipping, on the other side what carriers are charging you. The difference between the two (if there is any) is profit.
Despite how obvious it seems, I often see online sellers ignore either one side of the equation or another. Some people set unnecessarily high shipping costs for their customers in an attempt to “recoup” what they are being charged. Others offer free shipping because they know it’s an attractive option but then don’t limit who is eligible for it and end up seeing red because of it. So, you have to take care of both sides, okay? Here’s how:
Taking Care of the Customer Side
The first side of the shipping equation is the customer side, or what you charge your customers. When it comes to setting up shipping rates on Squarespace you have a few options:
Flat Rate Shipping - charging the same cost per order, with the option to increase the cost per each additional item in the order
Rates Based on Weight - charging based on the total weight of all items in the order; requires you to input your own cost tiers
Carrier Calculated Rates - charging based on weight, dimensions, and destination address; cost is calculated automatically from the carrier(s) you choose (FedEx, UPS, or USPS)
Free Shipping (for all orders) - set up in the Shipping section as a shipping option
Free Shipping (for only certain orders) - set up in the Discounts section either as a promo code or an automatic discount based on criteria you set
From a purely cost control point of view, carrier-calculated rates appear to be the best option since you’re getting variable rates directly from the carrier you’re going to ship with. This makes you think that you’re going to be able to charge your customer exactly what you’re going to get charged but variable shipping rates can be super frustrating and off-putting to customers. Since they never know what to expect and are often surprised by what they see when they get to the checkout, this option results in super high cart abandonment rates and discourages higher dollar value orders. If we’re working through a process of elimination, I would rule out Rates Based on Weight for these same reasons.
This leaves us with flat rate shipping or a couple of free shipping options. My recommendation? Go with a combo of both!
Game Plan:
Set a per order flat rate cost that covers some nominal amount of whatever it costs you to ship your average order. Don’t worry about making it cover everything, just make it something easy. Like $5. Or $7. Or something relatively easy to stomach.
Set up an automatic free shipping discount for orders above a certain amount, ideally somewhere just north of your current average order value. You’ll be surprised at how many people choose to add just a little something to their cart in exchange for free shipping! I wouldn’t offer free shipping to just anyone though so be sure to set this up in the discount section, not the shipping section!
Why This Combo Works:

Oprah keeps it real.
People hate feeling nickel-and-dimed and love feeling like they got a deal. Offering a flat rate that will apply to orders under your free shipping threshold feels honest and transparent and ensures that shoppers won’t face any nasty surprises in their cart.
Setting up an automatic free shipping discount encourages people to spend just a little bit more while still making it easy - no coupon code required! This combo is also super easy to promote! Imagine how simple it would be to boil your shipping offerings down to something as easy as: “$5 flat rate shipping. All orders over $45 ship free, no code required!”
The Quick Case for Free Shipping
I go into all the pros and cons of free shipping in this post: eCommerce Strategy 101: Should You Offer Free Shipping? but here are some of the benefits of this for anyone with lingering doubts about how well it works as a strategy. Free shipping:
Reduces cart abandonment rates
Increases conversion rates
Boosts revenue
Increases order volume
Increases average order value
Helps attract new customers
Encourages repeat visitors
Boosts loyalty, and more!
Combined with a minimum order amount requirement and a low flat rate for any orders below that amount, you’ve got a winning combo for the customer side of our shipping equation.
Taking Care of the Merchant Side
Alright, now that we have the customer side under control it’s time to get things in order behind the scenes. Just like on the customer side, you have some options:
Set up an account with the carrier(s) directly and manage shipping on your own. I used to work in shipping and logistics and let me tell you, this is a full-time job in and of itself! If you go this route you’ll need to take care of setting up and maintaining the system that you’ll use to pull in order info, generate and print shipping labels, and then send shipping data like tracking information back to Squarespace. You’ll also be responsible for negotiating your own shipping rates which may be tough if you don’t have the order volume to use as leverage.
Manually process shipments without an account by just showing up at the post office (or FedEx/UPS store) and hoping for the best! 🙃 With this option, you still have to do all the work as the option above (manually creating labels and entering tracking information) with the additional wildcard of having absolutely no negotiating leverage and absolutely no idea of what each shipment will cost.
Use a shipping extension that will automatically pull in order data to an organized system, generate shipping labels for you and send order data back to Squarespace without you needing to lift a finger. With this option, you also get to take advantage of discounted shipping rates that have been negotiated and set up on your behalf.
I think you know what I’m going to recommend here, right? :) Using a shipping extension is a no-brainer because it saves you both time and money, working to trim down the cost of shipping on the merchant side of our shipping equation.
What Are Shipping Extensions & How Do They Work
Shipping extensions are basically apps that use the Commerce API to pull in order data to a third-party platform that takes care of all things shipping for you. Some popular Squarespace shipping extensions are ShipStation, GoShippo, ShipBob, and Easyship - see the section below for my fave!
All of the shipping extensions with native Squarespace shipping integrations work pretty much the same way. You’ll sign up for an account directly with the app you’d like to use, then sign in and connect it to your Squarespace site. When orders are placed, the order information will get automatically pulled into the extension and a shipping label will be created for you to print when you are ready to ship. Once shipped, the tracking information will get sent back to Squarespace and automatically included in a shipping confirmation email to your customer. The rates you receive will be based on whatever discount the app has negotiated with the carriers you’ve selected.
One quick note: a common misconception about shipping extensions is that connecting one to your site somehow “takes over” the shipping options that are displayed to your customers at check out. What you need to remember about shipping extensions is that they only take care of the merchant side of the equation. The time and cost savings they offer still need to be balanced out with a winning customer-facing strategy like above!
My Favorite Shipping Extension: Easyship
Knowing that all shipping extensions work in essentially the same way, how do you go about choosing one over the other? Well, let me save you the agony of starting a bunch of free trials and testing them for yourself :) My fave is Easyship. Here’s why:
As its name implies… it’s easy. Some of the other extensions have complicated user interfaces and offer a bunch of unnecessary options. Easyship has a nice, clean interface and offers just enough options to allow you to customize the experience without feeling bloated.
The discounts are great! You can check them out using their shipping rate calculator here.
They have some of the best zap triggers, including one of my favorite ones: being able to trigger an email once a package is delivered! I love getting an email when orders are delivered so that I know to be on the lookout for my packages. This is just another helpful way to extend the customer service experience beyond the sale.
If you’re interested, you can also check out this post for more on each of the shipping options: A Minimalist’s Guide to Squarespace Shipping Extensions.
Bottom Line
A profitable shipping strategy needs to take into account both sides of the shipping equation: the rates and options you offer to your customers + the service and rates charged to you from carriers. You can’t just work one side or the other, you need to pay attention to both. On the customer side, a combo of flat rate plus free shipping for orders over a strategically set amount will create happy customers and increase orders. On the merchant side, a shipping extension like EasyShip will make sure you have the best rates available and save you time and headaches when it comes to shipping and fulfillment. Win-win!

When Not to Integrate Shopify and Squarespace
Taking a look at the reasons not to integrate Shopify into Squarespace by asking some tough questions and getting really real! Learn about the 5 worst reasons to integrate these two eCommerce platforms, plus some disadvantages and alternatives to this idea.
Sometimes it’s as important to know when NOT to do something as it is to know when to do it. A lot of people ask about how to integrate a Shopify shop into a Squarespace website and there are a couple of options for this that might work well for some. But although some think this hybrid approach is going to be a “best of both worlds” solution, the actual answer to whether this is a practical solution for you depends on what you’re attempting to get out of doing so.
So, if those other posts are the argument FOR doing this (or at least letting you know that it’s possible) this post is the argument AGAINST. I just think it’s important to define both sides of the argument so that you can fully understand the pros and cons of each setup and decide for yourself which is the best route!
Why Do You Want To Do This?
Whenever someone reaches out to me asking about integrating Shopify into Squarespace, I usually reply to them with some initial questions along the lines of:
Are there features you feel like you’re missing on Squarespace that you think Shopify offers instead?
Is it because someone else told you that you should be on Shopify?
What do you really love about your current site? What’s not working?
What is the potential desired outcome of doing this? What would be your ideal?
Here’s why I ask these questions:
By digging deeper into the WHY behind wondering about integrating a Shopify store into a Squarespace website, we can get to what the real “pain points” are. Sometimes they are real issues; sometimes it’s just because someone felt like they “should” do it ¯\_(ツ)_/¯
Asking about what someone really loves about their current site also lets me know what to prioritize. This is as important as understanding the pain points because it would be horrible to fix one small problem only to have a bigger one crop up.
Keeping the desired outcome in mind allows us to focus on the bigger picture instead of nit-picking silly little details.
5 Bad Reasons for Wanting to Integrate Shopify & Squarespace
Someone told you to - this is a horrible reason to make any kind of business decision but if I had a dollar for every person who started their query with “Well so and so said I really needed to be on Shopify…” well, let’s just say I would be on a beach somewhere with a margarita right now. Honestly - are you going to let someone else armchair quarterback YOUR business?
You want to use an app from the Shopify app store - sorry to be the bearer of bad news but this isn’t going to happen. Shopify apps are NOT compatible with the Shopify Buy Button so if you’re thinking you’ll be able to use a Shopify app on your Squarespace site by doing this you’re going to be disappointed.
You think it will be “easier” to manage - LOL why? When has managing two systems ever been easier than managing one? Walk me through that. Explain it to me like I’m five.
You think the checkout experience is better on Shopify - this is a myth stranger than the existence of the Loch Ness Monster. Squarespace’s checkout experience is simple, smooth, and proven to be a highly converting experience for customers.
You want to use Shopify POS - perfect but before you go through all that work, did you know that Squarespace has a pretty awesome POS setup that’s 1) automatically connected to your website and ready to go right now 2) allows you to sell in person and collect payments via Square 3) included for free with Squarespace commerce plans and 4) super mobile friendly? (Check it out here.)
Disadvantages & Alternatives
In addition to the notes above, here are some other general disadvantages to integration:
Even though the Shopify Lite Button is only $9/mo, it’s still an additional expense that you may not need to take on. Worst yet, sometimes people end up paying the full subscription cost for both platforms and then running essentially dual platforms for no reason. Twice the cost, twice the work. No bueno.
Styling options for embedding Shopify are pretty decent but a keen eye will still be able to distinguish between what elements are native Squarespace and which aren’t. Nothing is going to compare to just using the built-in Squarespace shop and checkout options when it comes to brand consistency (fonts, colors) and style.
You should also remember that both platforms (Shopify & Squarespace) come with their unique strengths and weaknesses. As great as it would be to be able to cherry-pick just your favorite parts of each and meld them together into one “perfect” solution, that’s just not realistic. You’re still going to have pain points if you don’t address the actual issues.
Alternatives to Integration
Clearly identify what you feel isn’t working on Squarespace and fix it there. It’s honestly probably way easier to do this than bring on a whole other system as a band-aid. Chances are there are some features or elements of Squarespace that you’re just not using to their fullest potential that would make life a whole lot easier. There may also be a simple plugin or code solution to your problem that would hold up better in the long run.
If you truly must have two sites, I think using a tool like Trunk (see my review here) to sync inventory between multiple shops is often a cleaner solution than embedding. A bonus with Trunk is that you can also sync inventory with all your other sales channels like Square, Quickbooks, Faire, Etsy, or Amazon!
Sometimes what people think is a website problem is actually a business, systems, or people problem 😬 Eek, I know, right?? It’s tough to admit but true. While your website is definitely a super-powerful business tool, it’s still just one part of your ecosystem. Making a huge change with your website to avoid making a small change to your business processes or your people is short-sighted and will severely limit growth in the long run. We put a lot on our websites because we think technology can handle everything but at the end of the day, even the best website can’t make up for broken people or processes.
Bottom Line
Real talk: 9 times out of 10, I end up advising someone to just go all-in on one platform or the other. Using the Shopify Buy Button as a solution is super cool IF you need it but with so many ongoing improvements on the Squarespace commerce front, I think those specific use cases are becoming fewer and farther between.
Integrating seems like it’s going to be the “best of both worlds” solution BUT it also means that you’ll always end up feeling like you’re dividing your attention between your “website” and your “shop.” And really, you want your website and your shop to be united and cohesive; when it comes to eCommerce, they definitely should be one and the same.
You know I love a minimalist solution that keeps things as simple as possible so instead of dividing and conquering, I would just choose the best tool for the job from the get-go and focus on getting the most out of it as possible.
p.s. If you’re wondering what tool I think is best check out this post: What eCommerce Platform am I Recommending Most These Days!

How to Connect Squarespace to Anything
Learn how to connect Squarespace to pretty much any other app you use for your ecommerce business - without needing to pay for or manage a bunch of random third-party apps!
This is probably going to be one of the more “techie” blog posts I’ve written recently but I’m going to put a giant disclaimer right here upfront: DON’T BE DISCOURAGED BY TECHNOLOGY! Once you learn how things work, even in general, the mystery kind of falls away and even if you don’t want to take on any of the nitty-gritty yourself you will at least know what’s possible! Because if you’re running an eCommerce business on Squarespace, knowing stuff like this is GAME CHANGER status. First, some background!
One of the reasons people seem to think they need to go with Shopify over Squarespace is because they see an app they like from the Shopify app store. And I can see why - there are tons of shiny apps there that seem like they are going to be revolutionary for your business. A few problems I have:
It’s way too easy to fall into needing 3-5 paid Shopify apps and even if you’re only paying a few bucks a month for each, those subscriptions can add up to major $$$ each month.
Not all apps play nice with each other and adding a bunch of random apps can add a ton of unnecessary bloat to your site. This can cause bugs or problems that Shopify isn’t responsible to help you fix since they are caused by third-party apps.
If you’re using the Shopify Lite Button to connect Shopify with Squarespace, you can’t use any apps at all anyways since they are just straight-up incompatible. So there you go.
You know that I’m a huge fan of a highly functioning site AKA one that works as hard for your business as you do. This is exactly why I rely on Squarespace Commerce APIs to strategically add capabilities to my beautiful Squarespace websites without the need for apps or bloat. In this post, I’m going to give you a 30,000-foot view of how this works, how to get started and some ideas on how to connect Squarespace to pretty much anything else. Because, as the title suggests, with Squarespace Commerce APIs you can do ANYTHING your little heart desires.
How APIs Work
Simple answer: APIs are just the way different apps talk to one another. Each software has data/information that it can send in response to a request for that information from another app or software. Each software (like Squarespace) determines what information it will make available and sets the parameters for how to inquire about it.
I think of it kind of like this (using Squarespace commerce as an example): your site has tons of info about who ordered what and when, whether things have shipped and how, how you were paid, etc. And without asking any questions, that information is mostly just stuck in Squarespace. BUT all that data is there and available to you - if you know to ask for it. And (here’s the fun part) you can use that information in all sorts of behind-the-scenes aspects of your eCommerce business. From marketing campaigns to fulfillment and logistics, using the data your site has stored up for you to automatically inform/trigger other actions is magic.
The last cool thing about APIs is that now that you’ve got systems talking to one another, you can do more than just ask for information -- you can also PROVIDE information! This means you can do things like telling Squarespace you shipped an order or to adjust a stock level automatically after receiving a shipment of inventory. 🤯
Webhooks
So, where an API is a request for information that demands a response, a webhook is more passive; waiting for the information to roll out. One is a push and the other is a pull. A webhook is basically like when you sign up to get notified about when something comes back into stock. Sure, you could ask every day: Is it in yet? Is it in yet? Is it in yet?... but with a webhook, you can just sit back and wait. You’ll get the news when there’s news to share.
Zapier
A Lot of people start zoning out when it comes to APIs/webhooks because they see things like this and just say NOPE 🙅♀️

But remember what I said at the beginning of this post? You are not going to let strange-looking code freak you out! Why? Because you have Zapier. There’s a reason why the tagline is “Zapier makes you happier” and it’s not just to help you remember how to pronounce it. :)
Zapier basically takes what can otherwise be a little overwhelming (code!) and turns it into simple formulas AKA zaps. Each formula (zap) contains one trigger and at least one action. The trigger is the catalyst that sets the whole rest of the chain in motion and the action is the thing (or chain of things) you want to happen. Zapier makes it easy to piece together all the bits and pieces all your apps require to talk to one another and gives the conversation a home.
Most people love Zapier because all their favorite services (like Squarespace) have built-in triggers or actions that make setting up zaps crazy simple. You can literally just pick from the list, fill in the blanks and you’re in action.
But let’s check out the built-in options for Squarespace:

Boo :( Just one trigger - and a kinda boring one at that: new form submission. I mean, this is helpful for some marketing activities and can help you get subscriber info into other apps (more on my favorite tech stacks here) but beyond that, it’s kind of MEH.
This is where just even having a basic understanding of APIs and webhooks comes into play. Because now that we know that there’s info there and we just need to either know to ask for it or to sign up to get notified about it, Zapier can help us connect Squarespace to literally ANYTHING-even if there aren’t any built-in triggers or actions for us to choose from. The trick is the unassuming-looking Webhooks by Zapier integration which can be set up to kick off a workflow or send info as a result of another trigger.
Now, I will admit that this is where things can get a bit technical but just a reminder: the goal here is that I think it’s important that you know what’s possible, even if setting it up yourself isn’t your jam. Just understanding that you can connect Squarespace to whatever email marketing platform you want, or that you can automate parts of your fulfillment process, or that you can connect your website to your CRM or project management software is what matters.
✅ It’s important to know that just because Zapier shows only one measly built-in trigger that you’re not limited to just that.
✅ It’s important to know you shouldn’t rule out Squarespace as a super-powerful commerce solution just because there isn’t a native integration between it and your other favorite apps.
✅ It’s important that you feel empowered to explore out-of-the-box solutions for your Squarespace eCommerce business with confidence.
The Squarespace Commerce APIs
Ok. So. The first half of this post was pretty heavy-duty. You learned a lot. You got a little pep talk. You’re (hopefully) ready to explore just all you can do to connect Squarespace to whatever other apps you’re using in your business. Enter: the Squarespace Commerce APIs. This is where Squarespace tells us exactly what information is available to us and what information we can edit ourselves from outside the platform.
Remember, just like above, some things push for info, others pull. Some things are triggers, others actions. If you dig into the API documentation you’ll see that slightly different words are used for these: GET and POST. This is just the API way of saying push or pull. A GET is a request for information, a POST is a depositing of information.
In the sections below, I’m going to give an overview of all the different triggers and actions you can set up in Zapier so that you know what’s possible! Hopefully, it will help you start to see just how powerful Squarespace commerce can be and get your mind thinking about ways to connect and integrate it into your own workflows.
Inventory API
What it does: Allows you to access and/or edit stock information for products + product variations on your site
What you can do:
Retrieve all inventory
Retrieve specific inventory
Adjust stock quantities
Ideas:
Automatically pull inventory into a spreadsheet so you can manage things like stock levels or product availability without needing to go item-by-item on your site
Automatically adjust stock quantities based on incoming shipments or sales through other channels
Orders API
What it does: Allows you to access the order history for your site, including both one-time orders and recurring orders/subscriptions.
What you can do:
Create an order
Fulfill an order
Retrieve all orders
Retrieve a specific order
Ideas:
Import orders from other sites or sales channels, mark orders as fulfilled, and then trigger shipment notifications through Squarespace.
Automatically mark orders as fulfilled when you mark them as done in your project management system
Pull all pending orders into a spreadsheet so you can have a list of what needs to get shipped out that day
Lookup order info and pull it into your CRM automatically so that you can instantly see the status and details of what people ordered when chatting with them
Products API
What it does: Allows you to manage your products and product variations. You can also manage product images and add/delete/modify products.
What you can do:
Create a product
Create a product variant
Upload a product image
Retrieve all store pages
Retrieve all products
Retrieve specific products
Product image upload status
Assign a product image to a variant
Reorder a product image
Update a product
Update a product variant
Update a product image
Delete a product
Delete a product variant
Delete a product image
Ideas:
Manage product info in bulk from a spreadsheet
Automatically adjust pricing for specific products or shop categories without needing to open each product and/or product variant in Squarespace
Automatically delete products that are discontinued or no longer available
Update product images after a new photoshoot in bulk
Profiles API
What it does: Allows you to manage site users
What you can do:
Retrieve all profiles
Retrieve specific profiles
Create or update a profile
Update a profile
Ideas:
Pull all site user information into a spreadsheet for analysis or reporting
Lookup specific user profile information and add it to your CRM so that you can automatically see things like how long they’ve been a customer, how many total orders they’ve placed, and how much they’ve spent over their lifetime.
Automatically update a Squarespace user profile to indicate that they’ve opted out of receiving marketing emails in a third-party email marketing platform to make sure you’re complying with anti-SPAM laws.
Transactions API
What it does: Allows you to access transaction history for orders (or donations) on your site
What you can do:
Retrieve all transactions
Retrieve specific transactions
Ideas:
Automatically pull all transaction history before or after a certain date into a spreadsheet for analysis or reporting
Create a backup of transaction history for auditing purposes
Webhook Subscriptions API
What it does: Allows you to subscribe to notifications from your site with webhooks.
What you can do:
Create a webhook subscription
Update a webhook subscription
Retrieve all webhook subscriptions
Retrieve a specific webhook subscription
Delete a webhook subscription
Send test notification
Rotate a subscription secret
Ideas:
Automatically send notifications to production any time a new order comes in
Automatically send a notification to management any time an order is updated
Automatically receive a notification any time a Squarespace extension is uninstalled from your site
Bottom Line
As I’ve said a few times now, the point of this kinda technical post is really just to let you know what’s possible with Squarespace. I’ve seen a lot of shop owners choose Shopify over Squarespace just to take advantage of slick-looking apps only to be frustrated by mounting monthly subscription costs and let down by a bloated, disjointed experience managing everything. Even if it’s not your ambition to understand exactly how APIs and webhooks work, my hope is that learning just a bit about these things can help you feel empowered to make more informed decisions when it comes to your business website.
If You Want to Learn Zapier
I’ve used Zapier casually for many years but last year decided that I really wanted to dig deeper because I knew I wasn’t using the tool to its fullest potential. I’m kinda obsessed with productivity and automation so learning more about Zapier was really fun and helped me be able to explore some of the more technical aspects with confidence. I 100% attribute this to taking Jimmy Rose’s Zapier Mastery course.
Of all the online courses I’ve taken over the years, this one has offered the best ROI by far. Jimmy explains things in an easy-to-understand way and uses lots of examples that help bring the concepts to life. The course link above is an affiliate link but this post is by no means sponsored by Jimmy; I just thought I’d give it a shout-out because if you’re also interested in learning more about Zapier, it’s definitely worth checking out. If you’re looking for some more on this topic you can also check out this other post of mine: Fun With Zapier for eCommerce!

The Best eCommerce Templates for Squarespace
Selecting a Squarespace template is easy if you know what to look for and how things work. In this post, I’m also shouting out my favorite free and paid Squarespace template for eCommerce!
In my recent post all about what it costs to start an eCommerce website in 2021, I touched on one of the bigger variables: your website template. And it’s not just the actual Squarespace template cost that you need to consider when deciding which one to go with; it’s important to factor in how closely the template design is to your vision for the finished look & feel of your site as that will impact the time and resources needed to get there, whether on your own by hiring a designer/developer to work on things for you. On Squarespace, you have the option of choosing one of the built-in templates or buying one from a third-party seller. I’ll break down the pros and cons including some of my faves in each category! If you’re looking for more on how to decide or what to look for in a template, definitely check out this post as well: How to Pick the Right Squarespace Template for Your eCommerce Site.
Built-In Templates
As I’ve mentioned before one of the strongest selling points of Squarespace is that the templates are all modern-looking and stylish (and free!). Another bonus is that all templates have the same functionality so you can’t really go wrong by choosing one and then making changes later. I still think it’s worth it though to select a strong contender from the start to save time and money in the long run and help you be able to launch faster. Check out the details for my three favorite built-in Squarespace templates for eCommerce!

Crosby
What I like:
Don’t let the darkness of Crosby dissuade you from selecting it for your eCommerce site! Colors are super easy to change! The reason why I think this is one of the better starting point templates for eCommerce is because I just love the home page layout! I love that you get an overview of everything followed by links to some popular shop categories. I like that it’s both informational (links to blog posts) and transactional (gift cards!). It’s nicely organized and would be easy to customize to suit pretty much any type of shop.
What I would add/change:
I would definitely add some shop categories and a filter to the shop page so that people can drill into the exact items they’re looking for faster. I also hate dead ends on websites (I know that this is just a demo, but still!) - so I would make sure that all the non-shop pages like the blog and the About pages all have links to relevant areas of the shop to keep people moving in the right direction.

Almar
What I like:
Almar is just clean and fun right out of the box! The “Get Started” page the demo has would make a great home page layout for a service-based business or shop with only a few items. If you had a larger store, adding links to the home page to shop categories or sections with summary blocks of new products would be a great way to tell your story + get people shopping. I also like that there is a consistent and clear call-to-action: booking a free 30 minute call. For a more traditional take, this could become a link to your most popular product(s) or a special offer that you’d like to highlight.
What I would add/change:
I’m not a fan of vague-ly titled web pages so I would definitely rename the “You” page to something more clear and direct. If this was the site for a real shop, I would also make sure that the contact page has a form on it since that’s an important feature for online shoppers. I would also be sure to add an FAQ page since those are invaluable to an eCommerce website!

Myhra
What I like:
The Myhra template is a hidden gem! It really showcases all that a small business owner can do on their Squarespace website; the fictitious Myhra offers coaching and consulting, online courses, live events and has an interesting blog! She could definitely add a little shop of food-related merchandise and I’d be a customer 😂 What I think is really working here is that the navigation makes it so easy to see all that is offered at a glance and even though there are lots of options and ways to interact with this site, I’m not overwhelmed at all.
What I would add/change:
I would turn the blog categories for the seasonal recipes and menus into clickable filters so that people could easily find, say, all fall recipes with blueberries, for example. If this site had a shop I would also make sure to feature products from the shop in each of the posts and then link to them with product blocks. I also love that when I land on each of the pages for things like Services and Coaching that I can see all the options but it might be even better to also add the individual offerings to a drop down menu so that a user could jump to them right to them instead of having to click twice.
Third-Party Templates
If you’re looking for a little more style and something that’s kind of a “step-up” from having to work on making the most of a standard template yourself, it may be worth it to invest in a paid Squarespace template. There are lots of people out there selling Squarespace templates these days and with most templates well under the $500 mark, this is an economical option if you’re not able to go all-in with a dedicated web designer.
Of all the options out there, I think it’s important to choose one that has an established reputation and provides great customer service. I recommend either GoLiveHQ or Ghost Plugins because they win on both of these fronts. GoLiveHQ templates tend to be a little more feminine/playful in style and Ghost is a little more modern/trendy.
Both work in pretty much the same way; upon purchase, your chosen template will be installed into your Squarespace account as a new trial site. You don’t have to watch hours of training videos, understand how to code, or need to be super techy to make the most of them… although just like with standard Squarespace templates, I would definitely recommend making tweaks as needed to suit your brand and make your site unique. You’d be surprised how just some easy style updates via the built-in Squarespace style editor to colors and fonts will help make your site feel like you! Here are some of my faves!

Club Collective by GoLive
What I like:
This template would go so well with Squarespace’s new Member Areas feature! It’s got some of the signature GoLiveHQ style but I think it could still be easily customized to fit a different theme or color palette and look just as good! The interesting thing about this template is that it’s really just a one-pager - every except the “Get Started” page is just a section on the home page that’s linked to in the top navigation. This is a great idea if you only have one signature product or call-to-action that you need to focus on since it just drives everyone right down all the main info they need without even needing to click! I also really like the “pricing table” section on the homepage! If you have a more traditional “shop” this template may not be for you but I think it’s got great style and structure for a modern, service-based business owner looking to sell a membership or course.
What I would add/change:
I would pay attention to how long the top navigation words/phrases are since they stack onto a second line when I view the demo on my laptop and that kinda drives the organizational freak in me a little nuts 🙃 Beyond that, I would really just focus on making sure all the unique backgrounds and graphics scale well on mobile since that can be one of the tricks to making sure this type of design works for all users.

Mint by Ghost Plugins
What I like:
This template perfectly shows how to take an average Squarespace template and bump up the design factor big time with a little CSS and some creative layouts. The demo is set up to showcase a shop with just a few signature products or subscriptions but it would work just as well for a shop with more products that also wanted room to tell their brand story with a little flair. I especially love the contact page layout because it combines typical contact info plus some room for FAQs - such a great idea! Another strong point is the super organized footer - web visitors are used to heading to that space to find all the links!
What I would add/change:
There’s not a lot I would change about the general page layouts (unless the content just called for something different, of course!) but I can understand how if you’re checking this template out you might be concerned about the graphic dot background and some of the color/gradients that are used because they’re definitely not a match for everyone’s brand! Luckily, these are both super easy swaps - the dots are just an image background and the gradient can be controlled with CSS or removed if that’s just not your style.
Save 10% off any Ghost template with discount code: KRISTINENEIL

Harvest by Ghost Plugins
What I like:
This is a Squarespace template that does not look like a Squarespace template! I just love its style and TBH I would totally dine at this restaurant! 😋 It takes advantage of some current web design trends that will make your restaurant, cafe, or local shop really stand out: bold typography, bright color blocking, and some unique elements like the vertical navigation on the side. I also really like the way the template handles a brand with multiple locations - they’re organized nicely in the footer and have a great dedicated page for them as well. The primary call to action is clear (book a table!) but the secondary actions like connecting on social media are also inviting. My final favorite thing about this Squarespace template is that the menus are super engaging; digital menus are a trend that is NOT going anywhere and they are guaranteed to be mobile friendly!
What I would add/change:
In the real-life version of this site, I would work to build out the menus even more. I love the idea of the menu items having photos so I would just make dedicated pages that are similar in layout to the one they use in the demo version for all the different areas of my menu. The only other thing I would possibly add is a secondary button to the top for ordering online - these are both important CTAs and online ordering is an awesome feature to be able to highlight!
Save 10% off any Ghost template with discount code: KRISTINENEIL
Final Thoughts
Takeaways: you can’t really go wrong with any of the free templates offered by Squarespace. They all look great and offer the same functions and features. You may need to pay a little more to have a web designer or developer help you get the most out of one of the designs. If you’re looking for something even more unique and are looking to cut down development time and costs, try a paid template from a trusted source like one of those I mentioned above. This can be a great compromise between a fully unique design and a generic template and get you to launch day quickly!

Why I Love Squarespace for eCommerce
Proving that some things really do get better with age, Squarespace’s latest platform offers all the eCommerce features you need plus the design freedom you want. This post covers the highlights of Squarespace versus other platforms, Squarespace 7.0 versus 7.1, and tips for when it’s time to give your site an update.
I’ve been building eCommerce sites since the early 2000s and Squarespace sites since the mid-aughts so it’s safe to say that I’ve used pretty much every web design platform and tool out there and been through plenty of updates on all of them. In the tech world, it’s pretty easy to get left in the dust; things evolve fast and you have to adapt to stay relevant.
I’ll be honest, Squarespace did go through some awkward early teenage years but it’s really turning out to be aging like fine wine. In 2020, Squarespace launched its latest version of the platform - Squarespace 7.1 - and dare I say it’s the best one yet. If you’ve been at the eCommerce game for a while you may have been convinced that Squarespace was just a mediocre option but buckle up - here’s why it’s turning out to be the best of the bunch and why I love it not just for beautiful websites but awesome eCommerce sites.
Squarespace eCommerce Features
If you’re starting from scratch, you’re likely comparing Squarespace to other commerce platforms such as Shopify. Here are the standout features & differences:
You can sell literally anything. Products, services, subscriptions, appointments, digital content, memberships, and more… online, or in person.
No need to rely on third-party apps or plugins. The features, capabilities, and tools you need are just built right in. Examples: abandoned cart recovery, discount codes, gift cards, membership areas, related products, and product merchandising tools are all just standard features on Squarespace.
It’s secure and stable. With secure checkout on every device, you never have to worry about your customer’s data. Squarespace is PCI compliant and SSL-enabled right out of the box.
It’s an all-in-one platform that can handle everything you need. eCommerce life is just easier with everything under one roof including things like email marketing, SEO, order management, customer service, sales tax, and shipping tools.
Every single page is customizable. Other commerce platforms give you some options to personalize a home page layout but not much else without knowing how to code. With Squarespace, it’s easy to create a consistent and professional site that feels like you through and through.
Why Squarespace 7.1 is Awesome
You can have unlimited products per store “page”. On Squarespace 7.0, even though there’s no limit to the number of products you can add to your site overall, you’re limited to 200 products per Product page. This means that a lot of store owners had to come up with hacky ways to divide products up into lots of different shop pages, creating not just a nightmare mess on the back end but an impossible way for shoppers to fully see everything offered. On Squarespace 7.1, you only need one Store page because the limit is 10,000 products.
Subcategories & nested menus. I mean, this feature alone is worthy of being a standalone item on this list. Being able to create nested subcategories in your online shop makes it infinitely easier for customers to shop, browse, and discover all you have to offer. This is a game-changing feature over the flat shop hierarchy on 7.0.
Improved page editing, more flexible page layouts, and way more design freedom. Because all templates on 7.1 are just jumping-off points and include all of the exact same features, you’re not limited by the template you initially choose. In 7.0, selecting the wrong template from the start means you either have to live with its limitations or recreate your entire site when you invariably hit a roadblock. Bonus: on Squarespace 7.1, all pages are super customizable. You don’t have to choose between index pages or regular pages or gallery pages 🤷♀️ - they're all just pages and you can do anything and everything you want on them. You can even add additional content to store & product pages!
Improved mobile design. On Squarespace 7.1 your design will adapt to mobile devices and smaller browser windows automatically. There’s no need to tinker with separate mobile styling or worrying that what looks good on desktop is going to look disastrous on mobile. Again, it all just magically works.
It’s time to launch or switch your eCommerce site to Squarespace 7.1
Bonus: How often should you update your website?
Trick question because I think that you should always be updating your website :) but how often should you completely overhaul your website? Like, tear it down and build it back up again? Different people will tell you different things but for me, the rules are pretty simple:
If your products or services change? Update.
If your branding or messaging changes? Update.
If it’s been 3 years since your last big overhaul? Update.
That’s it. Pretty simple. Also, keep in mind that an update doesn’t have to be huge. If you’re on Squarespace 7.0, just moving to Squarespace 7.1 will make things feel fresh and modern even if you keep a lot of the same content and structure. And just like moving IRL, a new website is a great time to clean out old junk and start clean again!

Feature Review: Squarespace Member Areas
When it comes to setting up gated or members-only content (whether free or paid), I’ve tried nearly all of them but the one I'm most excited about (and will probably solely recommend in the future) is the newest Squarespace feature: Member Areas!
So Squarespace just keeps coming with the eCommerce improvements this year and the latest is one that I know everyone has been waiting on for a long time - member areas! When it comes to setting up gated or members-only content (whether free or paid), I’ve tried nearly all of them: Memberspace, Podia, Mighty Networks, and Kajabi to name a few. I’ve even done the whole password-protect-a-single-page thing! These solutions all have some good things to offer depending on what you’re looking for but you know my mantra when it comes to software and programs: why use two things when one would do just fine?
Say Goodbye to Stringing Things Together
I just love a seamless user interface but that can be hard to achieve when you’re using multiple tools. The result is either a disjointed experience, too much time spent on admin to keep things propped up, too much spent on monthly subscription fees - or all the above! So, get ready to say goodbye to spending your time babysitting a hodgepodge of programs. And if you’re new to creating members-only content altogether? This is a great way to expand your offerings right from where you’re currently doing business: Squarespace.
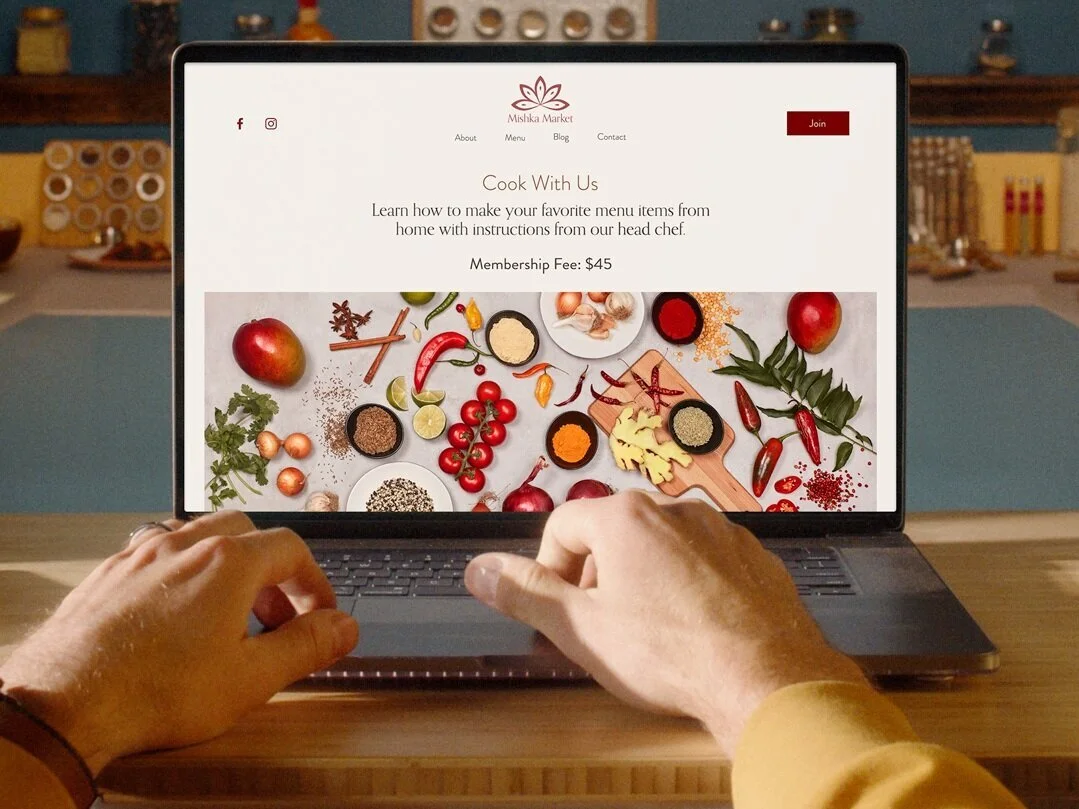
Hello Squarespace Member Areas
Ok, I’ve hyped it enough. You’re here for the dirt on Squarespace Member Areas. Let’s dig into the highlights of this new feature!
How to Create Secure, Gated Content on Squarespace
Old days: Create a password-protected page. Give everyone the world over access to the page with the same password. Cross your fingers and hope all goes well. Security rating: 0/10
Now: Create any page (complete with the same design/style as the rest of your site) and add it to a member area. It will now be gated and only members who 1) create an account and 2) sign up for a membership can see the content. No passwords to manage or code to fiddle with. Security rating: 10/10.
There is no limit to the number of pages you can add to a member area or to how those pages are designed. This is probably the biggest selling point to me because Squarespace pages are just so nice and the design possibilities on some other membership platforms are just so… not nice. Your gated content can also be things like downloadables, videos, a “VIP” blog, or really anything else that you’d normally create a web page for - just that now you can restrict access to it!
Share Your Expertise
Whether you’re offering classes, guides, workshops, or a whole host of other possible ideas, Squarespace Member Areas is a great place to share your expertise with the world. This is your chance to show the world that you are a thought-leader in your industry and all the stats out there about online learning show us that people are eager and willing to invest in learning from pros like you!
Get Paid for Your Content… or Not
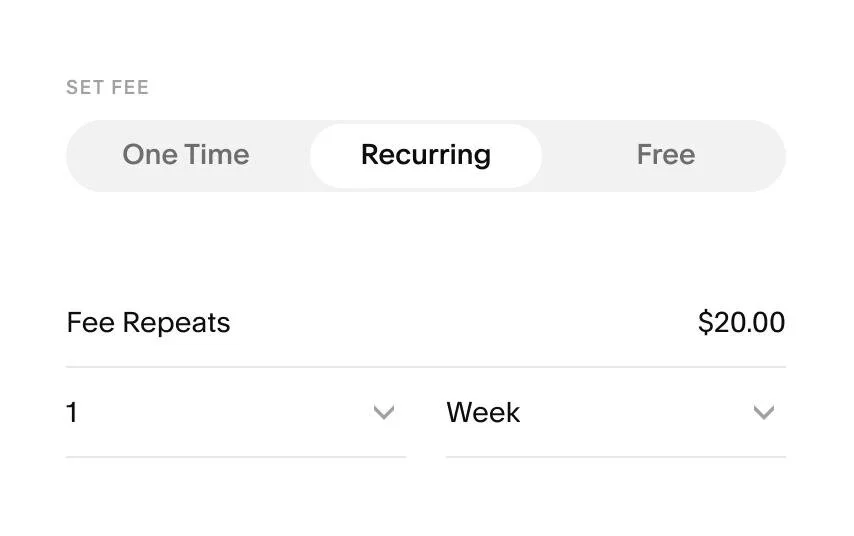
p.s. Since writing this post, the “One-Time” option is now called “Set Amount” and it allows you to charge members to pay your membership fee either all at once or in installments! Check out more about this here.
The beauty of Member Areas is that you can control exactly how you’d like to get paid for the content you’re sharing - even if the cost of admission is just an email sign up! You can offer membership plans with one-time or recurring fees or no fees at all.
You also have the option to customize payment intervals so they fit perfectly for your business. You could set up a one-time payment for lifetime access to your program or an ongoing monthly membership instead. If you’ve been using Squarespace digital products, switching those things up to Members Area content may also make a lot of sense. Think of this as just another eCommerce tool!
What It’s Not
As I said, all platforms have their pros and cons and since this is a brand new launch from Squarespace, it may not have all the bells and whistles of some other platforms that cater to more specific audiences. Keep in mind that this is a way to create gated members-only content, which can contain any info that you’d like including things like workshops or classes. But Member Areas is not an online learning platform so if you’re looking for things like course completion tracking, tests, or certificates - this isn’t it. For those things, you’d probably want to check out something like Podia, Thinkific, or Teachable instead.
Steps to Get Started
Select a Plan
Just like Campaigns or Scheduling, adding Member Areas to your existing Squarespace site requires an add-on to your subscription. Some people will say that they think it should all just be included in your regular monthly/annual Squarespace subscription but I disagree. I like that you can choose just the tools you need. Don’t need Campaigns or Scheduling? Don’t pay for them! If everything was included, the monthly cost for everyone would go up. So, with that said, I still think that the monthly costs for Squarespace Member Areas are totally worth it. Here’s what the current plans look like:
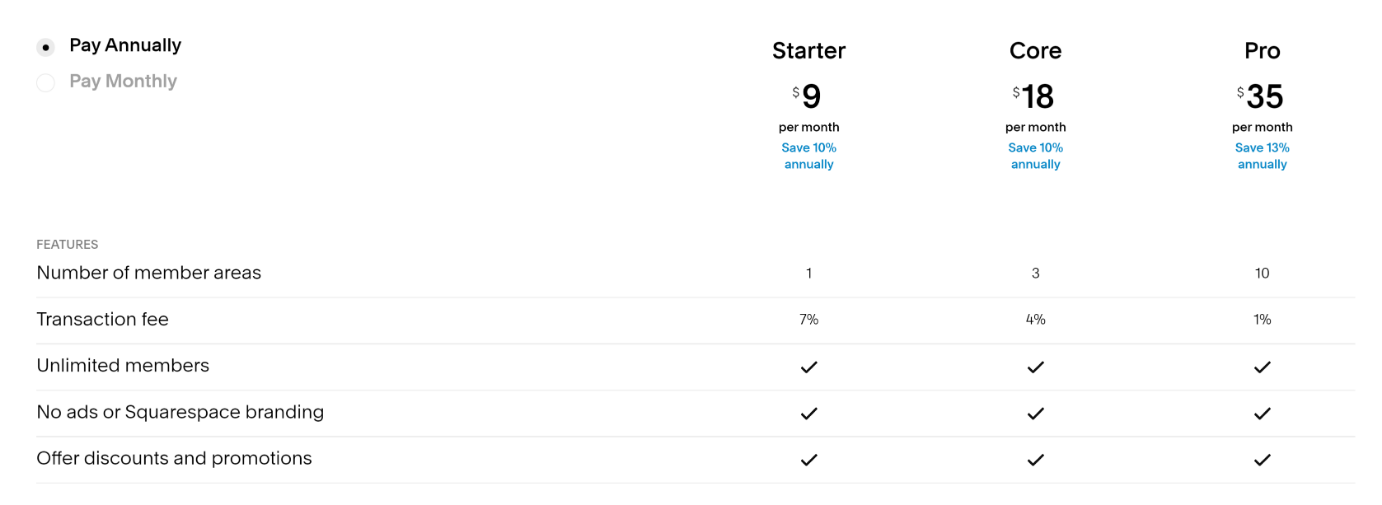
The thing to pay attention to here is the transaction fee. Depending on what you’re offering, you may be better off just paying for a higher monthly plan to get a lower transaction rate. For example, if you have just 30 members who all paid $12/month, you’d actually pay less on the Core Plan than on Starter. Starter makes sense if you’re mostly offering free content since you would never have to contend with the higher transaction fee and your monthly cost would just cover the added functionality. So, do your math first and don’t just go with the cheapest thing as it may end up costing you in the long run.
Create a Great User Experience
Once you get going, there are lots of opportunities to create a seamless user experience right on your domain. In addition to your actual content, Members Areas also allow you to customize the member area navigation, the checkout, customer email notifications, and even the screen that shows up if people don’t have access! There’s also a new “Member Area” block that you can add to any other non-gated page on your site to direct people to your offering and turn any page into an eCommerce sales page! The key here is to just make it as easy as possible for people to engage with your content and Squarespace Member Areas just made it that much easier!

How to Sync Inventory Between Squarespace & Shopify
Multi-channel selling is where it’s at but keeping track of inventory can be a nightmare! I’m reviewing an inventory-syncing app that will help you keep things up to date on Squarespace, Shopify, Square, and more.
One of the biggest questions I get (aside from just how to connect Shopify to Squarespace) is at least how to manage inventory across all the different sales channels you may work on. Think about it: you probably have your main inventory on your Squarespace website but you also sell on Etsy, in person via your Square POS, on Amazon, or maybe also on a Shopify version of your site that’s geared towards a different audience. Being a multi-channel seller these days is a super smart strategy but the amount of admin time it takes you to keep all these things current, make sure you don’t oversell here so that you can meet demand there… well, my bet is that your time is worth wayyyyy more than $35/month.
Enter the solution: Trunk!
Trunk is a relatively new app to the Squarespace Extensions list but it caught my attention because it’s a simple solution to what could be a very complex problem: how to centralize your inventory between Squarespace and everywhere else you sell. Revolutionary, right?
How It Works
Whether you have just a few SKUs or thousands, getting set up is super fast and easy. Once things are synced you can think of Trunk as the hub for managing all your inventory. It will know when you sell something on Squarespace so that it needs to adjust inventory on Etsy. If you added some inventory on Shopify, adjustments are made across the board. The only secret is that you need to give all the products the same SKU number across all platforms; this will be how Trunk knows to keep them in sync.
Now, here’s the beauty of this: say you have a product that you market to different audiences. The best example I have of this is a product that you sell retail on one site but wholesale on another - same product, same inventory counts but possibly different names, descriptions, or costs. NOT A PROBLEM. So long as the SKUs match, sales on one platform will automatically adjust available inventory on any others you have connected.
You can also sync things down to the variant level so if you need to keep track of red shirts and blue shirts and black shirts, you can do that, too!


You Can Sync Inventory Between:
Shopify
Squarespace
Square
Amazon
eBay
Etsy
Faire
Quickbooks Online
Xero 🆕
If You Decide to Give it a Try
You can try Trunk out free for 14-days, which I’m always a fan of - just to see if you like it before committing. Pricing from there just depends on how many orders you process each month + whether you need basic or more advanced features. This also seems super fair to me since you only have to pay more if you actually sell more. If you’re thinking of expanding your business to take on multiple sales channels, just the time savings alone from having to keep track of and sync inventory on multiple platforms is worth its weight in gold. Keep in mind that if you’re actually looking for a way to just have a shop on Shopify + a site on Squarespace that that’s not necessarily what Trunk is for; for that, you should check out the Shopify Buy Button!

5 Squarespace App Tips & Tricks
If you’re using your Squarespace site to sell… pretty much anything… you should totally be using the Squarespace Commerce App! It’s basically like having a powerful little store right in your pocket wherever you go and it makes it super easy to manage orders, shipments and inventory right from your phone or tablet!
If you’re using your Squarespace site to sell… pretty much anything… you should totally be using the Squarespace App! It’s basically like having a powerful little store right in your pocket wherever you go and it makes it super easy to manage orders, shipments and inventory right from your phone or tablet!
The funny thing about the Squarespace app is that I think it’s one of the most underused resources available to Squarespace store owners and it’s actually a super robust tool that’s free to download as a companion to the desktop experience. Most of the functionality is what you think it might be - it allows you to see orders as they come in and mark them as shipped, etc. but there are some things I bet you had no idea it could do!
Here are 5 tips and tricks to using the Squarespace app that I hope inspire you to think about how you can incorporate it to help make the behind-the-scenes part of running your online business look as good as your website. Before I get into all my favorite functions, here’s an overview of all the things you can do in the Squarespace app:
Add and delete product photos
Add order notes
Add products
Contact a customer
Create and manage discounts
Edit basic product information
Fulfill orders and scan shipping labels
Redeem gift cards
Refund and cancel orders
Sell in person via Squarespace Point of Sale
Track shipments
Update stock levels
View customer details
View order details
Share products to social media (Android version only)

Scanning barcodes like a shipping boss!
Redeem Gift Cards in Person - This is a new capability and definitely one of the coolest! Not only does this mean that you can redeem online gift cards in person (great if you’re a restaurant, cafe, salon, boutique, or any other retailer with a physical location) but that you can even lookup people’s gift cards using their email address if they don’t have their gift card code handy.
Scan Shipping Labels - Because typing all those numbers out can be tedious and an invitation for human error! Basically, the app turns your phone into one of those fancy handheld delivery guy device things. Just choose the order you’re fulfilling, scan the barcode and the info is sent to the customer. This works especially well if you’re not using one of the available Squarespace shipping extensions - most of which will automatically sync tracking info back to Squarespace for you anyways.
Add Order Notes - TBH is this something most people don’t know they can do in Squarespace anyways, let alone also on the app. The ability to add internal notes to orders can be super handy. Because notes automatically save not just the date and time they were added but also which site contributor added them, I think order notes are a great way for dispersed teams to make sure everyone’s on the same page about an order. Leave notes about client convos, delivery instructions, or reminders to help you make sure every customer has a great experience with you. For more on how you can manage customers in Squarespace, check out this post: How to Use Squarespace as Your CRM.
Organize Customers Using Tags - Another feature to help you manage your customers better is the ability to tag them! This is another CRM-like feature that could definitely be used to help you target customers in a really personalized way. You could give your best customers a VIP tag or indicate customer preferences using tags that go beyond just what they purchased. For example, you could tag people based on which member of your team they work with, or by what month their birthday is, or even by their likelihood of purchasing again. You can really get creative with tags!
Create Discounts Codes on The Fly - iOS users can now also use the app to create, edit, and share discounts! Just tap the tag icon in the Commerce menu to get started. This ability really comes in handy so that you can create or manage your shop’s active discounts without having to log in to your full desktop website. This might be helpful if you’re on a call or chat with a customer and need to make something really quick just for them or just so you can update active codes while you’re away from your desk.
Ready to give it a try?
The app is available for download for both iOS and Android and I think it’s essential for anyone who is using their Squarespace site to sell goods or services as a way to streamline order fulfillment or just to make sure you’re offering the best user experience to your customers and clients.

A Minimalist's Guide to Squarespace Shipping Extensions
Looking to up your shipping game… or just stop wasting afternoons in line at the post office? Try a Squarespace shipping extension to help you process orders, print labels, manage returns, track shipments, and more!
For small- to medium-sized businesses, managing shipping is typically one of the biggest headaches and often eats up tons of resources - time, money, and sanity! Luckily, there are a handful of extensions that can help take a load off. In true minimalist fashion, you know I’m not a fan of adding software to the mix unnecessarily so here’s my take on each extension so that you can strategically add just what you need. There are solutions for high-volume or low-volume shippers and even things to help you upsell, manage returns or just offer more advanced order tracking than Squarespace does out-of-the-box.
AfterShip Tracking
You can totally send shipment notification emails directly from within the orders management panel in Squarespace but sending just one lonely tracking email could mean that you’re missing out on other opportunities to connect and engage with your customers… after things ship ;) Guess the name makes sense, right?


What it does:
Allows you to track all your shipments on one dashboard and also send customers to a branded tracking page so that they can see their order’s status. The coolest feature is that you can feature other items there to upsell!
Who should try it:
Anyone looking to reduce the number of customer service-type emails and is looking to bring customers back to their site to make another purchase.
Pricing:
Free plan available that includes up to 50 trackings per month, but you don’t get notifications or a custom domain. The next plan up is $9/month and you get all the features + 100 trackings per month. Beyond this plan, you just pay per how many trackings/month you need.
Easyship
I used to think that Easyship was really only geared for international shipping or very large, enterprise-level stores but the recent Squarespace partnership shows that they’re just as committed to the smaller shippers out there.


What it does:
With Easyship, you can connect your store, sync your orders, generate labels, and more - even on the free plan. Syncing is easy and you can set up rules to help you automate shipment processing.
Who should try it:
Business owners who appreciate a clean interface and who are looking for a good all-in-one shipping platform to automate their process.
Pricing:
Free plan for up to 100 shipments per month but you don’t get a branded tracking experience to offer customers. For $29/month you get more features and up to 500 shipments per month. The Plus plan comes with a 30-day free trial so you can try it out before committing!
Aftership Returns
Aftership Returns is by the same company as Aftership Tracking, above, but they are separate subscriptions. Aftership Returns does just what the name implies: lets you set up an automated returns management portal for customers to initiate self-service returns.


What it does:
Allows customers to request return requests, generate return shipping labels, and then keeps them in the loop on how things are going. You can also set up automations and rules that comply with your return policy.
Who should try it:
Anyone who finds themselves processing a lot of returns! ;) Even though there is a free plan (see below) I wouldn’t add this unless you’re actually having a lot of returns. The bigger question I would have is WHY so many people want to give your products back?! 😬
Pricing:
Free for 3 returns per month (although at this rate you could probably manage them yourself). Higher level plans start at $9/month and have additional features that may be attractive such as also being able to offer exchanges.
ShipBob
If you like Amazon Prime 2-day shipping, you’re going to love ShipBob. More than just a shipping platform, however, ShipBob is full-on order fulfillment. They have inventory locations across the US so that you can offer fast, 2-day shipping just like Amazon from pretty much any location.


What it does:
Allows you to warehouse your inventory at their location(s) to automatically fulfill online orders and make sure they show up at your customer’s door in 2 days. You can use your own packaging to ensure that even the unboxing experience is on-brand.
Who should try it:
Store owners with larger inventories that can absorb the setup costs of using a fulfillment center or anyone who has a static inventory that hates processing shipments themselves!
Pricing:
The cost of ShipBob is going to vary depending on how much storage space you use each month in their warehouses, how many orders you have each month to pick and pack, and how often you need to ship new inventory to them to process. In addition to the fulfillment cost, you’ll pay for the shipping costs per shipment but they offer competitive rates and (bonus!) free plain boxes and tape if you decide to not use branded.
Shippo
I mean, I’m just a fan of this company’s name. Because, honestly, I’m jealous that I didn’t think of it. It’s a shipping hippo! You can import your orders and compare discounted rates for various USPS options.


What it does:
Shippo allows you to offer on-demand tracking, customer notifications, and seamless handling of returns in addition to the standard order syncing / shipment label printing capabilities. Shippo will also automatically sync orders from your Squarespace account and then send back tracking information.
Who should try it:
Anyone who may run multiple stores but just wants to process orders from one platform or who wants to take advantage of their “Pay As You Go” pricing without a big commitment. This is perfect if you have varying shipment quantities from month to month.
Pricing:
I’m a big fan of the “Pay As You Go” option which allows you to print up to 5,000 labels per month for just $0.05 per label. (And actually, at the time of this post, they’ve waived those fees entirely through July 7, 2020, due to Coronavirus which is pretty cool of them!)
ShipStation
I always think of ShipStation as kind of the OG of shipping platforms. It has tons of features and a very robust platform although it may be overkill for some. You can just quickly and easily manage your Squarespace shipments or also take advantage of some of their other fulfillment and inventory tracking features.
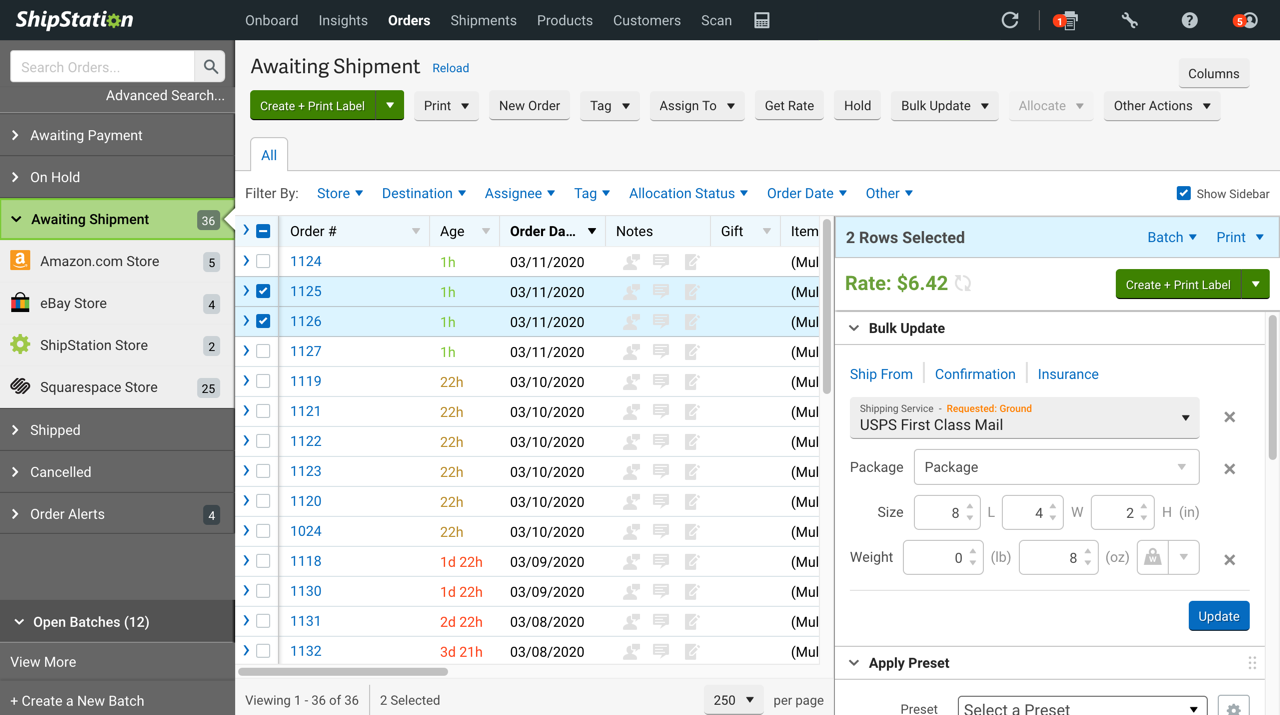


What it does:
Allows you to import Squarespace orders and then shop rates from a wide lineup of carriers. You can create customizable automation rules, crate branded labels, and packing slips
Who should try it:
Higher volume shippers who want or need all.the.features. The interface is a little busier than some of the others but that’s because they offer a lot!
Pricing:
There is no free plan. The cheapest option starts at $9/month and allows you to process up to 50 shipments. Like most of the others, prices and features go up along with the more advanced plans.
Bottom Line
Most of these extensions offer free plans or trial periods so that you can try them out before signing up for a long-term relationship. I would definitely recommend adding a shipping extension to your software lineup if you’re finding yourself spending too much time each week waiting in line at the post office, wasting time on carrier websites trying to get quotes, or need some help processing orders & returns in general. If you’ve not yet outsourced some of the “grunt” work for your business, I say that shipping is the best area to leave to the pros. Managing printing labels and sending notifications and monitoring tracking numbers can be a headache that you just don’t need to worry about!
Want more on shipping? Check out this post: eCommerce Strategy 101: Should You Offer Free Shipping?

Kristine Neil
Fractional Web Partner
I'm Kristine Neil - a communications strategist who has spent 20+ years designing websites, first running a full-scale design and marketing agency, and now leading my own studio. I've been the creative director managing the work, the coder quietly fixing what others couldn't, and the strategist in the room asking why before how. Somewhere between the MBA and the other degrees, I decided web design was just one tool in a much bigger toolbox - the real work is figuring out what you're trying to say, who needs to hear it, and what's getting in the way. A website is just where all of that comes to life.
I build on Squarespace, and after years deep in the platform I know how far it can go and when to push past its limits. These days, I'm especially drawn to working as a fractional partner - getting to know an organization over time and helping with whatever moves them forward, whether that's a full redesign, an ongoing hand with content and strategy, or just being the person who knows their site best. I write here about eCommerce, web strategy, and making the complex feel a little more human.